Showing posts with label fake fur. Show all posts

Tuesday, October 15, 2013

Faux fur for warm hats and Halloween costumes

If you were thinking of making a faux fur hat from my latest hat pattern, but didn't know where to find faux fur, I put some pieces of fur in my shop to make it easy for you. These are remnants from other projects, but the pieces are ample for hat making, with enough left over for a tail. Stay warm and cozy this Halloween!!! 

This is a delectably soft piece of gray and white faux fur, a large remnant from an animal costume I made. I have also made several hats from the fur, and I love it.
This is a delectably soft piece of black, blue and white faux fur, a large remnant from a coat I made for my boyfriend.  I've also made several hats from this fabric.  It's really nice stuff. The pile is two length: 1 and 1 3/4. This is very good quality fur, better than most, and has proven to stand up to repeated (cold water) washings.
This is a delectably soft piece of black faux fur, a large remnant from a coat I made.  The pile is medium long at 1 1/2.  The last  photo shows me wearing a hat with the same fur in purple. The fur for this listing is black. The fur goes by the name "punky muppet."


Friday, October 11, 2013

Pattern Faux Fur Hat with Ears Horns for Babies Children Adults

This PDF tutorial and pattern combo shows how to sew a faux fur hat with ears and horns and bobbles that tie under the chin. The pattern has “actual size” pieces for you to print on your home printer in 5 different sizes: baby, child, adult small, adult medium, adult large. Just print and cut. This pattern is suitable for intermediate sewers. Basic knowledge of sewing is required, but if you've never worked with faux fur before, this is the perfect place to start.
Wild Thing Faux Fur Hat
Learn to sew a Wild Thing hat to help your little (or big) monster stay warm this Winter. There’s nothing like a faux fur hat with big ears and horns to really bring out your inner beast. The ear flaps end with fuzzy bobbles that easily tie under the chin. Little and big hands alike find the stuffed bobbles tactile to squeeze and fun to play with. The ties keep the hat from flying off while biking or walking in the wind.
Wild Thing Hat Pattern
If you know me, you know how much I love fake fur.  It's so soft and since I'm always cold, it keeps me warm.  Over the last few years, I've made over a dozen faux fur coats, and with the scraps, I make hats.  All my friends have faux fur hats.  I have made over two dozen animal hats, using lots of different faux furs, and this Wild Thing Hat design and tutorial is the result of a lot of experiments in technique and shaping.
Fake Fur Hat with Ears and Horns
This Wild Thing hat pattern is easy to modify into any number of animal costumes including cat, dog, Satyr, bear, wolf, and many others, like this one with three horns and no ears.
My boyfriend engineered the pattern pieces so that the Wild Thing Hat pattern pieces print ACTUAL SIZE off your home printer in five sizes from babies to adults.  My 14-page tutorial full of illustrations and photos will lead you step by step through the entire process of making your very own faux fur hats. 
Wild Thing Hat Pattern
My friends and I love wearing faux fur hats when we go camping and at costume parties. I’ve noticed that people smile at me a lot more when I wear a Wild Thing hat.
Informal studies suggest that if you wear a Wild Thing hat while you are running errands, you will get better service. If you use quality fabrics, these hats are very comfortable, super soft, and of course, very warm. I even sleep in mine on cold winter nights.

Here you can see a three-year old wearing the child sized hat (With the pattern, you can make one size smaller for babies, or up to three sizes larger for adults).  Isn't she cute?  She really couldn't stop playing with the little bobbles that were tied under her chin.  So soft and squishy!
The Wild Thing Hat pattern gives pattern pieces and complete instructions for sewing the hat, including a discussion of the various types of fabrics you can use for each of the parts.

You will need the following materials to make a hat.

Faux fur: (½ yard by 1 yard): Medium or high pile.
Lining: (½ yard by 1 yard): Best choice is silk charmeuse, but polyester satin, cotton sateen or even flannel will work.
Strap/Ears: (Scraps of fabric or purchase ¼ yard): polyester cuddle fabric, stretch velvet, jersey, polar fleece, or Minky.
Horns (Scraps of fabric or purchase 1/8 yard): including stretch velvet, gold lame´, linen, and cotton. Pick something relatively thin.
Sewing Thread: polyester or poly/cotton blend.

Thanks for looking!

Monday, February 11, 2013

Trefoil and Cinqufoil Knots in CRAW and Arm Warmers

Here's the cinquefoil knot, made with cubic right angle weave.  It looks like a five-pointed star, and cinque is the French word for five.

Here's the trefoil knot, made with cubic right angle weave. 
I don't have a pattern for these knots precisely, but they are really the same as what I did to make the Borromean Link. If you buy that pattern, you should be able to figure out how I did both of these knots. If you still want a hint, just send me an email with the date you bought the pattern, and I'll tell you which steps in the Borromean Link pattern to modify to get these knots.

I have this small mountain of wool and cashmere sweaters that I have collected or have been gifted to me. I machine washed and dried them to make them felt, and now I cut them up and resew them into stuff. Here are some arm warmers.  The black is super soft cashmere, and the rest is fine merino wool, plus I edged the bottom in a little faux fur around the hand.  The fit is really nice as they bell just slightly over the hand.  If you want to wear them shorter, you can cuff the top and they still look nice.
I also made these little fingerless gloves. I think I resewed the hand opening about 4 times to get the shaping right, each time cutting off more and more to make them more formed fit and comfy. If you have cold hands, like orange and soft things, these might be just the thing for you. Again, the black is cashmere, and the rest is fine merino wool.  So soft and cozy.
 All of these pieces are available in my Etsy shop.  Click the photos to go to the listings.  Thanks for looking.

Wednesday, December 21, 2011

Furry Elf Slippers

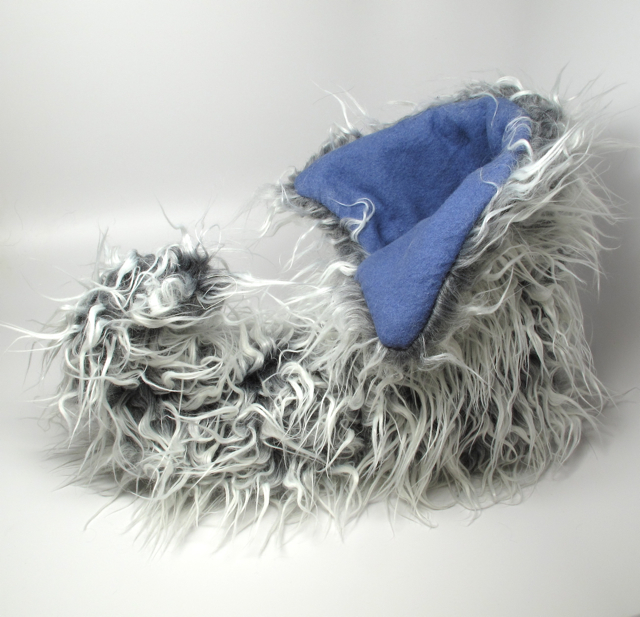
In early November, I had the wonderful opportunity to spend some time with my good friend Zelda, who is, among many things, a costume wizard extroidenaire.  I presented her with the idea of designing a pair of slippers, something whimsical with a turned up toe.  I was thinking of something you might see on an elf or gnome, large and comical, much bigger than regular shoes to exaggerate the size of your foot because big feet are funny, and adding extra padding makes the slippers warm.  Zelda helped me imagine how the tops should look, and I drew a few pictures.  We decided that faux fur was the best choice, for so many reasons, not the least of which is the yards and yards of it stashed high up in the closet, leftovers from previous coat projects. 
I have never sewed slippers before, but I was confident that if I wasn't afraid to cut up and waste a bunch of fabric, paper and tape, I could eventually figure out a pattern.  That's what it takes to make a pattern.  You also need a needle and thread, a seam ripper, scissors, pencils, and patience.   I also used my sewing machine. 
To start, I traced and measured my foot, and drew a paper pattern that I used to cut the ugliest mustard yellow quilting cotton.  Ew.  I sewed it together, ripped it apart, pinned it, resewed it, inked in the lines, ripped it all apart, and made a new pattern.  I did that whole thing again in a different but equally ugly piece of fabric.  Two tries done, I realized that I needed to work on the lining FIRST, and THEN use that to design the fur pattern with the curling toe.  I was doing it backwards.  So I made another draft, but this time of the lining, something that conformed to the shape of my foot.  The lining took me two rounds of drafts, and then one more draft for the fur.  I made many adjustments at each draft. 
And then FINALLY, I was ready to cut some fur.  I knew my pattern was still wonky and unlikely to meet my vision perfectly, but it was good enough to make slippers, and my feet were cold. So I made a blue pair which are super comfy, but I didn't include enough ease in sole, which caused the toe to only curl up halfway.   My sister wanted them, so I traded for her home made chocolate covered caramel with two kinds of chile and salt. She also gave me a really ugly cookie, that I asked for in particular because I felt sorry for it in the beautiful bouquet of flower cookies.  It was yummy. 
Anyways, I altered the pattern again, and made myself a pair, finding only a few minor improvements, like trading in the icky polyester batting I was using for nice natural cotton batting.  Then I made the pair in the first two photos, and they are just the way I wanted them to be, so I put these slippers in my Etsy shop.  I think maybe I'd like to write up and sell this pattern.  I'm pretty happy with it.  They're super comfy.

Sunday, December 11, 2011

Furry Hats with Ears and Horns

Making fuzzy hats with ears and horns makes me happy because people always seem to smile when they're wearing them.  People also seem to smile at me when I'm wearing mine.  We call ourselves Horny Hatters.

I'm offering two new hats for sale so you can be a Horny Hatter too.  I decided to start numbering them so I can keep track of how many I make.

Pink and Purple Horny Hat #13
I got a bundle of faux fur remnants from the fabric store, and this super thick fur was in the set.  I matched it with purple horns in cotton and a pretty purpley pink silk lining from my overflowing stash of silks. 
You know I love pure silk, right?  Well this one is particularly stunning, the way it shimmers in the light.

Blue Horny Hat #14
After making a pink one, I wanted to make one in boy colors.  Here you can see the blue one with the matching coat I made my sweetie. 
This blue one has especially big ears. I used a button clasp instead of pom-pom ties, just for a change.

Monday, November 1, 2010

Two Tone Faux Fur Playa Coat

Here's my latest faux fur coat, in deep purple and black.  I started with McCalls pattern 5092 (medium), but I altered it enough that I'm not sure you'd consider it the same pattern anymore.  
The purple is much deeper and richer in person; my camera just can't seem to photograph this color right!  It's got two pockets, a wide hood, and two pairs of hooks to clasp the front.  It's fully lined in black and oh-so comfy and warm.  The cut is a full swing coat with dolman sleeves.  Because I designed the hood from scratch, I had to cut the hood three times before I was happy with it.  The first hood was totally the wrong shape and the nap was going straight down which made it look funny in the front.  The second one, I fixed the shape, and I cut it with the nap pointing straight back, which created this funny duck-butt looking seam in the back.  The third time, I finally got the right shape and the nap going down and back diagonally. 
I also sewed the hem twice to get it to drape properly, but in the end, it turned out just as I envisioned it.  I'm shipping it out to it's new owner today.

Sunday, August 8, 2010

Fuzzy Hoodie Suit with Ears Horns and Tail

I just finished my first full body suit.  It's made out of faux fur with a polyester cuddle fabric lining. With all of its furry goodness, it reminds me of a cross between an abominable snowman costume and something from "Where the Wild Things Are." It has a hoodie-type hood with horns and ears.   This was a commissioned piece, completely made to order.

I started with a muslin mock up made from Simplicity Pattern 2853, size small, plus I added a two piece hood.   I also lengthened the sleeves and pants to be too long for the fitting.  My client and I arranged for a fitting of the mock up.  With him dressed in the muslin suit, inside out, I added a bunch of safety pins to fit the suit to his build.  I pinned the cuffs and pant hems, I took in the width of legs significantly, and also in the hips, waist and a little in the chest.  I drew on the placement of the side seam pockets and the inside patch pockets exactly where he wanted them.  I also marked where the bottom of the opening should start.  Then he got out of the suit, and I penciled where the seam should be as identified by the pins, removed the pins, ripped the muslin apart into its component pieces, transferred the markings to the paper pattern, added seam allowances back in, and my pattern was ready to go.

With the pattern in hand, I cut out the lining and fake fur, trimmed all of the fur out of the seam allowances, and serged all of the pieces including the lining.  I sewed the fur pieces together and all of the lining pieces together.  Then I added ears, horns, and a tail.
Normally, with a fur coat, I machine sew the lining to the fur, right sides together, up one side of the front lapel, across the shoulders, and down the other side.  This leaves just the bottom hems and cuffs to finish by hand.  However, because the particularities of this suit, I decided to finish everything entirely by hand.  It's more work, but I have much more control when hand sewing, so I could finish all of the corners neatly.  Adding the lining by hand required that I cross stitch all of the hems of the fur around both cuffs, pant hems, and the whole front opening (including hood).  You can see the cross stitching in many of the photos below.  I also added five extra-large hook and eye clasps along the front opening. It took me a few tries to figure out a good way to start adding the hooks, but if you look at the photo below, you can see the first two stitches that are adequate to anchor the hook efficiently.
Here's what a hook looks like after it's sewn, before it's covered with the lining.
I was worried that the fabric would rip at the bottom of the front opening, so I added a patch of flannel (it matches the pockets) with multiple rows of stitching across its width, an a tons of knots.

I also cross stitched down the seam allowance where the hood meets the neckline, under the arm pits, and at the crotch.  I did this to reduce bulk.  This photo shows an armpit.

Then, I added the lining.  In addition to stitching all around the openings, I also tacked the lining to the fur in the bottom third of the arm hole seam, on the crotch seams, and where the hood meets the neckline.  I added my tag and it's done!  Here you can see where the lining meets the fur at the front opening.

Today, the suit's new owner came over to try it on and he let me take photos.  Yeah.  We were both very happy with the fit, and he was amazed that the seams blended right in.  He couldn't even feel them.  I really enjoyed this project and we are both super happy with the results.  I put a little piece of my heart and my best workmanship skills into making this suit, inspired by the vision and enthusiasm of my client.  I joked that it's industrial strength, a family heirloom, so he can stay warm on the Playa at Burning Man, in his new fuzzy suit for many, many years to come.

Thursday, June 24, 2010

Pink Fur Coat


This coat has awesomeness written all over it.  What's not to love about pink faux fur and pure silk lining?  This was made with McCalls pattern 5092 (medium) but it is a different pattern in the same envelope as compared with the other coats I've shown on my blog.  Like with the other pattern, my muslin sample proved to be way, way too big for me.  In the Playa spirit, I wanted to make it a one-size-fits-all. So I made it smaller and now it's still big on me, but wearable by most.   I made some adjustments to the sleeves:  First I narrowed them so that you can wear a back pack.  I also made them longer, long enough to cuff.    Since the top of the sleeve was way down my shoulder, I also narrowed the entire coat by folding the pattern pieces all the way from the shoulder to the hem.  This moved each sleeve cap one inch closer to the neck (another reason I had to lengthen the sleeve), and removed 4 inches around the waist and hem.  It still has a drop shoulder.  I also lengthened the pattern from a jacket to a coat.

The only lining fabrics I had in my stash that coordinated with the fur were not large enough for the whole coat.  So I made a patchwork lining with patch pockets.  I bought the two swirly, dotty silks years ago in the fabric district of Philadelphia, and they are fabulously thick.  For this coat, I united them with the plain fuchsia silk, and to my delight, the fucshias match perfectly. 

What I learned: I learned that doing patchwork for a lining takes a lot more work than making a patchwork for a quilt because, in the lining, you have to finish each seam twice, front and back.  In a quilt, you only sew each seam once before sandwiching the layers together and quilting.

Three playa coats done, and I've been learning a lot from making these coats.  In retrospect, I learned a few more things from the Blue Coat that I incorporated in this pink one.  I found that I prefer cotton flannel for the side seam pockets.  It's heavier than silk so it will keep your hands warmer, and it's more durable.

I learned that you need to completely sew the lining together, including all pocket details, before attaching the lining to the coat.  I managed to create the crookedest pocket in the world on the blue coat, which I ripped and resewed by hand.

I learned that making buttonholes on my sewing machine isn't as scary as I think it is, at least not on the silk pocket flaps it wasn't.  In the front of the coat, things are different.  Having to cut a hole right in the center front of my work can be a bit debilitating.  I tend to procrastinate that step and switch to other projects.

The Blue Coat is the only one with button holes through the fur.  I learned that making buttonholes on fake fur is still tricky.  I had to cover both sides of the furry lapel with tracing paper in order to get the lapel through the sewing machine.  Without the paper, the fur gets caught in the bobbin case and everywhere.  Bad bad!   Also, if my buttons are too big, my automatic buttonholer doesn't make big button holes and I'm on my own.   I have to make the button holes manually.  In the end, to make large button holes in fur,  I used my machine to straight stitched around the button holes, I cut them open with a seam ripper, and then finished them by hand with a knotted button hole stitch in thick pearl cotton.  Functional, looks nice.  However, my fear of buttonholes in fur overtook me for the pink coat here.  So I used a really thick new hair tie as a loop instead.  For me, sewing a loop on the front is much easier that cutting a hole.

I learned from my brother that this faux fur is actually a faux feather.  The original is used in tying flies like the Grissly King wet fly.

This pink coat is SOLD.  Thanks Jim.

Sunday, June 6, 2010

Another Playa Coat with McCalls 5092 Pattern

I finished my second playa coat, this time with really nice, thick fake fur. This is the identical pattern as by blue/green one I showed earlier, McCalls, 5092, but with a lot of reduction in the sleeve and skirt.  It's still huge.   I learned that sewing with really thick fur is much more challenging that sewing with thinner stuff.  You NEED to trim the fur off of all of the seam allowances first, or you wont be able to get nice seams.  There's no way I'd be able to fit the 4 layers under the presser foot of my sewing machine, required to attach the collar, if I didn't trim the seam allowances first.  All that trimming takes several hours of snipping.  I just used scissors for this, but there might be an easier way.  I don't know.
I love the way this coat came out.  Two outside pockets, two inside pockets, and it's so warm and fluffy, my sweetie will never be cold on the Playa.  I took it to a weekend outting for Memorial Day and no less than a half a dozen people wore it that weekend.  It's got a lot of love on it now.  I also added a string of LEDs on the front with some hand stitching.  They were super cheap, so I hope they don't set it on fire at some point when the wiring breaks.

Sunday, January 31, 2010

Harlequin Playa Coat Using McCalls 5092 Pattern

I finally finished my blue and green playa coat.  This is the first fake fur coat that I sewed entirely from scratch.   This coat is based upon McCalls 5092 in the medium size (size 14-16), but after making a muslin mock up, I found it was HUGE, like a cape. I  took out somewhere between a quarter and a third of the width of the fabric in the skirt.  I also narrowed the underside of the dolman sleeves considerably because dolman sleeves and backpacks are not a good combination.  Plus, I haven't liked dolman sleeves since 1989.  I like the way one can flip up the collar for when it gets really cold.

The fabric is a wonderfully soft, and somewhat stretchy, poodle-like fur that is probably nylon or some other synthetic.  The lime green lining is pure silk, which also lines the pockets.  To make sure the seams will last, I used French seams on the lining and I binded all of the seams of the fur with twill tape.  Because I wanted really big green buttons, I made them myself out of some scrap wood in the garage and some leftover green house paint.  Each button loop also has a second loop from which I can hang glow stick bracelets.  I can't wait to wear this on the Playa!
Related Posts Plugin for WordPress, Blogger...