Showing posts with label pockets. Show all posts

Sunday, February 1, 2015

Upcycled Sweater Hoodies No. 7 8 and 9

Here are some photos of my latest hoodie cardigans made from felted wool and cashmere sweaters.  I wash the sweaters in hot water and dry them in the dryer to make them felt.  Then I cut them up and sew the pieces together on my serger sewing machine with some stitching done on my regular sewing machine because a serger doesn't do everything.  First is Sweater Number 7.  My great accomplishment on this piece was the front placket with buttons.  The placket is two layers, so it lies flat and is quite functional.  I'm quite pleased with this design, and I'm now using this placket on all of my cardigans. Of course, I used this as an excuse to splurge on vintage buttons.  I love buttons, and I was tickled to have a reason to buy more of them.  Sweater Number 7 is in marsala burgundy, hot pink, gray and brown, size medium with woven leather buttons.  It has two pockets and is super snuggly.

This is a photo of some of the pieces before I assembled them, mostly wool with a bit of cashmere.
This is some detail on a matching cotton skirt that you can see peeking out of the bottom.
I made Sweater Number 7 as a commission for a friend, not realizing that she's actually much broader than I am.  Although it fits me perfectly, sadly, it's too small for her.  Before we found that it doesn't fit her, she asked me to cut off the point of the hood.  Here you can see the difference that a pointed hood makes versus a rounded hood.  I thought I was in completely in love with pointed hoods until I cut off the point.  Now, I think I actually might prefer the rounded hood.  One thing I wasn't expecting when I cut off the point is how much it changes the shape of the collar around the neckline.  The very first sweater hoodie I made, I kept for myself, and it has a pointed hood.  I find the point kind of gets in the way.  I think from now on, I'll make most of my hoodies with rounded hoods.
Sweater Number 8 is in aqua blues, size small.  This one is quite elvish with a pointed hood and a long pointed pocket. It's about two-thirds wool and one third cashmere with green vintage plastic buttons.
Sweater Number 9 is in purple, blue, gray and olive, size medium.  It has a stripe up the back in purples and a pocket on the front. It's mostly wool with a bit of cashmere and vintage purple plastic buttons. 
These pieces are all for sale at Isabella Boutique in downtown Sunnyvale, CA.  Many of the techniques I used I learned from the ever-talented Katwise.  Thanks for looking.

Sunday, April 17, 2011

Making a Sweater Coat Part 9 What I have learned about how to sew lined coats


RECONSIDER LINING AND POCKETS
Now all of my patches are sewn into panels, but before I can assemble the coat, I need to consider the lining and pockets.  I buy deep black 90% cotton 10% spandex knit.  It’s not slippery like I’d like a lining to be, but it’s nice and stretchy, but still natural feeling.  I’ve learned that I prefer mostly natural fibers, but with cotton, in particular, a hint of synthetic fibers help the fabric keep its shape.  Since the sweater fabric is stretchy, I need a stretchy lining to match.  If I had all the money I wanted, I’d use a silk jersey knit for the lining; that would be so luxurious, but an extravagant expense, to be sure.

To pattern the lining, I would normally use my same pattern pieces minus the hem, but I want to try on the coat before I commit to my sleeve hem length.  I check my patchwork against my large pattern pieces, and the patchwork pieces are all about an inch longer than the paper pieces.  Hmm.  I think my fabric stretched?  Or was I systematically off on my piecing?  Considering the error is only in the length, I think the fabric probably stretched.

The lining pieces on a coat are similar to the fashion fabric pieces with a few notable differences. Here are a few things I have learned about lining coats:

1. None of the collar pieces have lining.  In other words, they have fashion fabric (felted sweaters) on both sides.  In the case of the hood, I essentially made a huge, head shaped collar, and like most collars, the top and bottom are made from fashion fabric. 

2.  Linings are cut shorter at the hemline than fashion fabric for the corresponding pattern piece.  This is to create a hem that has the fashion fabric on both sides near the hem.  In my case, the main coat is already an inch longer than my pattern, so, I decide NOT to shorten my pattern before I cut the lining. It’s better to error on too long of a lining than too short of one.

3. front = front facing + front lining – overlapping seam allowances.
In other words, if you sew the front facing to the front lining, you get a piece that’s the same size as the front piece.

Since I ended remaking most of the pattern pieces, I’ll be using those instead of the lining pattern pieces that came with my pattern.  I will however, use the front lining piece from the pattern since I didn’t alter my front piece.

4. back = back neck facing + back lining – overlapping seam allowances.
The only piece I have to alter is the top back piece to allow for the back neck facing.  To do this, I trace the back neck facing at the top of the back piece.  I move the traced line one and a quarter inches up since that’s twice my seam allowance.  Then, I cut slits in the paper and fold it into place.  The lining pattern is ready to go after I add a little tape.

CUT LINING
I need a big horizontal surface to cut my large lining pieces.  It’s better, easier and faster if you cut them all at once.  So I vacuum and mop the kitchen floor.  I lay my fabric out folded in half lengthwise so I can cut my pieces two at a time.  I lay out my pattern pieces on the fabric, and pin them in place.  I cut two of everything, plus an extra 2 pocket pieces, since I need two pieces per pocket.  
The pockets will be stretchy. I can’t decide if that’s a bad idea, but I can’t seem to think of anything intrinsically wrong with it, as long as they’re used mostly for hand cozies and not to transport pounds of cr@p.  I mean, it’s not luggage, it’s a coat.

SEW SIDE SEAMS WITH POCKETS
I sew the shoulder seams of the front and back panels together.  I try it on to decide how high on the side seams I should sew the pockets.  I sew the 4 pocket pieces to the side seams. 

I pin the side seams (including around the pocket),
and I can see that there is no way I can sew that sharp corner under the pockets on my serger.
I sew the side seams as well as I can, smoothing out the offending corners as my serger allows.  Remarkably, the loopers catch the edge of the fabric at that corner nicely.  I resew one of the points on my regular sewing machine, the first time overdoing it.  I can tell because I try on the coat and there’s a nice pucker right where the pocket meets the side seam.  So I rip it out and do it again.  Fixed.  The second one is easy.  See pin head for placement.
The side seams come out alright, but again, there are bulky spots where the loopers didn’t catch threads, and I have to hand whipstitch to fill in the bald spots.  I also broke a needle.
 
At this point, I realize that I should have used one of the thicker, sturdier fabrics on the shoulders.  I chose to use cashmere because it’s soft.  Unfortunately, it’s also much stretchier than the wool felt.  I think the coat might sag a bit in the sleeves because I used cashmere all across the shoulders. I learned that next time I should use the sturdiest (heaviest) fabric across the shoulders rather than using the softest.  I’m a sucker for soft; so I had to try it.

Monday, April 4, 2011

Making a Sweater Coat Part 5 Designing the Hood and Sleeves


THE HOOD AND SLEEVES
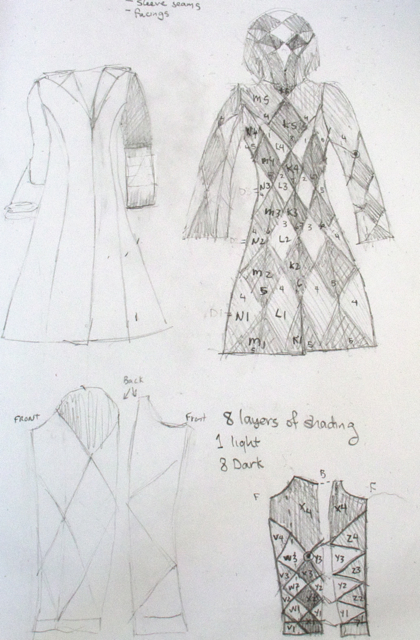
I finally finished the whole coat design, using diamond patches on the sleeves and hood. I added more columns of diamonds.
To design the diamonds, added more lines and points of intersection to my sketches, and moved them around this way and that while trying to imagine how it will all look in 3D.   
I removed the center back seam with a row of diamonds.  So the H pieces will only need to be cut once.  All other pieces come in pairs.  I added grain lines that go back from the forehead and down the back of the head. The grain lines show me (a) how to cut the pieces and (b) how to put the pieces back together. 

HOOD DARTS
I use darts in my furry hats, so it makes sense to use them here.  I “break” some of the points into two or more, allowing me to move the corners for individual patches to accommodate the curvature of the head. They are effectively darts spaces around the crown of the head. I'm guessing how big to make them.  I'll tell you later if it was a good guess or not.
POCKETS
I can do side seam pockets or hide them under a pair of diamonds on the coat front (piece C3).  I need at least one pocket.  Side seam pockets are only good if you line the coat, otherwise, they look awkward flopping around on the inside of the coat.  If I save putting together the front pieces until the end, I can put off making decisions about the pocket for now. 

TAYLOR’S TACKS
I sew through the corner points of my fabric with doubled scrap thread in blue.  It has just enough contrast that I’ll be able to see it, but if I can’t get every last bit out, it won’t show too much.  The reason for the tacks is so that I can match corner points when I pin and sew the patches together.
See Part 6 in which I set up my serger sewing machine, trying out various overlock and chain stitches.
 

Monday, March 28, 2011

Making a Sweater Coat Part 2 Muslin Sample and Alterations


MAKING A COTTON SAMPLE
I'm going to check the pattern by making a sample from inexpensive cotton fabric.  Unbleached cotton muslin is the classic type of fabric people use for this purpose, but since I have drawers full of left over scraps of cotton quilting fabric, I use those instead of the unbleached stuff.  It’s essentially the same material and weave, so it’s a fine and dandy substitute with a lot more color.   I picked some of my medium sized pieces, and with loud prints and overly bright colors and declare that today is they day they will be liberated and make themselves useful.  I didn't pay any attention to the colors of the fabrics I used, so I know already that the color combination of the finished muslin is going to be pretty awful.  I'm okay with that as I'll just have too consider form and fit.   I smooth out the doubled fabric, pin the pattern pieces to it and cut out all of my pieces.  I copy marks onto the cotton with a colored pencil. Below is a photo of the front and front side pieces.
For a few of the final pieces, I have to patch some fabric together to get pieces that are large enough to use, like I did here for the back panel.
When all of my pieces were cut, I skimmed through the pattern to find all of the places where two freshly cut pieces are sewn together, and I start with those.  When sewing the muslin together, you can skip a lot of the details of the pattern including stay stitching, interfacing, pockets, and lining. 

In the first round of pinning, sewing and pressing, I completed 11 seams. These seams are two front to side front, two center back seams on coat and hood, two sleeve uppers to sleeve lowers, back neck facing to front facing left, two sleeve cuffs, and two sleeve facings.  I pin all 11 seams together, then I sew 11 seams, then I press them all.  By pinning as many pieces as possible in the first step, you get somewhere between a third and a half of all of the seams completed in the first round.  It is very satisfying to finish this first round and know you’re close to a third done, not counting hemming, of course.  This is the complete back.  The center slit is kind of cool, but I probably won't use it in the final coat since it will be a lot harder to execute neatly with patchworked sweaters.
 Here are the cuffs pinned to the bottom of the sleeves.
Here are the sleeve facing pinned to the bottom of the sleeves.  On the right is the front facing and back neck facing (in blue).
Here are the cuffs finished.  The left one is sewn but inside out.  The right one is finished, except the facing is not hemmed to the inside of the cuff, but I don't need to do that part on the sample.
In my second round of seams, I don’t get anywhere close to 11, but I pin, sew and press until the I have the main body of the coat in one piece, two sleeves, and a hood.  Then, I sew the sleeves and hood to the main body.  It turns out I didn’t need the front facing and back neck facing to hold the coat together for a fitting.  Some of my other coat patterns require the facing to get the coat to hang properly, but apparently, this one doesn’t. 

Here is what my unaltered sample looks like. 

Oh yes, the colors are nice, no? Hehe.

FITTING
The coat is a little too big and the armholes are way too low. Since I’ll be using sweaters with a bit of stretch, I want the coat to be more fitted than what I might make with other material, like faux fur.  I take in all three of the back seams so it fits better around the torso. 
To raise the armhole, I have to add extra fabric under the armpit.  What’s so annoying about this is I have to alter 4 pieces: side front, side back and both the upper and under sleeve.  I redraft the sleeve entirely, removing about 4 inches from the width, only to find it’s too much, so I have to add more fabric back in again.  
 I don’t test out my third sleeve with the muslin.  I’m just going to assume it’s close enough and move on.  At this point, I also decide that the cuffs and sleeve facings are more complicated than what I want for my patchwork coat, so I ditch them and add a 2 inch hem to the bottom of the sleeve pattern.

Below you can see my altered sample. The right sleeve is altered (in the left side of the first photo).  Notice the right sleeve is narrower and the armpit is raised by a good inch.


TRANSFER ALTERATIONS
The next step is to transfer all of my alterations to my paper pattern pieces.  Before doing this, I mark the seam lines on all of the alter pieces of fabric with a pencil so I can see them when I take apart the muslin sample.  Then I take it apart, (but I really only need to take apart half of it).  Some of the pieces I press, but others I just copy the alterations to the paper pattern pieces if I can alter them with folds, but most of them I redraft the entire pattern piece.  To redraft the piece, I trace the old pattern piece.  Copy the piece name and markings.  Then lay the flat muslin piece over the tracing and mark new sewing lines.  Be sure to add 5/8 inches seam allowance.  Cut out pattern piece.  Repeat with all of the pattern pieces that need to be altered, which is most of them.

Okay, so now I have a coat pattern that fits, and I’m ready to go… almost.  I still need to design the coat.  You see, I can’t just go and use my pattern with my recycled sweaters because my pattern pieces are MUCH larger than my sweater fabric pieces.  Therefore, I MUST find a way to make a patchwork design for all of my pattern pieces.  So, until next time… happy sewing.

See Part 3 in which I design the patchwork and make my pattern pieces

Monday, November 1, 2010

Two Tone Faux Fur Playa Coat

Here's my latest faux fur coat, in deep purple and black.  I started with McCalls pattern 5092 (medium), but I altered it enough that I'm not sure you'd consider it the same pattern anymore.  
The purple is much deeper and richer in person; my camera just can't seem to photograph this color right!  It's got two pockets, a wide hood, and two pairs of hooks to clasp the front.  It's fully lined in black and oh-so comfy and warm.  The cut is a full swing coat with dolman sleeves.  Because I designed the hood from scratch, I had to cut the hood three times before I was happy with it.  The first hood was totally the wrong shape and the nap was going straight down which made it look funny in the front.  The second one, I fixed the shape, and I cut it with the nap pointing straight back, which created this funny duck-butt looking seam in the back.  The third time, I finally got the right shape and the nap going down and back diagonally. 
I also sewed the hem twice to get it to drape properly, but in the end, it turned out just as I envisioned it.  I'm shipping it out to it's new owner today.

Sunday, August 8, 2010

Fuzzy Hoodie Suit with Ears Horns and Tail

I just finished my first full body suit.  It's made out of faux fur with a polyester cuddle fabric lining. With all of its furry goodness, it reminds me of a cross between an abominable snowman costume and something from "Where the Wild Things Are." It has a hoodie-type hood with horns and ears.   This was a commissioned piece, completely made to order.

I started with a muslin mock up made from Simplicity Pattern 2853, size small, plus I added a two piece hood.   I also lengthened the sleeves and pants to be too long for the fitting.  My client and I arranged for a fitting of the mock up.  With him dressed in the muslin suit, inside out, I added a bunch of safety pins to fit the suit to his build.  I pinned the cuffs and pant hems, I took in the width of legs significantly, and also in the hips, waist and a little in the chest.  I drew on the placement of the side seam pockets and the inside patch pockets exactly where he wanted them.  I also marked where the bottom of the opening should start.  Then he got out of the suit, and I penciled where the seam should be as identified by the pins, removed the pins, ripped the muslin apart into its component pieces, transferred the markings to the paper pattern, added seam allowances back in, and my pattern was ready to go.

With the pattern in hand, I cut out the lining and fake fur, trimmed all of the fur out of the seam allowances, and serged all of the pieces including the lining.  I sewed the fur pieces together and all of the lining pieces together.  Then I added ears, horns, and a tail.
Normally, with a fur coat, I machine sew the lining to the fur, right sides together, up one side of the front lapel, across the shoulders, and down the other side.  This leaves just the bottom hems and cuffs to finish by hand.  However, because the particularities of this suit, I decided to finish everything entirely by hand.  It's more work, but I have much more control when hand sewing, so I could finish all of the corners neatly.  Adding the lining by hand required that I cross stitch all of the hems of the fur around both cuffs, pant hems, and the whole front opening (including hood).  You can see the cross stitching in many of the photos below.  I also added five extra-large hook and eye clasps along the front opening. It took me a few tries to figure out a good way to start adding the hooks, but if you look at the photo below, you can see the first two stitches that are adequate to anchor the hook efficiently.
Here's what a hook looks like after it's sewn, before it's covered with the lining.
I was worried that the fabric would rip at the bottom of the front opening, so I added a patch of flannel (it matches the pockets) with multiple rows of stitching across its width, an a tons of knots.

I also cross stitched down the seam allowance where the hood meets the neckline, under the arm pits, and at the crotch.  I did this to reduce bulk.  This photo shows an armpit.

Then, I added the lining.  In addition to stitching all around the openings, I also tacked the lining to the fur in the bottom third of the arm hole seam, on the crotch seams, and where the hood meets the neckline.  I added my tag and it's done!  Here you can see where the lining meets the fur at the front opening.

Today, the suit's new owner came over to try it on and he let me take photos.  Yeah.  We were both very happy with the fit, and he was amazed that the seams blended right in.  He couldn't even feel them.  I really enjoyed this project and we are both super happy with the results.  I put a little piece of my heart and my best workmanship skills into making this suit, inspired by the vision and enthusiasm of my client.  I joked that it's industrial strength, a family heirloom, so he can stay warm on the Playa at Burning Man, in his new fuzzy suit for many, many years to come.

Thursday, June 24, 2010

Pink Fur Coat


This coat has awesomeness written all over it.  What's not to love about pink faux fur and pure silk lining?  This was made with McCalls pattern 5092 (medium) but it is a different pattern in the same envelope as compared with the other coats I've shown on my blog.  Like with the other pattern, my muslin sample proved to be way, way too big for me.  In the Playa spirit, I wanted to make it a one-size-fits-all. So I made it smaller and now it's still big on me, but wearable by most.   I made some adjustments to the sleeves:  First I narrowed them so that you can wear a back pack.  I also made them longer, long enough to cuff.    Since the top of the sleeve was way down my shoulder, I also narrowed the entire coat by folding the pattern pieces all the way from the shoulder to the hem.  This moved each sleeve cap one inch closer to the neck (another reason I had to lengthen the sleeve), and removed 4 inches around the waist and hem.  It still has a drop shoulder.  I also lengthened the pattern from a jacket to a coat.

The only lining fabrics I had in my stash that coordinated with the fur were not large enough for the whole coat.  So I made a patchwork lining with patch pockets.  I bought the two swirly, dotty silks years ago in the fabric district of Philadelphia, and they are fabulously thick.  For this coat, I united them with the plain fuchsia silk, and to my delight, the fucshias match perfectly. 

What I learned: I learned that doing patchwork for a lining takes a lot more work than making a patchwork for a quilt because, in the lining, you have to finish each seam twice, front and back.  In a quilt, you only sew each seam once before sandwiching the layers together and quilting.

Three playa coats done, and I've been learning a lot from making these coats.  In retrospect, I learned a few more things from the Blue Coat that I incorporated in this pink one.  I found that I prefer cotton flannel for the side seam pockets.  It's heavier than silk so it will keep your hands warmer, and it's more durable.

I learned that you need to completely sew the lining together, including all pocket details, before attaching the lining to the coat.  I managed to create the crookedest pocket in the world on the blue coat, which I ripped and resewed by hand.

I learned that making buttonholes on my sewing machine isn't as scary as I think it is, at least not on the silk pocket flaps it wasn't.  In the front of the coat, things are different.  Having to cut a hole right in the center front of my work can be a bit debilitating.  I tend to procrastinate that step and switch to other projects.

The Blue Coat is the only one with button holes through the fur.  I learned that making buttonholes on fake fur is still tricky.  I had to cover both sides of the furry lapel with tracing paper in order to get the lapel through the sewing machine.  Without the paper, the fur gets caught in the bobbin case and everywhere.  Bad bad!   Also, if my buttons are too big, my automatic buttonholer doesn't make big button holes and I'm on my own.   I have to make the button holes manually.  In the end, to make large button holes in fur,  I used my machine to straight stitched around the button holes, I cut them open with a seam ripper, and then finished them by hand with a knotted button hole stitch in thick pearl cotton.  Functional, looks nice.  However, my fear of buttonholes in fur overtook me for the pink coat here.  So I used a really thick new hair tie as a loop instead.  For me, sewing a loop on the front is much easier that cutting a hole.

I learned from my brother that this faux fur is actually a faux feather.  The original is used in tying flies like the Grissly King wet fly.

This pink coat is SOLD.  Thanks Jim.

Sunday, June 6, 2010

Another Playa Coat with McCalls 5092 Pattern

I finished my second playa coat, this time with really nice, thick fake fur. This is the identical pattern as by blue/green one I showed earlier, McCalls, 5092, but with a lot of reduction in the sleeve and skirt.  It's still huge.   I learned that sewing with really thick fur is much more challenging that sewing with thinner stuff.  You NEED to trim the fur off of all of the seam allowances first, or you wont be able to get nice seams.  There's no way I'd be able to fit the 4 layers under the presser foot of my sewing machine, required to attach the collar, if I didn't trim the seam allowances first.  All that trimming takes several hours of snipping.  I just used scissors for this, but there might be an easier way.  I don't know.
I love the way this coat came out.  Two outside pockets, two inside pockets, and it's so warm and fluffy, my sweetie will never be cold on the Playa.  I took it to a weekend outting for Memorial Day and no less than a half a dozen people wore it that weekend.  It's got a lot of love on it now.  I also added a string of LEDs on the front with some hand stitching.  They were super cheap, so I hope they don't set it on fire at some point when the wiring breaks.

Wednesday, February 10, 2010

Finally my own bloomers design

I've been working on making up my own pattern for bloomers with ruffles.  I had tried making a few other pairs that I discussed earlier, but I didn't like the gathering at the knee and the bow tie in the back.  Tying my pants up behind my back is a little fiddly, so I decided to try other options.

This pair above is made from a wonderful blue black hand dyed cotton I bought during my quilting days.  I designed a wide leg cropped pant, decorated with two rows of double edged ruffles and no gathering at the knee.  The ruffles are hemmed on both edges.  (That's a lot of hemming!)  These have an elastic waistband which makes them much easier to take on and off than a bow in the back.  Super comfy, too, but they're a bit big on me, so I've listed them for sale.  I also added some pockets with piping on the edge because I can't successfully leave the house without pockets in my pants.

The problem with an elastic waistband is you still need extra fabric in the waist to get them over your hips.  You can remove the extra fabric by adding a zipper instead, but up until this week, I didn't know how to sew a zipper.   For MONTHS, I've been trying to learn how to set a zipper.  I keep reading instructions, but hadn't actually tried to do it. Finally,  I decided that if I started with a lapped zipper, I could sew anything.  So, I found a pattern for a lapped zipper, and after following the pattern with some scrap cotton, I found that the pattern didn't produce a very stylish result.  I found at least three errors.  So I spent a full day designing my own pattern off of the faulty one, until I got everything to line up properly.  It took my 5 iterations to get it just right and ready for use.  Since the green fabric isn't stretchy at all, I also decided to add a bit of elastic in the back of the waistband.  For this reason, my sister dubbed them "buffet pants." 

The green pair of bloomers include the lapped zipper, back darts, ruffles, and two front pockets with piping.  I also added a little tag with my name and the fiber content because it's the law if you want to sell clothing that it be labeled with fiber content.  Who knew?  I'm thrilled with the workmanship on this pair.  The details are very nearly perfect.   But, they're still a little big on me, so I'm selling them in anticipation of making myself a perfectly fitting pair.

Sunday, January 31, 2010

Harlequin Playa Coat Using McCalls 5092 Pattern

I finally finished my blue and green playa coat.  This is the first fake fur coat that I sewed entirely from scratch.   This coat is based upon McCalls 5092 in the medium size (size 14-16), but after making a muslin mock up, I found it was HUGE, like a cape. I  took out somewhere between a quarter and a third of the width of the fabric in the skirt.  I also narrowed the underside of the dolman sleeves considerably because dolman sleeves and backpacks are not a good combination.  Plus, I haven't liked dolman sleeves since 1989.  I like the way one can flip up the collar for when it gets really cold.

The fabric is a wonderfully soft, and somewhat stretchy, poodle-like fur that is probably nylon or some other synthetic.  The lime green lining is pure silk, which also lines the pockets.  To make sure the seams will last, I used French seams on the lining and I binded all of the seams of the fur with twill tape.  Because I wanted really big green buttons, I made them myself out of some scrap wood in the garage and some leftover green house paint.  Each button loop also has a second loop from which I can hang glow stick bracelets.  I can't wait to wear this on the Playa!
Related Posts Plugin for WordPress, Blogger...