Showing posts with label collar. Show all posts

Wednesday, August 19, 2015

Jersey Tunic Shirt Dress Reverse Appliqué

For the last several years, I have been working towards merging art and clothing. To that end, this tunic top is entirely hand stitched with love and care.
I used techniques I learned from books by Natalie Chanin of Alabama Chanin to transform fabric and thread into a delectable and comfortable work of wearable art. 
To start making this piece, I designed and cut my own stencil.
I used the stencil to paint the design on the front and back with fabric paint.


The bodice is two layers of delightfully soft bamboo rayon jersey that is hand stitched with soft, thick, green thread to hold the layers together. I carefully cut over 100 windows in the green fabric to let the black layer show through the green one, using a technique called reverse appliqué.
I left the cut edges as part of the design. The cut fabric edges are quite sturdy. They will curl with wear and washings, but shouldn't unravel if you treat it well. Dress it up with a skirt or dress it down with leggings or jeans. This is the complete front panel before assembly.
After I assembled all the pieces, I found it to be rather tight in the hips.  So, I busted apart the side seams and  added godets. Now, it is fuller around the hips and butt. Here is what one godet looked like before I finished the embroidery.
Here you can see more of the embroidery.  It is US size 8-10 and very soft and stretchy with a lovely drape. If you want details on the measurements, just ask.
This piece is so very soft and comfortable. The materials and craftsmanship are top quality, and it's the only one like it. If you like avocado green, it will quickly become your favorite top. In fact, I made it for myself, but I would be happy to sell it and make more. So I'm offering it for sale for a limited time.


Maybe you would like to have it? Get more info here: https://www.etsy.com/listing/244808736/

If it doesn't sell by winter time, I'm keeping it. Thanks for looking. 

Sunday, February 1, 2015

Upcycled Sweater Hoodies No. 7 8 and 9

Here are some photos of my latest hoodie cardigans made from felted wool and cashmere sweaters.  I wash the sweaters in hot water and dry them in the dryer to make them felt.  Then I cut them up and sew the pieces together on my serger sewing machine with some stitching done on my regular sewing machine because a serger doesn't do everything.  First is Sweater Number 7.  My great accomplishment on this piece was the front placket with buttons.  The placket is two layers, so it lies flat and is quite functional.  I'm quite pleased with this design, and I'm now using this placket on all of my cardigans. Of course, I used this as an excuse to splurge on vintage buttons.  I love buttons, and I was tickled to have a reason to buy more of them.  Sweater Number 7 is in marsala burgundy, hot pink, gray and brown, size medium with woven leather buttons.  It has two pockets and is super snuggly.

This is a photo of some of the pieces before I assembled them, mostly wool with a bit of cashmere.
This is some detail on a matching cotton skirt that you can see peeking out of the bottom.
I made Sweater Number 7 as a commission for a friend, not realizing that she's actually much broader than I am.  Although it fits me perfectly, sadly, it's too small for her.  Before we found that it doesn't fit her, she asked me to cut off the point of the hood.  Here you can see the difference that a pointed hood makes versus a rounded hood.  I thought I was in completely in love with pointed hoods until I cut off the point.  Now, I think I actually might prefer the rounded hood.  One thing I wasn't expecting when I cut off the point is how much it changes the shape of the collar around the neckline.  The very first sweater hoodie I made, I kept for myself, and it has a pointed hood.  I find the point kind of gets in the way.  I think from now on, I'll make most of my hoodies with rounded hoods.
Sweater Number 8 is in aqua blues, size small.  This one is quite elvish with a pointed hood and a long pointed pocket. It's about two-thirds wool and one third cashmere with green vintage plastic buttons.
Sweater Number 9 is in purple, blue, gray and olive, size medium.  It has a stripe up the back in purples and a pocket on the front. It's mostly wool with a bit of cashmere and vintage purple plastic buttons. 
These pieces are all for sale at Isabella Boutique in downtown Sunnyvale, CA.  Many of the techniques I used I learned from the ever-talented Katwise.  Thanks for looking.

Tuesday, November 4, 2014

Upcycled Sweater Number 5

I really enjoy making these new sweaters out of old sweaters, enough that I decided to start numbering them.  This one is number 5.  I'm finally feeling more comfortable with the technique of sewing sweaters on my serger without fretting over every seam.
https://www.etsy.com/listing/209757932/sweater-dress-cardigan-upcycled-cashmere
It's made of fine wool and cashmere.  It's pretty soft, cozy and warm.
https://www.etsy.com/listing/209757932/sweater-dress-cardigan-upcycled-cashmere
Plus, it buttons up the front with some old buttons from my grandmother's button box.  I made the button placket myself, which I'm pretty proud of.  It took me 13 tries on a scrap to figure out how to get my sewing machine to make button holes properly, but I got it, and I took notes for next time. 
https://www.etsy.com/listing/209757932/sweater-dress-cardigan-upcycled-cashmere
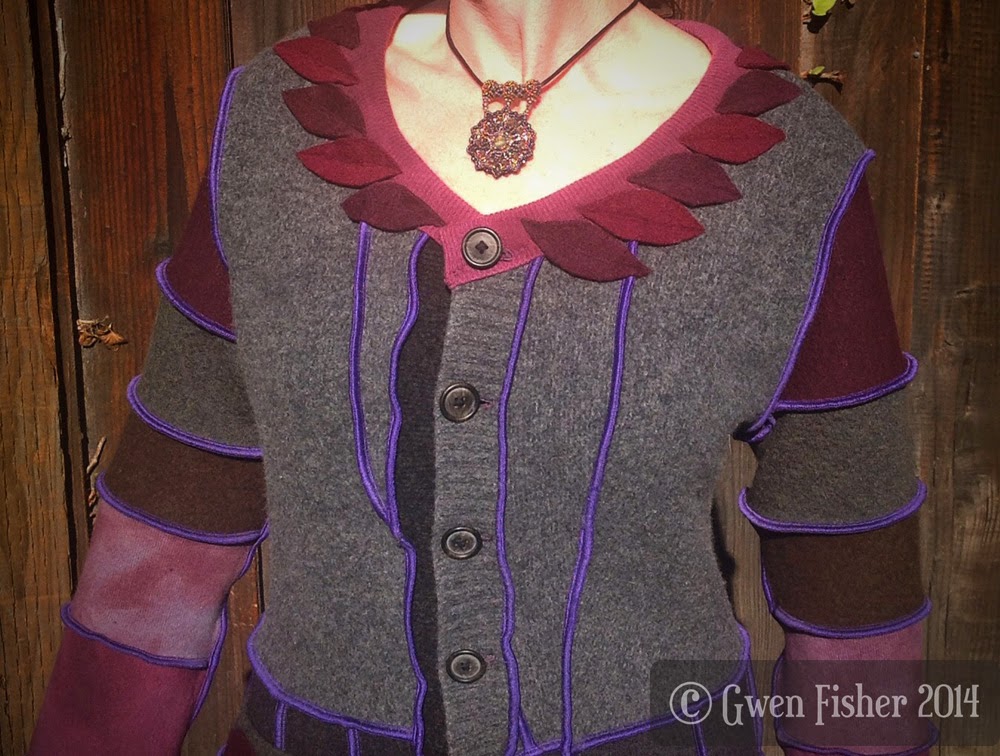
I'm rather pleased with how the neckline came out.
https://www.etsy.com/listing/209757932/sweater-dress-cardigan-upcycled-cashmere
The little leaves are all stitched on separately.
https://www.etsy.com/listing/209757932/sweater-dress-cardigan-upcycled-cashmere
I also added leaves on the sleeve hems and on the patch pocket. This sweater is SOLD.  Thanks for looking.
https://www.etsy.com/listing/209757932/sweater-dress-cardigan-upcycled-cashmere

Thursday, December 19, 2013

Beaded Lace Adventure Necklace No. 2

Last time I reported on the Beaded Lace Adventure, I showed some beaded motifs from my latest tutorial, Eucalyptus Leaves.  Today, I have the complete collar to share with you that uses a bunch of those motifs. 
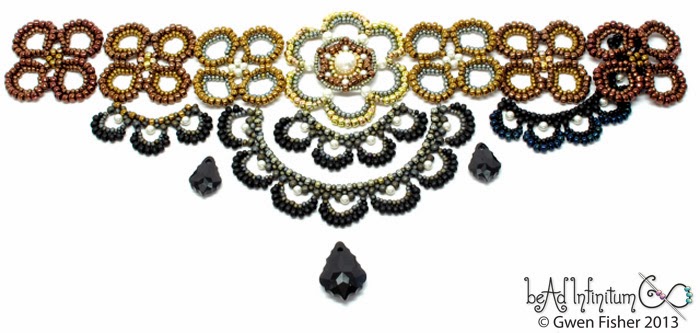
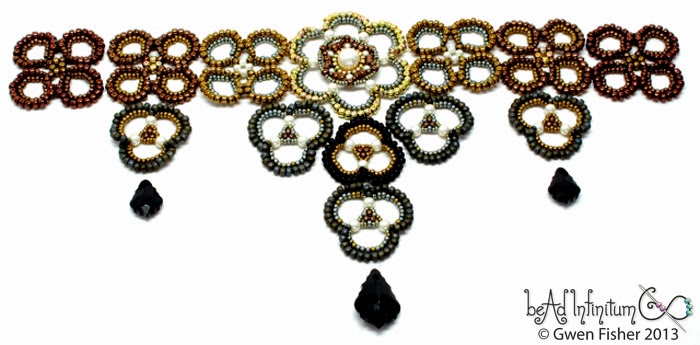
Eucalyptus Leaves is a two-for-one pattern that shows how to make a bracelet as well as the Eucalyptus Clover, which was the basis for this collar.  The top edge of this collar is composed of nine eucalyptus clovers in bronze, silver, black and matte gray seed beads.
I also used nine beaded lace flowers with 3 petals and eight pieces of beaded lace swags on the bottom edge. Swarovski pearls in cream connect the various motifs.
I have to admit, I'm thrilled with the drape of this piece.  It fits perfectly at that place where the base of the neck meets the top of the collarbone.  Considering how heavy it is, this collar is remarkably comfortable.  I used gold filled chain, lobster clasps, and jumprings to make the clasp adjustable for a perfect fit.  Actually, it didn't really want to lie flat for the photos where I laid it flat on the table because it's not designed to be flat. But since it's lace, it will stretch and compress to fit.  That's what all of those holes are good for!
This Beaded Lace Adventure Necklace No.2 is for sale in my Etsy shop.  Thanks for looking.  Happy holidays.

Friday, December 6, 2013

Eucalyptus Leaves Bracelet: Part 5 of the Beaded Lace Adventure

It's been a couple weeks since I reported on the Beaded Lace Adventure, and during that time, I've given a lot of thanks, ate a lot of delicious food with my friends and family, and managed to finish one new tutorial.  I hope you'll think it's a good one.  This is Part 5 of the beaded lace adventure, which I call Eucalyptus Leaves.  Eucalyptus is a two-for-one pattern which shows how to make this bracelet,

Eucalyptus Leaves Beaded Lace Bracelet Tutorial
as well as the Eucalyptus Clover, a four-petaled design that plays well with the other lace motifs in the adventure. It's like the four-petaled flower from Part 2, but bigger and more elaborate.  A bunch of them in a row makes a nice band for a collar or bracelet.
In fact, I will use most of these clovers in the collar I am currently stitching, which I'll share when it's finished.  In the mean time, here are some of the designs I've been playing with, and the tutorial includes a few more to inspire you to make one for yourself. 


Here you can see what the eucalyptus vine looks like in black. I think looks like some mod black lace from the 1950s, super chic.  I should probably finish this bracelet, but I'd rather work on the collar because it's bigger and more elaborate.  
The eucalyptus tutorial even includes a few lacy snowflake designs like this one.  How pretty would this be hanging in a window, twinkling when the sun shines on it, and lacy when the sun shines through it.  
To conclude this post, I'm thrilled to share the work of a fellow beading blogger... From a companion on the Adventure, here is bead work by Tanya of Pixiloo.  
She made this beautiful necklace using my Beaded Lace Swags tutorial.  I love how she stacked two different swag designs, and added pink daggers to make such a lovely necklace.  The colors she chose look very antique to me.  I like it. Can I tell you, I am so exited to have someone joining me on this adventure, because I think the possibilities are huge and potentially gorgeous (like Tanya's necklace here), and Tanya promised to make more beaded lace!  So I'm waiting patiently for that.   Tanya also wrote a nice review of the Beaded Lace Adventure on her blog, and for that I am thankful.  And for you reading my blog, too. Thanks for looking.  

Friday, November 15, 2013

Lace Medallions: Part 4 of the Beaded Lace Adventure

I finished my first beaded lace necklace, and I'm so in love. 
Steampunk Lace Necklace
It's so comfortable, and it hangs beautifully below my neck. The drape is just perfect. I chose steampunk colors of black, gold, bronze and pearl.   
Steampunk Beaded Lace Necklace

You might notice this necklace features a large golden bronze Beaded Lace Medallion, which happens to be Part 4 of my Beaded Lace Adventure. The medallion tutorial is now available if you would like to make some medallions too.
The instructions explain how to make 5 different medallion variations. I give specific patterns for medallions with 6, 7, and 8 petals that range in size from 1 1/2 to 2 inches. The last three pages includes photos of several design possibilities for necklaces and wide cuff bracelets using medallions, flowers, and swags. more designs are coming!  Here's an example of a cuff design.
You can read more about the Beaded Lace Adventure here on my blog, find the patterns in the tutorials section of my Etsy shop, and please look out for more soon. I've got more designs in my notebook still to realize in seed beads, but I have to sit down and bead them first before I can show you.  So, come back later!  And as always, thanks for looking.

Wednesday, October 30, 2013

Going on a Beaded Lace Adventure

I'm going on a lace adventure.  Do you want to come along with me?
Beaded Lace Flowers
Let me explain...  For the last couple of weeks, I started beading lace.  I'm taking my inspiration from the fantastic Terese de Dillmont, who documented the art of Irish lace crochet in her Encyclopedia of Needlework, in the 1880s.  From Terese, I learned how to do crochet lace flowers, and I made a few free video tutorials that you can find here on my blog.  One classic crochet design is the basic five petaled flower.
Crocheted Flower

I tried to make a flower with beads and a needle instead of yarn and a crochet hook.  And so I did, and I made more and more, and now I have a little garden of black lace flowers made out of seed beads and thread.  
Beaded Lace Flowers
I have enough flowers to make a bracelet.   I could sew them together and add a clasp, but what I really want to do is make is a big black lace necklace, a collar that fits comfortably around the base of my neck with crystals hanging off of it and pearls connecting it together.  Something dramatic and Gothic.   So I just put in an order for the bigger beads, and I'm going to make more flowers.  I'm also going to add swags and other do-dads and lacy bits to fill out the piece until it's big and complicated.  And I want you to make one too!  Don't you want to make your own?  I mean, you like lace too, right?

Now, what's so great about this lace technique made with bead weaving is that it's easy to do, and because it's flat, it's easy to draw patterns explaining how to do it, and I think that should make it easy to learn as well.  So I'm writing a series of tutorials in hopes that some of you will play along and make beaded lace jewelry with me.  Athena's Acanthus Bracelet is the first design in the series.
Athena's Acanthus Bracelet
So I'm going to make big necklaces.  Rather than making one large tutorial explaining how to make a whole necklace, I'm going to write several shorter (read that "inexpensive") tutorials that each explain one kind of design. Rather than focusing on making complete jewelry, for now at least, I want to teach you how to make individual motifs, and show you ways of arranging them.  The result will be a series of designs and tutorials that all coordinate so you can compose larger pieces of jewelry.  I'm not sure how many of these tutorials I have in me, and it might depend upon how enthusiastic you gals are in encouraging me to make more.  But I think I have at least a couple more.  
So, I'm selling these as short tutorials, individually priced so you can just buy the parts you want to learn and make.  And I am pricing them at a fraction of what I normally charge to encourage you to try it out, and make your own beaded lace jewelry.

Part 1 of the Beaded Lace Adventure is Athena’s Acanthus Bracelet.
Athena's Acanthus Bracelet
Part 2 is Beaded Lace Flowers.
Beaded Lace Flowers
Part 3 is Beaded Lace Swags.
Beaded Lace Swags

Part 4 is Beaded Lace Medallions.
Beaded Lace Medallions
Part 5 is the Eucalyptus Leaves, which shows how to make a bracelet
Eucalyptus Leaves Beaded Lace Bracelet Tutorial
and the Eucalyptus Clover, a four-petaled design that plays well with the other lace motifs in this adventure. It's like the four-petaled flower from Part 2, but bigger.  A bunch of them in a row makes a nice band.
and more designs are coming! Look for in the tutorials section of my Etsy shop.  Here is my first complete necklace, made with motifs from Parts 2, 3, and 4.   
Steampunk Beaded Lace Necklace
Stay tuned for more because there's definitely more.  More tutorials and more jewelry.  As always, thanks for looking.

Saturday, March 26, 2011

Making a Sweater Coat Part 1 Inspriation and Vogue 1266 Pattern

Some inspiration and my new sewing project...

I’ve seen so many beautiful reconstructed sweater coats on Etsy lately.  I think the most notable designer is Katwise She pitches her work as “Original Elf Coats made from Recycled Sweaters” and I think that her work is amazing.  A few other designers whose work I’ve admired are Green Oak Creations, Amber Studios and Enlightened Platypus.

With so much inspiration, I decided that I love the idea and wanted to make an up-cycled sweater coat of my own.   Rather than copy the designs of the artists who inspired me, I am designing my own pattern.  However, the materials will be the same, lots and lots of old sweaters.  I'll tell you about the sweaters later.  Since I started this blog to encourage myself to write about what I learn from creating art, and I’ve never made anything from old sweaters before, I decided to blog my way through this project, and away we go...

THE PATTERN
To start, I needed a coat pattern that fits my body.  So, I figured where better to start than with a purchased coat pattern.  Yes, I’m using a pattern, but I will to alter it significantly before I cut any sweaters.  I just need something to start because it’s easier for me to alter a pattern than to draft my own.  I’m not there yet, but I hope someday…  Anyways, I chose Vogue 1266 (12, 14, 16) because I already had a copy of size (6, 8, 10) but I purchased this pattern before I figured out that my dress size in the store is not the same as my dress size in paper patterns.   

I’ve been flirting with this coat pattern for over a year, so I bought a second copy, in the medium size.  I’m a medium size.  I know this because I measured my bust, waist, and hip measurements, and figured out my size by looking at the chart on the flap.  It also comes in size (18, 20, 22, 24), and so that’s the large.
I chose this pattern because it has princess seams, which make for a nice fitted bodice.  That also makes it different from most of what I’ve seen on Etsy.  Amber Studios has made at least a few coats with princess seams, like this one, which is awesome, but I’ll be sure to try to make mine different. 

I pulled out the pattern instructions, found the list of pieces by name and number, and identified which pieces I needed.  I’m making version C.  So I marked all C pieces and facings with “C”.  I marked all C lining pieces with “L”.  At this point, I don’t know if I’m going to line my sweater coat (probably not), and there is plenty of time to think about the lining later since you add that at the end, just before hemming.
So I pulled the tissue paper pieces out of the envelope, and I unfolded, and they just kept unfolding more and more. They were INSANELY HUGE, giant rectangles of tissue paper at least five feet on a side.  I used to be scared stiff by giant pattern pieces, but I took a deep breath and cut out all of the “C” pieces, snip-snip.  I refolded the other pieces and shoved them back in the envelope.  At this point, it’s not important to cut exactly on the lines, so I left a little margin to make life easier on myself. 

I pressed all of the pattern pieces with a cool iron, no steam.  It makes a satisfying crinkle sound when you press the paper and the wrinkles smooth out.   
This is exactly how far I made it through the size (6, 8, 10) before I figured out it would be too small in the shoulders.  For some reason, I decided that if the shoulders fit, I could probably make any other adjustments I needed to make the whole thing fit, and I would be better off starting with a larger size.  I’m not sure if my intuition is right on this point.  We’ll see.

After cutting all of my C pieces, I made sure everything was accounted for. There are so many pieces that it’s easy to miss one.

There are four pieces that make up the bodice of the coat, front, back, front side, and back side.  I’ll need two of each in fabric.  The sleeves have four pattern pieces: upper sleeve, under sleeve, cuff and sleeve facing which provides and edge for the sleeve hem.  I’ll need two of each of those in fabric.  I’m not sure if I’m going to use the cuffs yet, but I’m keeping them for now.  The collar has two pieces, the upper collar and the under collar.  I’m ditching both of them in favor of a hood.  Hoods are cozy.  I like hoods.  I’ll talk more about my dealings with the hood later.  There are two more facing pieces, the back neck and front facing.  The facings are the pieces that give the coat some of its structure and finish the edges around the neck and front edge.

ALTERING THE PATTERN
Before I cut any fabric, I need to alter the pattern a little.  The coat in the pattern is ankle length, so really long.  I like my coats to fall just below my knees, so I shortened the pattern by a clean foot.   I shortened 5 pieces: front, back, front side, back side, and front facing.  I shortened the pieces by folding the hems up and using itty bitty pieces of scotch tape to secure them. I don’t like cutting pattern pieces if I can just fold the alteration.
I’m removing the collar and adding a medium wide hood. Here's how the collar fits on the front of the top front of the coat.
I have one hoodie in my closet, but the hood is too small and fits a little funny, so I traced it for my first draft, and made some adjustments for a better fit.  Then, I measured my around my head, out and wide like I want the hood to fit, and adjusted the size of my tracing, a little hear and there, to better fit with my measurements.  I also compared the bottom edge of my hood with the bottom edge of the collar pieces.  
I made the hood edge similar but with a deeper curve to add some extra fullness near the neck.  I noted that the collar leaves about 2.5 inches to the edge of the collar (measured on the seam line, not the edge of the pattern pieces.
I also wanted to remove the notch in the collar, to make the hood join smoothly with the front edge.  So I folded the front facing and front pieces by one inch which removed the little flap (and consequently the notch). This fold subtracted one inch, and I added 1.5 inches to the hood bottom edge. That's why the hood piece is longer than the collar piece in the photo above.
To finish my hood piece for now, I made sure the corners at the top and back of the neck are right angles (they're marked in the photo). They have to be so that when you unfold the pieces at those places, you get a straight edge.  I’m still not sure about the exact size and shape of the hood so I’m using a full inch seam allowance on my pattern piece for now. That will leave me some wiggle room if I need to let it out a little when I try it on later.

My pattern is now ready for a mock up in scrap cotton fabric.  That’s next.

Until then, I leave you with some yellow Rosebud Beaded Bead Earrings, which I sent off to Texas, of course.

Continue on to Part 2 in which I make and fit my muslin sample.
Related Posts Plugin for WordPress, Blogger...