Wednesday, December 7, 2016

Beading Tutorial - Pentadome Pendant

Learn to bead a Pentadome Pendant with Japanese seed beads and 2-hole beads.
https://www.etsy.com/listing/496880929/
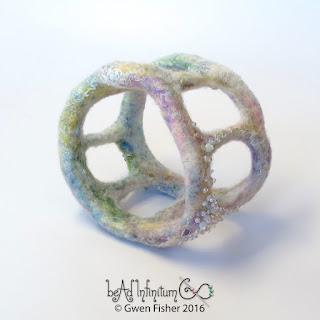
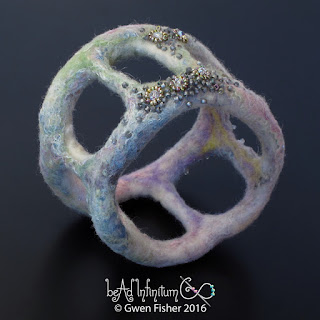
 The two layers of beaded star weave create a stiff dome structure that holds it shape.

https://www.etsy.com/listing/496880929/
This tutorial includes step-by-step instructions for weaving a beaded pendant. 
https://www.etsy.com/listing/496880929/
Using an unusual and complex angle weave, the Pentadome is suitable for intermediate bead weavers who are already very comfortable with right angle weave. If you like RAW and want a new challenge, you’ll love this.

https://www.etsy.com/listing/496880929/
Pendant measure about 2 inches (5 cm) wide and 7/8 inches (22 mm) thick.
https://www.etsy.com/listing/496880929/
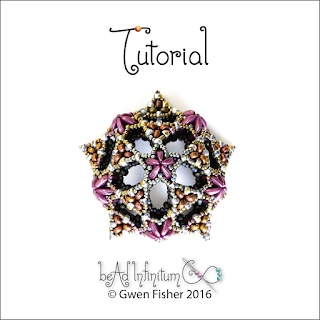
 Thanks for looking.  Happy holidays!

Saturday, October 29, 2016

Tunic Shirts with Reverse Applique on Jersey Inspired by Alabama Chanin

Back in June, I promised you more clothing made with reverse applique on jersey fabric. Well, today is the day. This is my most recent piece, a short sleeved, tunic top in cotton jersey. I learned the techniques from #AlabamaChanin. Stencil design was originally designed by Zelda Lin for the Genie Bottle.
The fabric is on the thinner side for cotton jersey, but not transparent. With two layers, it makes a nice weight for a shirt.
  
I spent many weeks of my free time to make this piece, and I really enjoyed the process. Doing running stitch is very meditative and easy to do even if you're tired. 
I like the way it looks a lot. However, I altered the back pattern piece to remove some gaping at the back neckline and now it's a little tight in the armpits. I can snips some threads and resew the seams to fix that, I hope.  This piece has a lot of detail covering the entire surface.  I probably won't do another piece again with this much detail. 
It has about 300 yards of thread, all worked doubled in hand stitches. That's 150 yards of running stitch and a bit of Cretan stitch on the neckline.
Here are some process photos. This photo shows the three pattern pieces: Front, back and short sleeve. The front and back are both two pieces. The fabric is cut and stenciled with spray paint fabric paint. I used Tulip Color Shot Instant Fabric Color in purple. I needed two 3 oz. cans to stencil all of the pieces, but didn't finish the second can.
Here is what the fabric looked like after stitching but before cutting. I put the knots on the outside to emphasize that it's hand made. It's also more comfortable to have the knots on the outside where they aren't right next to your skin.
Next are several photos of another shirt I made using the same techniques. This long sleeved tunic is made out of Modal jersey, which is a type of rayon made from beech trees. To say it's rayon means it is semi synthetic cellulose fiber. It is very soft and springy, much more springy than cotton. You could probably shoot this shirt across the room like a slingshot, but I haven't tried it yet. 
This is my dress form, Marge wearing the top. This jersey fabric is a thicker weight from the cotton above, making this a warm and cozy shirt that is both comfortable and fancy. Its weight and spring help it to drape nicely. I'm looking forward to wearing it a lot this winter.
 Here is a process photo of the cutwork. 
I thought the design needed some more density, so I added the blue stitching you can see below.  This is the back left shoulder.
I end with a heart to offer you my appreciating for making it this far.  This photo shows the center front of one of my very favorite shirts with black and taupe jersey and big patches of floral embroidery (not shown). 
I got an oil stain right on the center front of this favorite shirt of mine. So here's how I fixed it. This is reverse applique with red cotton jersey and two rows of running stitch. Good as new. Have a great day. Thanks for looking.

Wednesday, October 12, 2016

Free Beading Pattern - Sierpinski Triangle

Once upon a time I was going to write a beading book on beaded angle weaves.  The first part of the book was going to show how to bead many of the basic angle weaves, and the last part of the book was going to show lots of charts of flat weave designs.
I abandoned that book idea long ago, although I haven't abandoned the idea of writing a beading book, just that one.  Some of the designs that I would have included in the book are now available for free here on my blog, including Hexagon Angle Weave, Circle Earrings, David's Star, and Super Right Angle Weave.  Others are in my Etsy shop and website, including Kepler's Star, Night Sky, Honeycomb, Lozenge, Book of Kells, and Solaris.

Before I tossed aside the idea of completing the book, I created three sample pages for the section with the charts.  Today, I'm sharing them with you because they're not doing anything particularly interesting sitting inside my computer.  I hope you enjoy them.


Have a great day. Thanks for looking.

Friday, October 7, 2016

New Tutorial - Solstice Earrings

You can learn to make Solstice Earrings with this original variation on Cubic Right Angle Weave (CRAW). This tutorial is very detailed, written for advanced beginner beaders who have a basic knowledge of bead weaving. Knowledge of CRAW is recommended but not assumed.
Solstice Earrings use two types of fancy beads, combined with our old favorites of seed beads and rounds. The fancies include little drops or daggers and little beads with two holes. This purple pair below is available here: Purple Solstice Earrings.
Several pages show and describe 6 pairs of earrings using different types of fancy beads, including all of these.
Depending on which bead shapes you use, each Solstice Earring is usually a little over an inch wide (28-30 mm) and 20-22 mm tall. You can also make large earrings (48 mm wide) like this pair with long dagger beads, which are for sale here: Neon Pink Solstice Earrings.

The tutorial is 15 pages, with over 90 full color illustrations and photographs, a COLORFUL FEAST for the eyes. The tutorial gives highly detailed illustrations, photographs, and written instructions to make six different pairs of earrings. That I have made so many pairs of Solstice Earrings is a testament to how much fun these are to make and wear. This is my King Tut pair in lapis blue and gold.
Thanks for looking.  Have a great weekend.

Wednesday, September 21, 2016

Preview of the Solstice Earrings

I'm finishing a new tutorial for what I'm calling Solstice Earrings. Here's a little preview of some of the variations.

Monday, September 12, 2016

Tutorial - Bicone Bangle Bracelet Pattern Made with Seed Beads

https://www.etsy.com/listing/464065712/
This beading tutorial explains how to bead weave a bracelet with two sizes of Japanese seed beads and two sizes of bicone crystals. Use Swarovski crystals for a lot of sparkle! No fancy shapes required! The Bicone Bangle Bracelet is hollow and somewhat flexible, but if you reinforce your stitching, it will be stiff like a bangle should be. It measures 11 mm wide and 9 mm thick, 79 mm in outside diameter, 62 mm inside diameter.

This tutorial includes step-by-step instructions for weaving the bracelet into a continuous bangle.

This tutorial is designed for intermediate bead weavers. The weave is a variation on David’s Star, an angle weave like a cross between hexagon angle weave and super right angle weave. If you like angle weaves and want a new challenge, you’ll love this.

Thanks for looking.

Saturday, July 16, 2016

New Tutorial - Kali Beaded Pendant and Little Bird Earrings

I'm still playing with new designs using beaded Cellini spirals in peyote stitch.  Now you can learn to bead weave little bird earrings and the Kali pendant with seed beads and thread.
https://www.etsy.com/listing/465121347/
This is Kali. She is a Hindu goddess of time and death.
The beadwork is stitched with just 2 sizes of regular Japanese seed beads. So if you are a bead weaver, you probably already have everything you need. Using just a pinch of each color, this is a great way to use up seed beads leftover from other beading projects. 
https://www.etsy.com/listing/465121347/
Beaded in the colors of fire, you can make a Kali Pendant that looks like a flaming phoenix. 
https://www.etsy.com/listing/465121347/
Making the earrings is a suitable project for advanced beginning bead weavers who like size seed beads, and the pendant is for more advanced bead weavers, first, because there are more steps, and second, because it's a little tricky to assemble the pieces. Both the pendant and earrings scale nicely with bead size.  The beadwork in the photos above use size 15° and 11° seed beads. You can also use size 11° and 8°, which make correspondingly larger pieces of jewelry. The little birds are either 35 mm or 46 mm, depending upon which size seed beads you use. The pendant is either 72 mm or 90 mm across.
I would guess that you could even scale it to use size 8° and 6° with good results, but I haven't tried it yet.  The larger beads are easier to work with, for sure.

The tutorial is 20 pages, with nearly 100 full color illustrations and photographs, a colorful feast for the eyes. The tutorial gives highly detailed illustrations, photographs, charts and written commentary showing how to make the earrings and pendant.

After writing the tutorial, I found a new color scheme for the earrings, the Ruby Slippers, still on the wicked witch.
 Ruby Slipper Earrings

Thanks for looking.

Tuesday, July 12, 2016

Inspired by Opals - Beaded Textile Bangle Bracelet No. 57 Felted Wool Silk

https://www.etsy.com/listing/452050852/
I love opals, and I adore artwork that looks like opals, art that is almost white but has subtle colors, to make it not just white. Yesterday, I was pouring over some white-ish polymer clay art by Richelle of Shipwreck Dandy.  (Photos used with permission.)
 https://www.etsy.com/listing/271466460/
https://www.etsy.com/listing/270330619/
Aren't they pretty? Drooling over these babies, I was inspired to make something like that, art that appears to have an inner glow, but I don't have any polymer clay. I do have wool and silk, however, in a nice array of colors. So, I made this bangle bracelet.
https://www.etsy.com/listing/452050852/
Silk and some sparkle fiber give it a nice luminosity. You can't tell from the photos, but it shimmers. Felt is a perfect base for some bead embroidery. So I added some real opals beads and seed beads in one spot.
https://www.etsy.com/listing/452050852/
There are also some Swarovski crystals and more seed beads.
https://www.etsy.com/listing/452050852/
I'm actually quite tickled that the finished piece met my vision. 

These pieces are for sale.  Click on the photos to go to the listings.  Thanks for looking!

Wednesday, June 29, 2016

Rainbow DNA Beaded Earrings

With the recent tragedy in Orlando, it seemed like some new rainbow DNA was in order. They are a small symbol to show my support for the victims, their families, and the LGBQT community.

Rainbow DNA
https://www.etsy.com/listing/462535047/

Coded Rainbow DNA
https://www.etsy.com/listing/462533787/
Blue and Silver DNA
https://www.etsy.com/listing/449058852/
If you would like to learn to make your own beaded DNA earrings, I have a free video tutorial available on my blog. Thanks for looking.

Friday, June 24, 2016

Learning from Alabama Chanin - Red Hearts on Gray Tunic Top

I bought a couple books last summer at the local Barnes & Nobles.  When I sat myself down in the crafts section, as I like to do from time to time, I found two books by Natalie Chanin on hand sewing clothing.  One is titled, "Alabama Studio Sewing + Design: A guide to Hand-Sewing and Alabama Chanin Wardrobe." The newer book is "Alabama Studio Sewing Patterns: A Guide to Customizing a Hand Stitched Alabama Chanin Wardrobe."

This is the back of a tunic top.

Now that I've had the books for a full year, I've gotten a chance to read them thoroughly as well as make a few pieces from them, including the one in this blog post. This fitted tunic top is a slightly altered version of the pattern in the books.  It is upcycled from 3 different t-shirts. The stitching is in black and red with four "random ruffles" running down the front.

Front
 Shoulder close up
Here are some close up shots that show the detailed hand stitching. The seams are all sewn twice for strength and style.  It has inside felled seams where I sewed the light gray to the dark gray. Because I upcycled from other shirts, I had to patch together the fabric to make this top.  So there are more seams inside the dark and light areas. Outside felled seams connect the dark gray to itself, and the light gray is patched together using outside open seams with feather top-stitching. By the time I got the front and back cut out, there wasn't enough fabric left to make the binding, so I cut into a third shirt, the red one.  The red binding is attached with a stretchy stitch, called Cretin stitch, to keep the arm holes and neck line stretchy. Since I had so much red fabric left over, I thought I'd add some applique, and hearts seemed like the obvious choice.
As is characteristic of Chanin's style, the bottom edge is left unstitched. Also, characteristic of her style are the hand appliqued bits attached with running stitch and an unfinished cut edge.

One important tip that is omitted from the books is that you have to ease the binding anywhere you use it.  This means that the binding is a bit shorter than the edges it binds.  If you don't ease, you will find that the arm holes and neckline gape in an unattractive way. (Ask me how I know.) Figuring out how much to ease the binding is a bit of an art, but I find that I use as much ease as I can without creating ripples. Even a tiny bit of ripple is okay.  I found that it's better to slightly over do it than to slightly under do it, especially since these tops tend to be fitted, which leads me to another observation...

I think the pattern sizing in this book is too small.  I've found that anything I make from these books in a large size tends to be a tight on me, and I'm 5'5" and 130 pounds. I am a US Size 8 or maybe 10. In fact, according to the designs I've made from these books, I'm consistently an "extra large," which bothers me a bit since I'm not a particularly large woman.
Other than that, I really love the designs and techniques in these books. If you like hand stitching and making clothing, I totally recommend these books to you. I love the combo of soft jersey and fancy stitching.  The clothing I have produced is both beautiful and comfortable, and I'm offering much of what I make for sale, including the top in this blog post.  I made a couple more tops that I still need to photograph.  So expect more from me soon.
Thanks for looking. 
Related Posts Plugin for WordPress, Blogger...