Showing posts with label free pattern. Show all posts
Showing posts with label free pattern. Show all posts
Monday, July 10, 2017


Saturday, February 4, 2017
Free Pattern Beaded Pussy Hat
Sorry I've been MIA, but... politics.
 With all of the craziness that has occurred over the last few months in the US, I have been inspired by politics in a way that I never have been before. The day after the 2017 inauguration, I watched as more than 3 million people protested across the globe for women's rights. In the photos, I saw huge crowds marching for the Women's March on Washington. I saw thousands, maybe tens of thousands of pink pussy hats, all made by hand to honor and draw attention to this event. Being an artist myself, I wanted pay homage to this symbol of women's rights. As a result, I drew this pattern for beaded pussy hats.

 The pattern is free for you to use and share as you'd like. Please make lots of beaded pussy hats, give them to your friends. Use them as a reminder to stay involved, and always stand up for women's rights.
 These beaded charms are quite little. As patterned, they are suitable as zipper pulls,
earrings, pendants, and bracelet charms. I'd recommend scaling the beads to 11, 8 and 6
to make it bigger for a key ring.
On the photo below, the one on the right has stripes. The two on the bottom and left use three colors of beads. Switch colors after each row. If you use a cycle of 2 colors, you get stripes, whereas if you use a cycle of 3 colors, then no two beads of the same color touch each other. There is another 3-cycle in the photo above (far right). You can compare the effect of the relative contrast in color values. Mix dark and light values (previous photo) or mix values of low contrast (photo below).

 Thank you for standing up for women's right. Women's rights are human rights.


On the photo below, the one on the right has stripes. The two on the bottom and left use three colors of beads. Switch colors after each row. If you use a cycle of 2 colors, you get stripes, whereas if you use a cycle of 3 colors, then no two beads of the same color touch each other. There is another 3-cycle in the photo above (far right). You can compare the effect of the relative contrast in color values. Mix dark and light values (previous photo) or mix values of low contrast (photo below).

If you would like to make an origami version of the pussy hat, here is a free tutorial by Beth Johnson.
http://bethjohnsonorigami.com/instructions/ The paper hats here were folded and photographed by Ron Taylor. Notice the bottle cap for scale. Ron folded each of these from 3/4 of a sheet of 3.4 inch memo paper.
Wednesday, October 12, 2016
Free Beading Pattern - Sierpinski Triangle
Once upon a time I was going to write a beading book on beaded angle weaves. The first part of the book was going to show how to bead many of the basic angle weaves, and the last part of the book was going to show lots of charts of flat weave designs.
 I abandoned that book idea long ago, although I haven't abandoned the idea of writing a beading book, just that one. Some of the designs that I would have included in the book are now available for free here on my blog, including Hexagon Angle Weave, Circle Earrings, David's Star, and Super Right Angle Weave. Others are in my Etsy shop and website, including Kepler's Star, Night Sky, Honeycomb, Lozenge, Book of Kells, and Solaris.
Before I tossed aside the idea of completing the book, I created three sample pages for the section with the charts. Today, I'm sharing them with you because they're not doing anything particularly interesting sitting inside my computer. I hope you enjoy them.


Have a great day. Thanks for looking.

Before I tossed aside the idea of completing the book, I created three sample pages for the section with the charts. Today, I'm sharing them with you because they're not doing anything particularly interesting sitting inside my computer. I hope you enjoy them.


Wednesday, June 29, 2016
Rainbow DNA Beaded Earrings
With the recent tragedy in Orlando, it seemed like some new rainbow DNA was in order. They are a small symbol to show my support for the victims, their families, and the LGBQT community.
Rainbow DNA

Coded Rainbow DNA
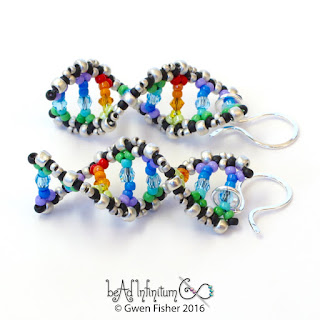 Blue and Silver DNA
 If you would like to learn to make your own beaded DNA earrings, I have a free video tutorial available on my blog. Thanks for looking.
Rainbow DNA
Coded Rainbow DNA
Saturday, February 13, 2016
Free Tutorial - Lentil Lantern Beaded Bead Earrings
Here
is a free beaded bead earring tutorial!
 This little Lentil Lantern is a
design I made with beads I got from Starman Beads. I'm on their Trend Setters team, which means that I trade them designs for free beads. This is my
first designs that they turned into a tutorial.
 It's a pretty fun deal
for me since they did most of the work. Amanda Hundt did the writing,
illustrations, and stitching of the samples. Nichole Starman worked on the writing, and Lisa Jordan did the photography. All I had to do was he fun part... designing with
their fancy two-holed beads, and a little proof reading. I hope you enjoy it!


Saturday, November 21, 2015
Beaded Cube Math Lesson for Kids
Several people have asked me to write a math lesson for kids using beading. The challenge is to make something mathematically interesting with bead weaving that can be completed within a single lesson, under an hour, preferably less.


So I wrote this lesson on beaded cubes (PDF). The lesson begins with some background on what a beaded cube is with lots of drawings and a photo. It uses terms like edge, face, vertex, and graph of a cube. The second section gives step-by-step instructions for how to bead weave a cube with a needle, string, and pony beads. After finishing this lesson, students will have practiced basic sewing skills like measuring thread, threading a needle, and tying square knots. The final section provides several math and spatial reasoning "challenges" to extend learners' thinking about beaded cubes.
This lesson teaches several things, especially spatial reasoning, where the learner has to move back and forth between a 2D representation on paper to the 3D model in their hands. It also teaches the importance of carefully following instructions because every step is laid out, and if you skip one of them, your work won't look like what is on the paper. The challenges encourage students to build different symmetric coloring of a cube, extend the construction to a row of cubes, and think about a minimal thread path.
I taught this lesson at the Julia Robinson Math Festival and another version at MoMath. With just 12 beads, this task is not easy, but it is enticing, approachable, and engaging for children, especially girls, and boys like it too, as do their moms and dads. It seems appropriate for children as young as fourth grade, and most of them generally need a good amount of help, but they can do it with coaching. Fifth and six graders have a bit easier time with it. Interestingly enough, my experience in teaching this lesson to adults and children is that it is not any easier for a typical adult than it is for a typical fifth or sixth grader. In fact, I watched one man get completely lapped by his fifth grade daughter today. GO GIRL MATH POWER!
Here are the materials you need to teach a group of kids:
 Pony beads
Size 18 tapestry needles, one per student
String: Cotton is good. Something thin enough to fit through the eye of the needle, but thick enough to provide some friction.
Magnetic pin cushion: an easy way to collect the needles
Snips or scissors: I tied them to the end of some crazy yarn so they wouldn't disappear.
Beaded samples
Ruler(s)
Cups or bowls to hold beads
Hand outs: I designed the PDF file to be printed once, and then photocopied onto two sides of a sheet of paper, with one sheet per student. Print the PDF file for best quality, not the jpgs.
I encourage you to try this lesson with your own students or children. If you have anything meaningful to contribute to making it better, please do not hesitate to send me an email or leave a comment below. If you want to see what else you can do with beaded cubes, you should search for my blog for CRAW or "cubic right angle weave" because a beaded cube forms the basic unit of one of my favorite bead weaving stitches. Also search Planet Bead to see the many beautiful things that have been beaded with cubes.
If you think this lesson is useful, consider showing your support by perusing my Etsy shop, gwenbeads and buying yourself a little something special. You deserve it.
Thanks for looking. You're awesome. Yes, you!
Edited to add: Emilie Pritchard suggests using long plastic beads, called "spaghetti" beads, to help visualize the edges of the cube. Search the internet to find them for sale.


So I wrote this lesson on beaded cubes (PDF). The lesson begins with some background on what a beaded cube is with lots of drawings and a photo. It uses terms like edge, face, vertex, and graph of a cube. The second section gives step-by-step instructions for how to bead weave a cube with a needle, string, and pony beads. After finishing this lesson, students will have practiced basic sewing skills like measuring thread, threading a needle, and tying square knots. The final section provides several math and spatial reasoning "challenges" to extend learners' thinking about beaded cubes.
This lesson teaches several things, especially spatial reasoning, where the learner has to move back and forth between a 2D representation on paper to the 3D model in their hands. It also teaches the importance of carefully following instructions because every step is laid out, and if you skip one of them, your work won't look like what is on the paper. The challenges encourage students to build different symmetric coloring of a cube, extend the construction to a row of cubes, and think about a minimal thread path.
I taught this lesson at the Julia Robinson Math Festival and another version at MoMath. With just 12 beads, this task is not easy, but it is enticing, approachable, and engaging for children, especially girls, and boys like it too, as do their moms and dads. It seems appropriate for children as young as fourth grade, and most of them generally need a good amount of help, but they can do it with coaching. Fifth and six graders have a bit easier time with it. Interestingly enough, my experience in teaching this lesson to adults and children is that it is not any easier for a typical adult than it is for a typical fifth or sixth grader. In fact, I watched one man get completely lapped by his fifth grade daughter today. GO GIRL MATH POWER!
Here are the materials you need to teach a group of kids:

Size 18 tapestry needles, one per student
String: Cotton is good. Something thin enough to fit through the eye of the needle, but thick enough to provide some friction.
Magnetic pin cushion: an easy way to collect the needles
Snips or scissors: I tied them to the end of some crazy yarn so they wouldn't disappear.
Beaded samples
Ruler(s)
Cups or bowls to hold beads
Hand outs: I designed the PDF file to be printed once, and then photocopied onto two sides of a sheet of paper, with one sheet per student. Print the PDF file for best quality, not the jpgs.
I encourage you to try this lesson with your own students or children. If you have anything meaningful to contribute to making it better, please do not hesitate to send me an email or leave a comment below. If you want to see what else you can do with beaded cubes, you should search for my blog for CRAW or "cubic right angle weave" because a beaded cube forms the basic unit of one of my favorite bead weaving stitches. Also search Planet Bead to see the many beautiful things that have been beaded with cubes.
If you think this lesson is useful, consider showing your support by perusing my Etsy shop, gwenbeads and buying yourself a little something special. You deserve it.
Thanks for looking. You're awesome. Yes, you!
Edited to add: Emilie Pritchard suggests using long plastic beads, called "spaghetti" beads, to help visualize the edges of the cube. Search the internet to find them for sale.
Saturday, January 24, 2015
Free Tutorial -- A beading math lesson with David's Star for children and adults
Maybe you read my paper on using tiling theory to generate angle weaves with beads (PDF). Then again, maybe you didn't. One of the most elegantly simple weaves that I presented in that paper is what I called, "David's Star." You can read about it on pages 12 and 13, and even if you don't want to read anything, you can look at the three bracelets on page 13 that use the same technique as I show here.
 I derived David's Star using mathematics, in particular the mathematics of tilings or tessellations. Using a tiling to describe this weave, David's Star is the edge-and-cover angle weave for (6.6.6). Let me explain that mouthful. First we start with the regular tiling by hexagons, like what we commonly see in natural honeycombs. This tiling is the black lines labeled (6^3) below. The standard notation for this tiling is (6.6.6), or (6^3) for
short. The 6 is because the tiles all have 6 sides (i.e., they're
hexagons), and the 3 is for the 3 hexagons that meet at each vertex.
 The dark blue edge beads are the beads that you place on all of the edges of the tiling, the black line segments. The cover beads are the beads that cover the thread between the edge beads when you sew each hexgon of beads in a loop of thread. All of the non-dark-blue beads in the picture are cover beads. So, David's Star is the edge-and-cover angle weave for (6.6.6).
I like this bead weave for several reasons. First, it is very simple to stitch and works up relatively quickly. Therefore, I think it's a good pattern for beginners who want to make a wide flat bracelet. Second, the arrangement of beads allows for lots of different and beautiful ways to color the beads. Finally, the beads fit together really well: David's Star doesn't show thread or bead holes. Oh, and one more thing, you can weave it in any direction.
I drew this picture today in preparation for an invited plenary talk and workshop I'll be giving in Washington State in April at a math conference. For a moment, I considered writing up a complete tutorial and putting it in my Etsy shop. Then I reconsidered. For something this simple and basic to the art and math of beadweaving, I think this information should be generally available for free to those who are interested. So here it is. Also, a lot of people over the years have suggested that we should use beading more to teach mathematics, and I think that this particular weave is a nice choice for a math lesson. I made the beadwork in the photos here with pony beads and fishing line, and without a needle. Beading the patch above is a good lesson in visualization. Using pony beads and fishing line or stretchy thread makes it suitable for children and adults alike. Thin yarn with a size 10 tapestry needle is also a good choice. The friction on the yarn helps hold the beads together.
After trying this pattern, you can ask lots of extension questions in both math and art. For example, ask, "What does an edge only weave of (6.6.6) look like?" (Answer: Hexagon angle weave.) Or you could ask, "Draw the tilings (4^4) and (3^6)." "Can you draw the edge-and-cover weaves for these tilings?" and, "Can you bead weave them?" The answers to these questions are explored in the paper I linked to above.
If you want to play with the art, draw a picture of an interesting coloring for David's Star and then weave it. If you want a real challenge, (1) pick your own tiling, (2) draw an edge-and-cover weave for it, and then (3) bead it.
If you made it this far, please remember, I make most of my living selling my tutorials and other artwork. So if you liked this little free-bee, and try it yourself or with a kid, maybe you'll be so pleased that you'll want to hop over to my website or Etsy shop and show your appreciation by buying something. It's like a buy-one-get-one-free, but in the opposite order. If you've already purchased something, then consider this a thank you gift for supporting my work as an artist and teacher. Without you, I couldn't afford the time to write this blog every week, and I'd have to get a normal job. In any case, I hope you enjoyed this little mathematical beading lesson. Thanks for looking.
Saturday, November 29, 2014
Related Bead Stitches - Peyote Chenille Netting Herringbone Pondo SRAW
Here is a comparison of a few related bead weaving stitches, including peyote, chenille, netting, filled netting and herringbone. I needed to see them all together to get exactly how they are different and how they are similar, too. So I drew this picture.
 Netting and chenille stitches look very similar when they are beaded. Chenille is a tighter weave than netting. Chenille doesn't stretch the way netting can.
After making the above drawing, I realized I left a couple of related stitches out, including SRAW and Pondo stitch.
 All four of these here are
woven differently but look nearly identical when beaded.
All four have the same beads in the same relative placements, but the
ways the beads are connected with the thread is different. Another
difference is that in Netting and Chenille, all of the blue bead holes
are parallel to each other. In SRAW and Pondo, some of blue bead holes
are horizontal and some are vertical. They alternate row by row. Netting
is the fastest and stretchiest of the four. My personal favorite is
SRAW because it's strong, and I can weave it in any direction. It's also
pretty fast because you pick up 5 beads at a time on most stitches.
Happy Holidays! Thanks for looking!
After making the above drawing, I realized I left a couple of related stitches out, including SRAW and Pondo stitch.
Happy Holidays! Thanks for looking!
Saturday, May 17, 2014
Beaded DNA Earrings in Greens
Last night I made a long pair of green DNA Earrings, and today I listed them in the Earrings Section of my Etsy shop.
 With 12 sets of base pairs, these earrings are a bit longer than I typically make. The length of earrings from top of ear wire is 72 mm (almost 2 3/4 inches).
 The coloring of the base pairs comes from the enzyme PpiI which is found
in the microorganism Pseudomonas putida. Pseudomonas putida is a safe
strain of soil bacterium, and is the first patented organism in the
world. Because it is a living organism the patent was disputed and
brought before the United States Supreme Court in the historic court
case Diamond v. Chakrabarty which the inventor, Ananda M. Chakrabarty,
won. It demonstrates the ability to biodegrade organic solvents such as
oil. The specific base pair sequence shown in each earrings is
GAACN5CTC
CTTGN5GAG
I like the way the spirals look from different angles.
 The helices are stiff, but flexible. They bend from side to side, but they don't untwist.
 If you would like to learn to make your own beaded DNA earrings, try my free video tutorial on how to make DNA earrings with beads. Thanks for looking!
GAACN5CTC
CTTGN5GAG
I like the way the spirals look from different angles.
Wednesday, April 23, 2014
Notation for Cubic Right Angle Weave CRAW
I really love designing with cubic right angle weave (CRAW), but I really hate trying to write tutorials for it. CRAW has a couple problems that make it hard to document on paper. First, the C in CRAW stands for "cubic," meaning it's made of cubes. Cubes are three dimensional, and the beads in CRAW go in three different (mutually perpendicular) directions. That's not so easy to draw. Second, there are lots of correct ways to bead weave a cube, and I don't like having to pick the one and only way for my students to do it because I certainly don't do it the same way every time, myself.
So I developed what I think might be a new way of writing tutorials for CRAW that is much faster and easier to write and read, that is, assuming you already know how to weave CRAW. And I'd love to hear your feedback. If you don't know CRAW and want to learn, here's a great CRAW video by Heather Collins. Here's a Doceri video on CRAW that I did. And here's information on a step-by-step tutorial for the CRAW Borromean Link that I wrote.
The first page here shows a piece of finished beadwork with a list of materials to make the CRAW Tower in two sizes, and some charts that explain the structure of the beadwork. My hope is that if you're an experienced bead weaver, all of the information you need to make this CRAW Tower is on these two pages.
 The second page gives some tips on how to read the charts.
 So, what do you think? If you already know how to do CRAW, could you make the CRAW Tower from just these two pages? If so, stay tuned because I plan to release some new tutorials using this new method of diagramming CRAW.
Update 9/27/2014: I've written some tutorials with this notation, including the following. This is the Highly Unlikely Triangle, written for advanced beginning beaders. This tutorial is designed to help you learn how to read the charts as well as to do the project. So, if you don't know how to read the charts and want to learn, I recommend the tutorial for the Highly Unlikely Triangle.

The Sweetheart Pendant is for experienced bead weavers. This tutorial is only 6 pages, quite short by my standards. If you don't know how to weave CRAW without looking at instructions, please do not purchase this tutorial. You will be disappointed. If you love CRAW and want a new challenge, try it.
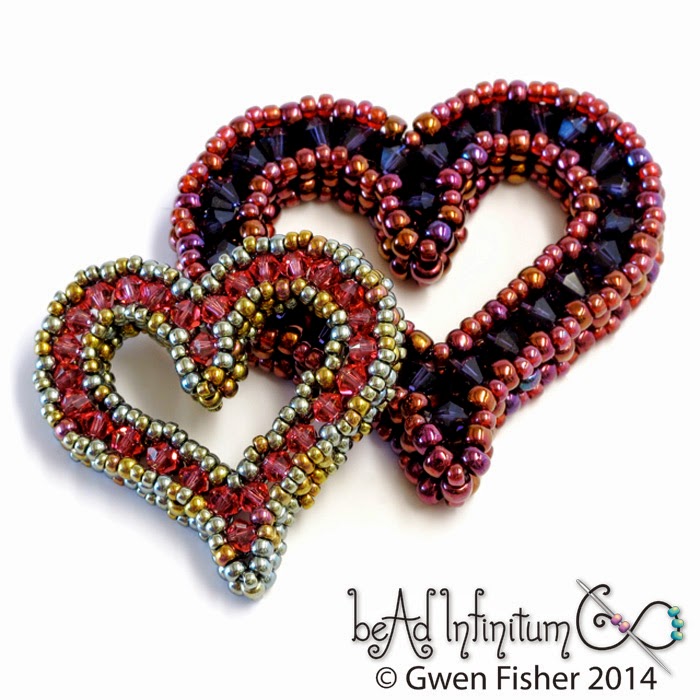
This is the Conway Bead, and advanced design with tetrahedrons and prism. Like the Sweetheart Pendant, if you don't know how to weave CRAW without looking at instructions, please do not purchase this tutorial. You will be disappointed. If you love CRAW and want a new challenge, try it.

And the tutorial for the Coxeter Bead is also designed for experienced beaders. Same story as above. If you're new to beading, don't start here.
 Thanks for looking.
So I developed what I think might be a new way of writing tutorials for CRAW that is much faster and easier to write and read, that is, assuming you already know how to weave CRAW. And I'd love to hear your feedback. If you don't know CRAW and want to learn, here's a great CRAW video by Heather Collins. Here's a Doceri video on CRAW that I did. And here's information on a step-by-step tutorial for the CRAW Borromean Link that I wrote.
The first page here shows a piece of finished beadwork with a list of materials to make the CRAW Tower in two sizes, and some charts that explain the structure of the beadwork. My hope is that if you're an experienced bead weaver, all of the information you need to make this CRAW Tower is on these two pages.
Update 9/27/2014: I've written some tutorials with this notation, including the following. This is the Highly Unlikely Triangle, written for advanced beginning beaders. This tutorial is designed to help you learn how to read the charts as well as to do the project. So, if you don't know how to read the charts and want to learn, I recommend the tutorial for the Highly Unlikely Triangle.
The Sweetheart Pendant is for experienced bead weavers. This tutorial is only 6 pages, quite short by my standards. If you don't know how to weave CRAW without looking at instructions, please do not purchase this tutorial. You will be disappointed. If you love CRAW and want a new challenge, try it.
This is the Conway Bead, and advanced design with tetrahedrons and prism. Like the Sweetheart Pendant, if you don't know how to weave CRAW without looking at instructions, please do not purchase this tutorial. You will be disappointed. If you love CRAW and want a new challenge, try it.
And the tutorial for the Coxeter Bead is also designed for experienced beaders. Same story as above. If you're new to beading, don't start here.
Saturday, March 29, 2014
beAd Infinitum Now Has Instant PDF Downloads!
Florence Turnour
and I have been working on redesigning our beAd Infinitum website for the last month,
giving it a new look, updating photos of our bead work, making it easier to navigate, and most significantly,
offering instant PDF downloads. Have a look!
 This is the fourth time we have seriously remodeled our website since we started in 2005. The task of redoing a website like this is quite large. So, to keep our sanity, we are updating our pattern library in stages. We still have yet to re-list many of our patterns and kits, but we plan to get them all listed and available for purchase as soon as we can. Thank you for your patience.
Wednesday, December 11, 2013
Free Tutorial - Holly Leaf & Berry Earrings
Here's a free tutorial for Holly Leaf & Berry Earrings (PDF). It's my way of wishing you a very happy holidays.
 Enjoy!

Monday, December 9, 2013
Holly Leaf Earrings
Late
last night, after a couple of tries, I worked out a design for a tiny
seed beaded holly leaf. Today, I got the illustrations drawn, and next,
I'm working on a pair of earrings with red crystals for the berries. The
design is quick and easy. So, look out for a free tutorial on holly
earrings from me later this week. It's going to be my little Christmas
gift to all of you bead weavers out there so you'll have something
seasonally appropriate to wear to all of those holiday parties that I hope you'll attend.
Here's the first earring. It took a couple of tries to get the berries as I wanted them, but now I'm happy with it. Thanks for looking!
Update: the tutorial is now available here: http://gwenbeads.blogspot.com/2013/12/free-tutorial-holly-leaf-berry-earrings.html

Here's the first earring. It took a couple of tries to get the berries as I wanted them, but now I'm happy with it. Thanks for looking!
Update: the tutorial is now available here: http://gwenbeads.blogspot.com/2013/12/free-tutorial-holly-leaf-berry-earrings.html

Saturday, January 5, 2013
28 Rungs of Beaded DNA


Do you want to learn how to make your own beaded DNA? Well, you're in luck!
Learn to weave beaded DNA with my free video pattern here.
Tuesday, December 11, 2012
Beaded DNA with Clear Beads
I was asked this week to make a custom order of beaded DNA using transparent beads. Usually I don't use light colored transparent beads, especially not so many of them, but that's what they wanted, so that's what I gave them. I got two photos before I packed it up and shipped it out.
Since it's so light, I photographed it on a dark background.
 In the next photo, I used a new light I got for taking photos. Which photo do you like better? I can't decide, so I'm giving you both.
 Have you made some DNA lately? Well, you should. You can learn how to make beaded DNA just like this with this free video tutorial: http://gwenbeads.blogspot.com/2011/04/how-to-bead-weave-dna-double-helix.html
Since it's so light, I photographed it on a dark background.


Tuesday, October 16, 2012
Rainbow Twist No. 6

Last week, I shared instructions for how to make a Rainbow Twist beaded bead. I made them free, so if you haven't checked them out yet, you should go watch the video. I'm still making them, and I love that each one is a little different from the others.

Tuesday, October 9, 2012
Rainbow Twist Monarch Butterfly
A couple posts ago, I shared instructions for how to make a Rainbow Twist beaded bead. I made them free, so if you haven't checked them out yet, you should go watch the video.
 Like the beaded bead in my last post, this version here has 20 repeats instead of the 16 I describe in the Doceri video. It does not include the optional shared J bead. Leaving out the optional step makes it more flexible.

This piece is SOLD! Cheers!


This piece is SOLD! Cheers!
Monday, October 8, 2012
Rainbow Twist Beaded Bead with 20 Repeats
In my last post, I shared instructions for how to make a Rainbow Twist beaded bead. I made them free, so if you haven't checked them out yet, you should go watch the video.
 This version here has 20 repeats instead of the 16 I describe in the Doceri video, including the optional shared J bead described at the end.
 If you'd rather just purchase this piece than try to make one yourself, you can buy this beaded bead in my Etsy shop. Cheers!


Saturday, October 6, 2012
How to Make a Rainbow Twist Beaded Bead
I just recorded a new Doceri video on how to make a Rainbow Twist beaded bead, but I'm offering you more than just a video.
 Here is the Rainbow Twist as a PDF file. Below the video, I give you the script I used in the video, along with a Doceri drawing of each complete slide in my presentation. Doceri software allows me to be multimedia in all of these different ways, so I'm doing it. I have to admit that the teacher in me is pleased with so many delivery options.
And now for the lesson...
The Rainbow Twist: A beaded bead made with peyote stitch, by me, Gwen Fisher of
beAd Infinitum. This lesson is
made with Doceri software, which is the premier software suite for hand drawn
communication of all forms, designed specifically for teachers.
Here you can see three views of the rainbow twist. Although it might look huge on your
computer screen, its biggest length is just one inch, or 24 millimeters, so
about the size of a quarter dollar.
It makes a cute little pendant, and if you’re so inclined to make a
matching pair, it’s even small enough for an earring.
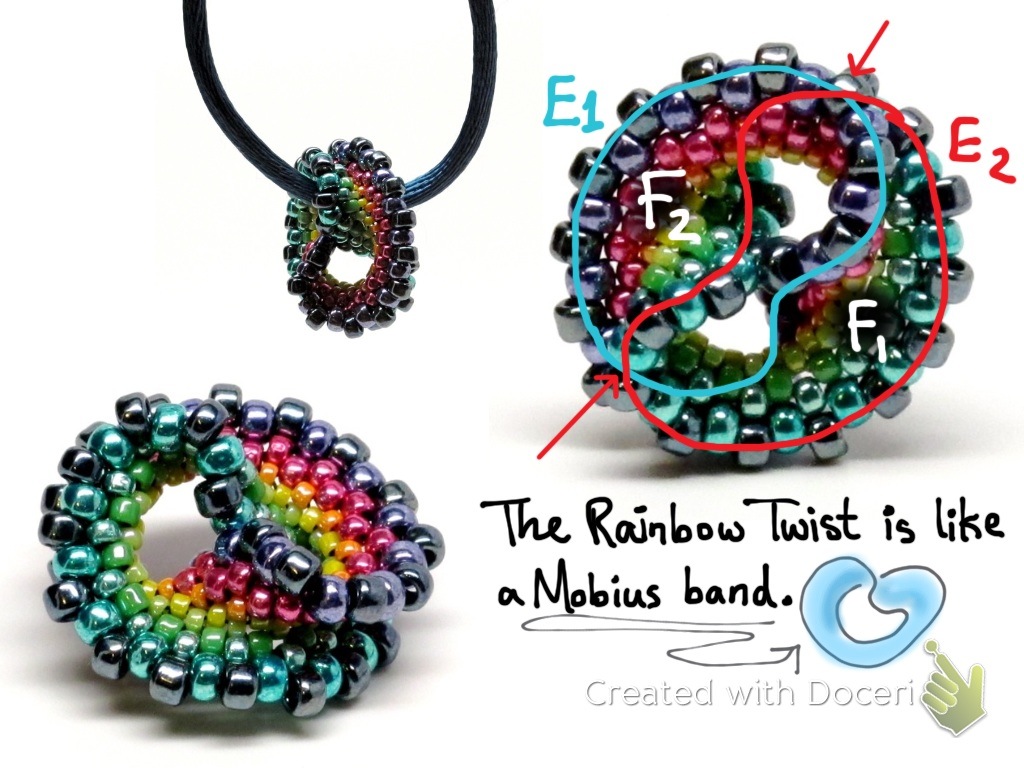
The Rainbow Twist might look like a Mobius band, but
actually, it’s a little different.
Like a Mobius band, it’s a strip with a twist, but this one has a full
twist and a Mobius band has only a half twist. You can tell by looking at the edges. When we trace out the edges, we can see
that there are two of them, and they cross each other twice. This shows that the rainbow twist has 2 edges and 2 faces. In contrast, a Mobius band only has one
edge and one face.
These are two more Rainbow Twists I made.

The one on the left has 10 different beads in it, and the one on the right uses just 6 different beads. You can make one with as few as 3
different beads, but in any case, you need seed beads in sizes 15, 11, and 8 to
make a Rainbow Twist.
In particular, the materials you need include 4 feet of
beading thread.

You’ll need size 15 seed beads in three colors. These itty bitty beads lie right in the
middle of the strip. There are size 11 seed beads in 4 colors, but I cheated and
just used three here because I didn’t have the right purple, so I used the pink
twice, and size 8 seed beads in 3 colors. These are the big ones on both edges. You also need a beading needle, or maybe two because we will
be working from both ends of the thread, but you can get by with one if you’d rather
thread your needle a couple extra times than get out of your chair. As my dad used to say, only you know
what’s best for you.
To start beading, pick up 32 size 15 seed beads, ABABABAB
and so on, until you have 16 pairs.
Pass through the first bead to make a loop, and then center the
beads on your thread.

In Step 2, you need to step up to the next round, and what I
mean by THIS is you just pass your needle through the next B bead, which gets
you ready to start the next row of peyote stitch. Normally the “step up” means that you sew through the first
bead in the last round you added, like the C bead, but this first time, things
sit better if you step up to the other side. It’s a tension thing. Just go through the B bead. Trust me.
For Step 3: Use peyote stitch to add size 11/0 seed beads in
color D between the size 15 seed beads in color B. Be sure to stop right before the last stitch. Notice how the
beadwork in this photo is lying in a flat circle, hence the name “circular
peyote stitch”. This is also
called tubular peyote stitch.
Tubular, the Californian in me is pleased.

Now we need to add a twist. Here you can see a half twist. Notice that when I trace the edges, they cross each other
once. That’s how I know it’s a
half twist. If I joined the ends
this way, I’d have a mobius band.
But what I really want is a full twist, like in this second
photo. I can see it’s a full twist
because when I trace the edges, they cross each other two times. Also, the green beads match up with the
greens, and the oranges match up with the oranges.

So in Step 4, you twist the beaded ribbon 1 full twist, and you’ll
probably need to pass your needle through the hole in the center. Or maybe the tail end, depending upon
how you twist it. Now you can add the last D bead between the B beads, and
then step up by passing through a D bead.
This is a normal step up.
For step 5, thread the tail end of your thread onto a second
needle. If you have a second
needle for this, you won’t have to thread any more needles.

Then step up through a size 15 seed bead in color C. Then peyote stitch by adding size 11
seed beads in color E between the size 15 seed beads in color C. Be sure to step up by passing through a size 11 E at the end
of the round.
Before doing Step 6, let’s look at what we have so far. We did rounds A and B together. Then added C to A, Then, D to B where we did the twist,
and then we added E to C.

Staying on the E side, now add F to E, which you can see here on the beadwork. More specifically, peyote stitch by adding size 11 seed
beads in color F between the size 11 seed beads in color E. Be sure to step up by passing through a
size 11 F at the end of the round. Continue using peyote stitch to add more rows to the edges
of the beads. Add G to D; H to G; I to F;
and J to both I and H.
Here are labels for the bead sizes. So, if you really understand how this
whole thing works, this chart is all you need to make rainbow twists.
There’s one optional step at the end, which is to make
exactly one J bead shared by both edges.
I’m not sure exactly how I found the middle to make it symmetric, so I
can’t explain it to you. You’ll
just have to figure out that step for yourself, or leave it out entirely. You might not even want it there
anyway.
Step 7 is tightening the last row on each edge and then
tying off. That’s it, you’re done.
One last note on twist: On the left two pieces, you can see the twist has the same
handedness. Yarn spinners call
this S twist.

Subscribe to:
Posts (Atom)
