Thursday, March 31, 2011

Making a Sweater Coat Part 4 Cutting Fabric Patches


CUTTING THE FABRIC
Yeah! I found another cashmere sweater in the pile, the lime green one!  I’m saving the dark bright blue cashmere sweater for the hood and lining.  If there’s any left over, I’ll use it for the back neck facing and the top of the front facing so it will be soft and cozy around the neck and face.

I’m cutting all of the front and back (not sleeves nor hood) pieces first, altogether because these are the largest pieces.  The sleeve and hood pieces are smaller and will be easier to cut from the scraps. 

I numbered my colors from 1 (lightest) to 8 (darkest, black).  I have two sweaters for color 4 and two for color 5, and I added the lime green sweater to the light end, which makes it color 0.  The lime green extends my color palette and gives me a little more fabric because I think I’ll need it.  That’s 12 sweaters for one coat.  Certainly, if I hadn’t shrunk them all in the wash, I would have used significantly fewer sweaters, but I like the feeling of the felted wool, and now I don’t have to worry about washing the finished coat.  It’s already pre-shrunk.

I mentally sorted my sweaters by color number, and I sorted my pattern pieces onto their numbered sweater.  This way, I could see if I had too many pattern pieces on any of the sweaters, which I certainly did.   
I moved the pieces around, looking at my sketch to check the sequences of colors, like A1, A2, A3, and A4, to make sure they progression of colors was in sequence.  I tried to keep the sequences in all gray or all blue, but sometimes they switch mid-sequence from one to the other, but not back again. That should give the columns of diamonds some unity.
I pin all of the pattern piece to each sweater before cutting. I find that I can safely cut the sleeves off of the sweaters, right along the seam, because I’d never want a patch to go over one of those seams.  The fabric is decidedly not flat at the sleeve seam, so it’s safe to cut there.  I also cut up the lateral sleeve seam to make the sleeve lie flat.  Then I pin the pattern piece to the sleeve.  When cutting my patches, I avoid the seams in the sweaters, ribbing, collars, and hems.  This way, each patch will be uniform in thickness and stretch.
Cool!  I found a little pocket on the aqua sweater.  It will go on the lower front hip.   I have to settle for some pieces being off grain, but so far, only 1 in 20, so that’s not too bad. 

SO MANY PILES
As I cut the pieces, I put them into their lettered piles A, B, C, D, K, L, M, and N.   
I put the large scraps in one big pile.  I’ll use these to cut the patches for the sleeves, hood, and front facing.  I put the small scraps in another pile.  I’ll use these to test the settings on my serger sewing machine.  They’re practice scraps (I might make a pillow case out of them later; there are enough of them!).   
The itty bitty scraps get thrown away, so far, three handfuls.  Next time, I'll design and cut the hood and sleeves and add my taylors tacks...  

Tuesday, March 29, 2011

Making a Sweater Coat Part 3 Desiging the Patchwork Pattern


DESIGNING THE PATCHWORK SEAMS: 
So my basic coat pattern has 17 pieces, but I will end up cutting it up to have more than a hundred.  I drew several different designs for coat patterns in my sketch book.   
The only one I really like is a harlequin-style coat with large diamonds, like a checkerboard on point.  This is a very impractical design for several reasons:  It’s virtually impossible to alter and every piece is a different size and shape. For these reasons, I really don’t want to use this as my design, but since I haven’t come up with anything I like as much, I’m going for it anyways.  Oh boy.  There’s no turning back now.
 The one good thing about using diamonds is that almost all of my short seams are straight, but the long seams change slope from patch to patch, and they’ll look curved as they fall around the body.  Also, I will have large, medium and small pieces so I can cut my fabric accordingly. 

To make my pattern, I draw lines on my large pattern pieces, from which I can make my smaller pattern pieces.  It takes me a couple of tries to copy my diamonds correctly from my sketch onto the pattern pieces, and I realized what a pain the back slit will be, with so many pieces.  So I’m omitting the back slit.  Too bad because I kind of liked it, but so long, good bye to the slit.  


After I draw my diamonds, I have to move some of the points of intersection to get more graceful lines.  (The pencils are showing how I moved one point.) At some point in this process, I decide to keep the side seams for sure.  It will make the final construction easier.  Plus, the side diamonds are bigger on the pattern than they are in my sketch, and I can’t have any really big patches or they won’t fit on my shrunken sweaters.  So keeping the side seams will turn those large diamonds into two triangles each.

I find that I have to label the diamonds to organize my thinking.  I’ll need to do that at some point, and now’s the first time I need the labels.  The front is has columns of diamonds I label ABCD, the back is KLMN and the sleeves are VWXYZ.  Each column has between 4 and 6 pieces.
 Here is the column of L pieces.
Here I am cutting out the K pieces which go down the center back. Notice I removed the center back seam.
Here are the K pieces all laid out on what used to be the back seam.
 In a few ways, I see that my sketch is not perfectly to scale with my pattern.  The side pieces are larger than I sketched.  I hope the lines will still be graceful.  I decide that I want to use one cashmere sweater for the six pieces that go across the shoulders (front, back and sleeve cap). I cut the gray cashmere sweater on a few seams to compare with my shoulder pattern pieces.  The patches on the shoulders are also much larger than I expected.
So I add more seam lines to the shoulders. I continue to make adjustments by moving the points of intersection around a lot, until I get a little frustrated, and I decide to stop with what I have. 

I add diamonds to the sleeves, merging triangles on one of the seams so there will only be one major sleeve seam. Again, this seam will make things easier later.  I put more diamonds on the sleeves than I expected because I want the pieces to be pretty small there so I can use the scraps after cutting the pieces for the front and back of the coat.  I ended up with nearly 60 pattern pieces, which will result in 125 patches of fabric.  Eek.  Too many… oh well…  I haven’t worked out the details on the hood yet because I’m anxious to cut and sew fabric.  I’ll leave the hood until later; so those numbers are approximate.  It will likely only go up.

This photo shows how I mark the points of intersection for patch M2, which goes across a princess seam on the back. Four corners define the boundary of M2.
Here I am using my ruler and rotary cutter to cut a 5/8 inch seam allowance.  The pencils are pointing at the dots where the corners are.
I think I want the seaming to mostly be on the outside with black thread so the seams become a design element.  I will still do the main seams (down the sides, shoulder seams, etc.) with the seams on the inside.  I have a patchwork coat that does the seaming this way, and I like it.

On columns C and M, where the princess seams were, I removed these seams by combining two triangles into a diamond everywhere except over the bust (piece C4), since there is too much curvature there.  So C4 is two pieces but I’ll sew it with the seams on the inside so as not to draw attention to it.

THE SWEATERS
I visited two local Goodwill stores in my area and bought up most of the pure wool or cashmere sweaters they had in stock, men’s and women’s.  Everything I bought was plain (except the blue cashmere one with cables).  I got 19 sweaters, 3 of which are cashmere.  I hope it will be enough for two coats, but I’m sure it will be enough for one.  I got lots of blues and grays, and a few greens, plus one in every color of the rainbow.  I’m going to save the rainbow set and use just the blues and grays, adding a green or two if I need them.
I washed and dried and washed and dried the first batch and they shrank a lot, even through the second washing.  The only ones that sort of fit me are the XXL.  Many of them now look child sized, however, the seams don’t shrink proportionally so they would be ill fitting and uncomfortable for sure.  I noticed that the cashmeres didn’t felt as much as the wools, but they retained their delectable softness.  Yeah!  This is some of the most delectable set of fabrics I’ve ever played with.  They are thick and are wonderfully springy.  I’m a little nervous about sewing with them, but sergers are made for sewing stretchy fabric, so I’m trying not to worry about it.

In Part 4, I start cutting my recycled sweaters...

Monday, March 28, 2011

Making a Sweater Coat Part 2 Muslin Sample and Alterations


MAKING A COTTON SAMPLE
I'm going to check the pattern by making a sample from inexpensive cotton fabric.  Unbleached cotton muslin is the classic type of fabric people use for this purpose, but since I have drawers full of left over scraps of cotton quilting fabric, I use those instead of the unbleached stuff.  It’s essentially the same material and weave, so it’s a fine and dandy substitute with a lot more color.   I picked some of my medium sized pieces, and with loud prints and overly bright colors and declare that today is they day they will be liberated and make themselves useful.  I didn't pay any attention to the colors of the fabrics I used, so I know already that the color combination of the finished muslin is going to be pretty awful.  I'm okay with that as I'll just have too consider form and fit.   I smooth out the doubled fabric, pin the pattern pieces to it and cut out all of my pieces.  I copy marks onto the cotton with a colored pencil. Below is a photo of the front and front side pieces.
For a few of the final pieces, I have to patch some fabric together to get pieces that are large enough to use, like I did here for the back panel.
When all of my pieces were cut, I skimmed through the pattern to find all of the places where two freshly cut pieces are sewn together, and I start with those.  When sewing the muslin together, you can skip a lot of the details of the pattern including stay stitching, interfacing, pockets, and lining. 

In the first round of pinning, sewing and pressing, I completed 11 seams. These seams are two front to side front, two center back seams on coat and hood, two sleeve uppers to sleeve lowers, back neck facing to front facing left, two sleeve cuffs, and two sleeve facings.  I pin all 11 seams together, then I sew 11 seams, then I press them all.  By pinning as many pieces as possible in the first step, you get somewhere between a third and a half of all of the seams completed in the first round.  It is very satisfying to finish this first round and know you’re close to a third done, not counting hemming, of course.  This is the complete back.  The center slit is kind of cool, but I probably won't use it in the final coat since it will be a lot harder to execute neatly with patchworked sweaters.
 Here are the cuffs pinned to the bottom of the sleeves.
Here are the sleeve facing pinned to the bottom of the sleeves.  On the right is the front facing and back neck facing (in blue).
Here are the cuffs finished.  The left one is sewn but inside out.  The right one is finished, except the facing is not hemmed to the inside of the cuff, but I don't need to do that part on the sample.
In my second round of seams, I don’t get anywhere close to 11, but I pin, sew and press until the I have the main body of the coat in one piece, two sleeves, and a hood.  Then, I sew the sleeves and hood to the main body.  It turns out I didn’t need the front facing and back neck facing to hold the coat together for a fitting.  Some of my other coat patterns require the facing to get the coat to hang properly, but apparently, this one doesn’t. 

Here is what my unaltered sample looks like. 

Oh yes, the colors are nice, no? Hehe.

FITTING
The coat is a little too big and the armholes are way too low. Since I’ll be using sweaters with a bit of stretch, I want the coat to be more fitted than what I might make with other material, like faux fur.  I take in all three of the back seams so it fits better around the torso. 
To raise the armhole, I have to add extra fabric under the armpit.  What’s so annoying about this is I have to alter 4 pieces: side front, side back and both the upper and under sleeve.  I redraft the sleeve entirely, removing about 4 inches from the width, only to find it’s too much, so I have to add more fabric back in again.  
 I don’t test out my third sleeve with the muslin.  I’m just going to assume it’s close enough and move on.  At this point, I also decide that the cuffs and sleeve facings are more complicated than what I want for my patchwork coat, so I ditch them and add a 2 inch hem to the bottom of the sleeve pattern.

Below you can see my altered sample. The right sleeve is altered (in the left side of the first photo).  Notice the right sleeve is narrower and the armpit is raised by a good inch.


TRANSFER ALTERATIONS
The next step is to transfer all of my alterations to my paper pattern pieces.  Before doing this, I mark the seam lines on all of the alter pieces of fabric with a pencil so I can see them when I take apart the muslin sample.  Then I take it apart, (but I really only need to take apart half of it).  Some of the pieces I press, but others I just copy the alterations to the paper pattern pieces if I can alter them with folds, but most of them I redraft the entire pattern piece.  To redraft the piece, I trace the old pattern piece.  Copy the piece name and markings.  Then lay the flat muslin piece over the tracing and mark new sewing lines.  Be sure to add 5/8 inches seam allowance.  Cut out pattern piece.  Repeat with all of the pattern pieces that need to be altered, which is most of them.

Okay, so now I have a coat pattern that fits, and I’m ready to go… almost.  I still need to design the coat.  You see, I can’t just go and use my pattern with my recycled sweaters because my pattern pieces are MUCH larger than my sweater fabric pieces.  Therefore, I MUST find a way to make a patchwork design for all of my pattern pieces.  So, until next time… happy sewing.

See Part 3 in which I design the patchwork and make my pattern pieces

Sunday, March 27, 2011

DNA Double Helix Bead Weaving Earrings

I've been wanting to bead a double helix for years, and it's taken me that long to figure out how to do it.  My idea was to make it look like the classic visual representation we see of DNA, with bars running down the center, like a twisted ladder.  I also wanted there to be enough beads so that I could color the base pairs using different colors of beads.
I experimented with using bugle beads for the ladder rungs, and seed beads for the molecules. 
Once I succeeded in beading a double helix, I fiddled with the sizes of the beads to give the design visual texture.  I also made a couple samples trying to better simplify the weave.  In all, I made eight different test samples to perfect my design.  I found that turning corners is the hardest part of the design.  Good tension is also really important or the helix wont stay firmly twisted.  Certainly, DNA is a lot more complicated that what I've done, but still I'm happy with the result. As you can see in the photo below, the beadwork is still flexible.
After figuring the technical aspects of the weave, I set out to find interesting ways to color the base pairs.  Thankfully, Cindy Holsclaw of Bead Origami came to my rescue, and pointed me to some useful tables on Wikipedia.  So, in the process of beading, I'm learning all kinds of stuff about ensymes and the organisms that produce them. Yeah Chemistry!


The coloring of the base pairs in the earrings just above and below comes from the enzyme PpiI, which is found in the microorganism Pseudomonas putida, which is a safe strain of soil bacterium, and is the first patented organism in the world.
Check out the earrings section of my Etsy shop for more photos and information about purchasing these pieces.

Saturday, March 26, 2011

Making a Sweater Coat Part 1 Inspriation and Vogue 1266 Pattern

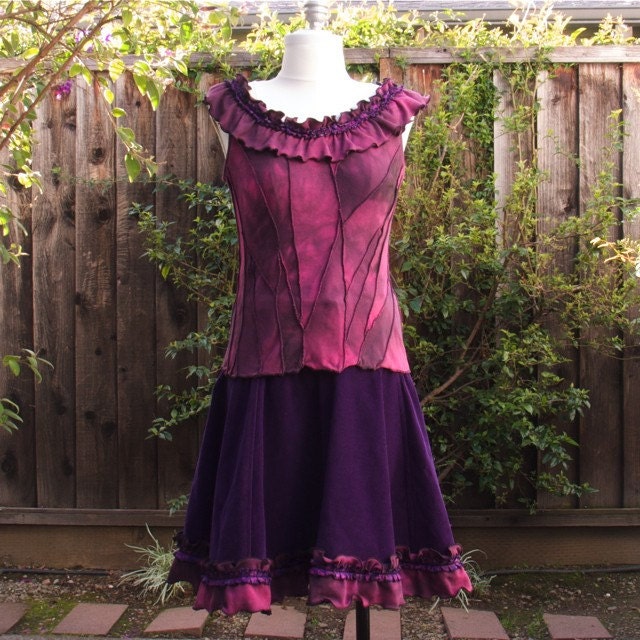
Some inspiration and my new sewing project...

I’ve seen so many beautiful reconstructed sweater coats on Etsy lately.  I think the most notable designer is Katwise She pitches her work as “Original Elf Coats made from Recycled Sweaters” and I think that her work is amazing.  A few other designers whose work I’ve admired are Green Oak Creations, Amber Studios and Enlightened Platypus.

With so much inspiration, I decided that I love the idea and wanted to make an up-cycled sweater coat of my own.   Rather than copy the designs of the artists who inspired me, I am designing my own pattern.  However, the materials will be the same, lots and lots of old sweaters.  I'll tell you about the sweaters later.  Since I started this blog to encourage myself to write about what I learn from creating art, and I’ve never made anything from old sweaters before, I decided to blog my way through this project, and away we go...

THE PATTERN
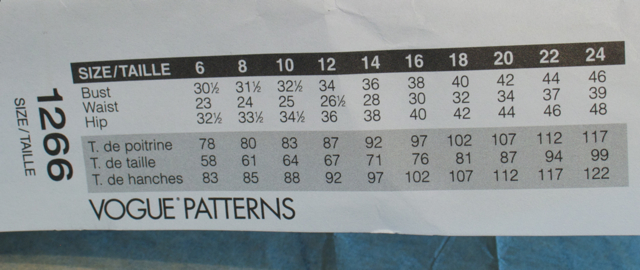
To start, I needed a coat pattern that fits my body.  So, I figured where better to start than with a purchased coat pattern.  Yes, I’m using a pattern, but I will to alter it significantly before I cut any sweaters.  I just need something to start because it’s easier for me to alter a pattern than to draft my own.  I’m not there yet, but I hope someday…  Anyways, I chose Vogue 1266 (12, 14, 16) because I already had a copy of size (6, 8, 10) but I purchased this pattern before I figured out that my dress size in the store is not the same as my dress size in paper patterns.   

I’ve been flirting with this coat pattern for over a year, so I bought a second copy, in the medium size.  I’m a medium size.  I know this because I measured my bust, waist, and hip measurements, and figured out my size by looking at the chart on the flap.  It also comes in size (18, 20, 22, 24), and so that’s the large.
I chose this pattern because it has princess seams, which make for a nice fitted bodice.  That also makes it different from most of what I’ve seen on Etsy.  Amber Studios has made at least a few coats with princess seams, like this one, which is awesome, but I’ll be sure to try to make mine different. 

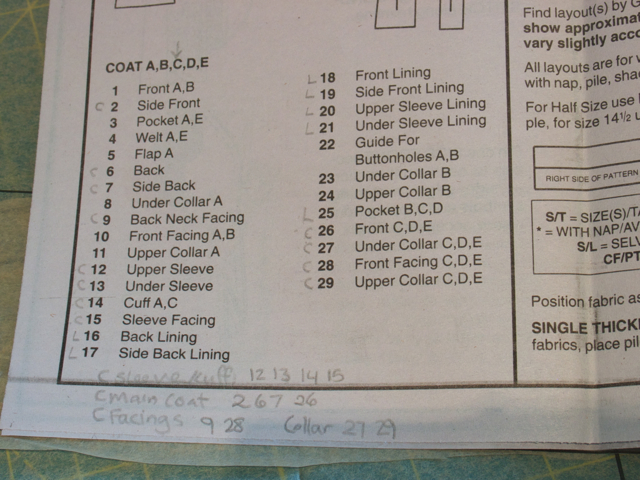
I pulled out the pattern instructions, found the list of pieces by name and number, and identified which pieces I needed.  I’m making version C.  So I marked all C pieces and facings with “C”.  I marked all C lining pieces with “L”.  At this point, I don’t know if I’m going to line my sweater coat (probably not), and there is plenty of time to think about the lining later since you add that at the end, just before hemming.
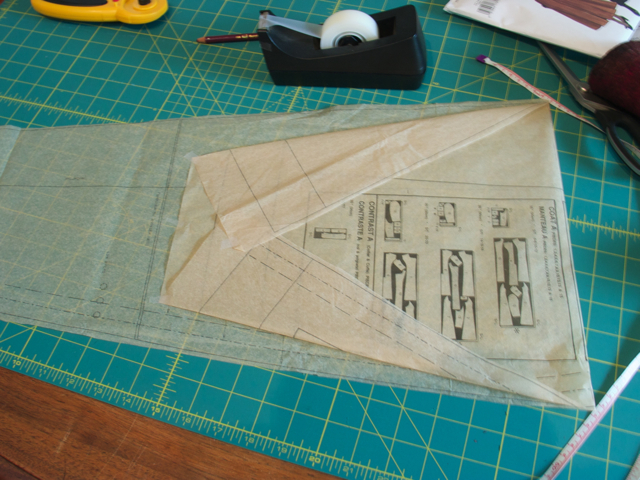
So I pulled the tissue paper pieces out of the envelope, and I unfolded, and they just kept unfolding more and more. They were INSANELY HUGE, giant rectangles of tissue paper at least five feet on a side.  I used to be scared stiff by giant pattern pieces, but I took a deep breath and cut out all of the “C” pieces, snip-snip.  I refolded the other pieces and shoved them back in the envelope.  At this point, it’s not important to cut exactly on the lines, so I left a little margin to make life easier on myself. 

I pressed all of the pattern pieces with a cool iron, no steam.  It makes a satisfying crinkle sound when you press the paper and the wrinkles smooth out.   
This is exactly how far I made it through the size (6, 8, 10) before I figured out it would be too small in the shoulders.  For some reason, I decided that if the shoulders fit, I could probably make any other adjustments I needed to make the whole thing fit, and I would be better off starting with a larger size.  I’m not sure if my intuition is right on this point.  We’ll see.

After cutting all of my C pieces, I made sure everything was accounted for. There are so many pieces that it’s easy to miss one.

There are four pieces that make up the bodice of the coat, front, back, front side, and back side.  I’ll need two of each in fabric.  The sleeves have four pattern pieces: upper sleeve, under sleeve, cuff and sleeve facing which provides and edge for the sleeve hem.  I’ll need two of each of those in fabric.  I’m not sure if I’m going to use the cuffs yet, but I’m keeping them for now.  The collar has two pieces, the upper collar and the under collar.  I’m ditching both of them in favor of a hood.  Hoods are cozy.  I like hoods.  I’ll talk more about my dealings with the hood later.  There are two more facing pieces, the back neck and front facing.  The facings are the pieces that give the coat some of its structure and finish the edges around the neck and front edge.

ALTERING THE PATTERN
Before I cut any fabric, I need to alter the pattern a little.  The coat in the pattern is ankle length, so really long.  I like my coats to fall just below my knees, so I shortened the pattern by a clean foot.   I shortened 5 pieces: front, back, front side, back side, and front facing.  I shortened the pieces by folding the hems up and using itty bitty pieces of scotch tape to secure them. I don’t like cutting pattern pieces if I can just fold the alteration.
I’m removing the collar and adding a medium wide hood. Here's how the collar fits on the front of the top front of the coat.
I have one hoodie in my closet, but the hood is too small and fits a little funny, so I traced it for my first draft, and made some adjustments for a better fit.  Then, I measured my around my head, out and wide like I want the hood to fit, and adjusted the size of my tracing, a little hear and there, to better fit with my measurements.  I also compared the bottom edge of my hood with the bottom edge of the collar pieces.  
I made the hood edge similar but with a deeper curve to add some extra fullness near the neck.  I noted that the collar leaves about 2.5 inches to the edge of the collar (measured on the seam line, not the edge of the pattern pieces.
I also wanted to remove the notch in the collar, to make the hood join smoothly with the front edge.  So I folded the front facing and front pieces by one inch which removed the little flap (and consequently the notch). This fold subtracted one inch, and I added 1.5 inches to the hood bottom edge. That's why the hood piece is longer than the collar piece in the photo above.
To finish my hood piece for now, I made sure the corners at the top and back of the neck are right angles (they're marked in the photo). They have to be so that when you unfold the pieces at those places, you get a straight edge.  I’m still not sure about the exact size and shape of the hood so I’m using a full inch seam allowance on my pattern piece for now. That will leave me some wiggle room if I need to let it out a little when I try it on later.

My pattern is now ready for a mock up in scrap cotton fabric.  That’s next.

Until then, I leave you with some yellow Rosebud Beaded Bead Earrings, which I sent off to Texas, of course.

Continue on to Part 2 in which I make and fit my muslin sample.

Monday, March 14, 2011

Hexagon Angle Weave Video

I just posted my latest how-to-bead video lesson made with Doceri.  This one is on hexagon angle weave, which is similar to right angle weave (RAW) but the loops have 6 beads instead of 4, and only 3 loops meet at a corner (like in a tiling by hexagons) instead of 4 (like a tiling by squares).  I made this bracelet using the technique I explain in the video.  I made a separate video explaining how to make the earrings.
The video for hexagon angle weave is below. If you don't have 8 minutes to spare, just zip to the end and watch the last minute.  It's my favorite part.  It demonstrates my tendency towards horror vacui, an artist's fear of open space.  Every since I started drawing, I have felt this desire to fill up the entire page with my drawing.  Maybe that's why I am so fascinated by repeating patterns, because you can make them fill up as big of a space as you can choose.  Likewise, they bother me because you can never get to the end of the pattern.

In terms of beads, I prefer the look of hexagon angle weave to un-embellished RAW because less thread is visible in HAW, but it still creates a similar look and feel to RAW.  The beaded fabric is still soft and drapes well.  Plus, with the method I show in the video, HAW weaves up faster than RAW.   If you try HAW with some real beads, I hope you'll show me what you make!

Saturday, March 12, 2011

Playing with Box Stitch

I've been playing with box stitch again, or what others call three-dimensional right angle weave.  I like the name "box stitch" because it's much shorter and, I think, equally descriptive.

Anyways, here's what I made.  I call this first piece "3 Intersecting Rectangles for the Math Nerd in You No. 2."  I made the first one of these in 2005, and this is the second one.  It was a bit easier than I remember, probably because I've had a lot of practice weaving beads since then.  It is an example of the Borromean link, and you can read more about it and see more photos in my Etsy shop. If you would like to learn how to make one for yourself, check out the pattern and kits for the beaded Borromean Links

The second piece is also made with box stitch.  I call it an "Octahedral Orb."
This is the very first beaded bead I've made quite like this. Before I added the golden drops, it was much rounder, like a globe, which is how I envisioned it before I started.  I want to try to make another one without the drops to see if I can get it to keep its perfectly round shape. You can read more about this orb and see more photos in my Etsy shop.

Wednesday, March 9, 2011

Video Tutorial on Beaded Circle Earrings Using Hexagon Weave

I just uploaded my latest Doceri video tutorial on bead weaving.  The video shows how to make these beaded circle earrings using hexagon angle weave.

Here's the video:

Hexagon angle weave is similar to right angle weave (RAW) in that both of them are beaded angle weaves.  Beaded angle weaves are made by joining loops of beads together.  With RAW, the loops have 4 beads and the angles between adjacent bead holes are right angles, hence the name.  With hexagon angle weave (HAW?), the loops each have 6 beads and the holes of the beads are at 120 degrees to each other, like in a hexagon.

My next video will demonstrate how hexagon angle weave can be generalized to fill any patch of the plane, to make bracelets, earrings, necklaces or whatever you can imagine.  The presentation is ready; I just have to record it.  For me, speaking is the hardest part of making these videos.  Maybe in the next one I'll be funny.  I'm pretty sure I'm a lot funnier in real life than I am in my videos.  HAW!

What I learned: In making these videos, I'm learning that I have trouble explaining anything worth explaining in under 5 minutes.  In fact, I originally wrote both of the lessons together, but decided that a 10 minute video is too long, and so I cut it in two.

Reflections on Doceri:
Working in Doceri is particularly novel because you have to think in time. When you edit drawings, you have to edit them in time, which we don't normally do when we write on paper. Paper is just spatial.

Doceri is spatial and temporal. It's the extra variable of time that makes a Doceri video different to compose and refine, and it is also different to watch for the viewer.  Because the viewer can watch the drawing unfold, more information can be communicated without extra words or pen strokes.

Another thing that makes Doceri unusual to compose in, is you have to zoom into your iPad screen to write and draw clearly. The more you zoom in, the more control you have in where to place your pen strokes. By constantly zooming in and out, distances are changing as well. Therefore, I almost always work with graph paper as a scaffold for my presentation. It helps me keep my lines straight. Other Doceri users have just as well used their own illustrations, templates, or photos as a background for their work. When our drawings are complete, we use a clean background for final presentation.

With permission, I am coping a comment from Suzanne Golden.
"Just watched the video. I think Doceri really changes the world of beading instructions.....So easy to follow and I love the way you did the layout first and then the actual instruction. "

Thank you Suzanne!
Related Posts Plugin for WordPress, Blogger...