Friday, April 29, 2011

Beaded DNA: Groove and Twist


After watching my video on beaded DNA , Cindy Holsclaw (beadorigami) sent me this link on DNA's B Form, A Form and Z Form.  From there, I learned that the DNA design in my video has just about the right amount of twist.  In particular, my base-pairs-per-turn ratio came to the same as the B-DNA structure.  This was a lucky accident.  In real DNA, the two helices are not equally spaced on both sides; in other words, DNA has both major and minor grooves.  One of my earlier samples was just like that, in fact.
I thought it was an error, so I "fixed" it for the video, but now I thought I’d show it to you.
What causes the unequal spacing in this beaded double helix is more (or longer) beads on the edge.  In other words, make it ruffle more without changing the first steps to make the ladder.  I wonder if there is a similar cause for the unequal grooves with DNA molecules.  Wouldn't that be cool if art explains nature.  Here's what it looks like when I tried to untwist it, a ruffly colorful mess.
Click the photos to buy it.  It's the only one.

Wednesday, April 27, 2011

Video on Knot Doodles

Just for fun, I doodled some knots and made a video.

Actually, this video started as a lesson on counting strands in a rectangular Celtic knot, but I got distracted by the colors, and my lesson turned into a doodle.  It happens.
So here is what I MEANT to say in the video before I wandered off into swirly knot land.  The first knot I drew, called an "unknot," is a 1 by 1 square knot with 1 component (strand).  The second one is 2 units wide by 2 units high and it has 2 components.  The third is 3 by 3 with 3 components, and the fourth is 4 by 4 with 4 components.  So, you might have noticed a pattern here.  If you have a square knot of this sort, and it is p units wide by p units high, it will have p components. 

The next one I drew was rectangular, 2 by 5, and it has 1 component.  There's a theorem that says
that the number of components in a p by q knotwork panel is given by the greatest common divisor gcd(p, q).  So applying this to the rectangular knot, gcd (2, 5) is 1, and the theorem works.  If we apply this to square knots, when the panel is square, we get p = q and the gcd(p, p) = p.

Then I got bored with my lesson so I started doodling.  Sorry, but I don't know any good math to go with the rest of the doodles. 

I made this video with Doceri and lots of coffee.  Too much coffee.

Tuesday, April 26, 2011

Three Gemstone Necklaces

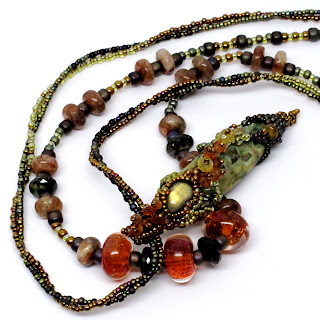
Can I tell you how much I love natural gemstones?  A lot.  I covet them.  I regularly go into my bead stash and ogle over the sparkling treasures that lie within.  Occasionally, I make stuff with them.  Here is the Paisley Tourmaline Necklace with Two Strands of Sparkling Gems.
 Notice the tourmaline roundels on the edge of the paisley.
 The second is El Cubo Necklace with Peridot and Heliodore Beryl.
Just look at the size of those heliodore crystals!  By the way, heliodore is a type of beryl, just like emerald (green) and aquamarine (blue).  When beryl is golden in color, it's called heliodore. So, if these stones were a little brighter green, they'd be emeralds.

I also took some new photos of this Fairy Chrysalis Beaded Necklace -- Rainforest.  This photo of the front of the chrysalis really captured the golden flash in the labradorite and the rich colors of the sapphires that speckle the front of the pendant.
Here's the back of the pendant.
 

Many of the stones on these necklaces are chosen from the nicest in my bead collection.  I think if you make anything out of nice natural stone beads, it almost has to be pretty.  Doesn't it?

Monday, April 25, 2011

Crochet Layered Flower in Red Wool

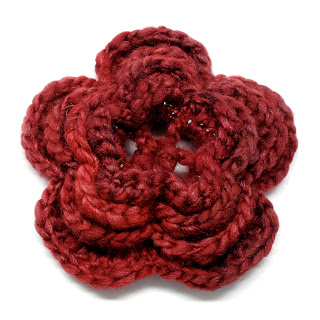
I got out my spinning wheel this weekend and spun up some beautiful burgundy wool/silk from Wonderland Dyeworks.  The depth and richness of her dyed wools are wonderful.  Here you can see the roving, yarn, and my partially finished flower.  I added enough beads to decorate just the top layer. I made a medium thick single ply yarn and started crocheting it following my Doceri video on how to crochet a layered flower.
I made it 4 layers thick, but I had a lot of yarn left, so I kept going.  Instead of making more layers though, I crocheted around the petals I already did, added one row of stitches to each petals to make them wider. I spiraled back in from layer 4, 3, 2 then 1.  I was happy when I was able to finish all four layers before running out of yarn.  I have about one yard to spare.
This flower is soft and springy and measures 4.5 inches across and about 1.5 inches thick.  From the side, you can see that the flower is dome shaped.  The springy wool helps the dome hold it's shape nicely.

Here is the back.  
I attached a pin by poking holes in my tag and pushing the pin through the holes.  I appliqued the tag to the back of the flower, and the tag holds the pin in place.  I had to attach the pin to the outside ring of petals rather than the center, or I would have lost the nice domed shape of the flower when the flower was pinned in place.  I am currently sewing a skirt with deep red silk, and I'm hoping this flower will find a home on the skirt somehow.

Sunday, April 24, 2011

Video on How to Crochet a Layered Flower

Here is my latest Doceri video, showing how to crochet a layered flower. The text of the pattern is color-coordinated with the crochet chart. I think the linked representations, animated in time, makes the chart pretty easy to follow, assuming you know basic crochet stitches, of course.
Someone emailed me a question, so I want to clarify here how I did one of the steps. The single crochet stitches (those that are taken between the long strands of 3, 5, or 7 chain stitches) are worked BEHIND the flower.  You will need to flip your work over, and jam your needle between the base of the petals to get your needle into the double crochet (or single crochet on later rounds).   By the way, I forgot to change the "dc" to "sc" in the video for those later rounds.  Sorry about that.  If you were just watching the chart, you probably didn't notice.
You could instead work those single crochet stitches on top of the flower if you'd like, and then flip over the flower when you're done, but I prefer the look of the front of crochet stitches than the back.  You get that nice little chain boarder on the front.  Whatever you do, just pick one way and do it for the whole flower. 
LACE BORDER
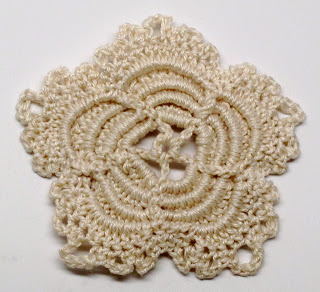
For the off-white flower, I used 4 layers.   Each petal of the 4th layer has 11 stitches.  I added an extra border in the last layer.  Over each of the five petals do this:
Make 2 times: sc, sc, chain 3.
Then, sc, sc, chain 5 over the next stitch, which is the center of the petal.
Make 2 times: sc, sc, chain 3.

sc = single crochet

Thursday, April 21, 2011

Making a Sweater Coat Part 12 Sewing Buttons and Loops and the Finished Coat


In writing this, my last entry of 12 about this sweater coat,  I notice that I didn’t start sewing until Part 6.  It confirms my suspicion that there’s a lot more to sewing clothing than threading a needle and taking stitches.  If you’ve made it this far, you probably want to see the coat first and hear about the buttons later.  Alas, with no more pomp or circumstance, here is the finished coat.  Front…


 Lining...
Side…
 Back…
FASTENERS
Fasteners still confuse me.  I often put off thinking about them until the end, and then I get stuck.  This time was no exception.  There are just too many options, and I’m never sure which one is the best.  I’ll limit this to what I might do next time if I have the wherewithal to plan ahead, and what I did.

First, if I overlap the front too much to close the coat, the design won’t be symmetric.  Too bad.  I should have used a vertical band or two down the two front lapels, long vertical stripes.  I had sketched designs with such lapels early, but I rejected them because I knew I couldn’t cut them in a single piece.  I realize now that I should have just pieced them out of a single color.  If I make another sweater coat, I think I will use vertical patching down the center front and move the diamonds out a bit.

I also realize that a zipper closure would be nice.  But I never seem to find nice heavy-duty zippers for sale.  I don’t know as much about zippers as I’d like.  What’s your favorite type of zippor?  Anyways, adding a zipper would require ripping the whole front seams open, and I don’t want to do that.  So, I decide to use buttons with loops.

BUTTONS WITH LOOPS
Making button holes freaks me out.  I have holephobia.  If my sewing machine screws up a button hole, things get ugly.  If that’s not enough, cutting holes in the front of a project that took me weeks to complete is just too much anxiety.  It feels like if I screw up now, I’ve wasted so much time and I won’t be able to fix it.  Instead of button holes, I prefer fabric loops, and I have a few large scraps of fabric left to make a set of matching loops.  So, I pin the front of the coat to mark 4 buttons and loops.
I choose big shiny black buttons from my Grandmom’s button box.  I have three large ones, and a smaller one that I’ll use right at the top.  To make the loops, I start by sewing a strip 1 ¾ inches wide using a 4 thread overlock stitch.  I use thick dark blue fabric because I like the color, and with a little effort, I get the tube to turn.    It’s way too thick for the buttons.  The tube is thicker than the shanks are high.  Fortunately, I have enough of a thinner black fabric so I use that instead.  I sew my tubes from strips 1 5/8 inches wide and 5 inches long.  After turning, I stretch them on my ironing board with two pins on each end, and I press them with tons of steam, more steam than pressing, to get the stretch out. 
Through the hole in the side seam, I pull out the front edge seam between the front and front facing.  I cut open the seams where my 4 pins are, and poke a loop through each hole. Here are two done, two to go.
I flip the coat and pin the loops into position, checking that the loops are the right size for the buttons.  Flip again through the hole in the lining, repin, and sew the loops into place on my regular sewing machine… forwards, backwards, forwards backwards, through the seam allowance.  These puppies aren’t going anywhere.

I attach the buttons with smaller buttons on the inside to distribute the force and prevent the fabric from puckering later.  I use nylon thread and 3 or 4 knots per hole.   I sew up the hole in the lining, and add my tag.  Stop and admire my work. It’s really done!  And it fits like a dream!  Next project?  Definitely something quick and easy, maybe a skirt.  Thanks for playing.

Wednesday, April 20, 2011

Making a Sweater Coat Part 11 Sewing Lining and Hem


SEWING THE LINING
The lining sews together easily.  The only hard part is attaching the sleeve lining to the lining armhole.  I do it just like the coat sleeve and it works great. Notice how the lining doesn't meet in the front because that's where the front facing will be.
To sew the lining to the coat, I need a larger horizontal space, and you know what that means… It’s time to mop the kitchen floor again. I lay the coat down on the floor, right side up. 
 I lay the lining over the coat, right side down.  Pin them together around the longest seam in the coat.  
I love this seam.  It’s so satisfying to complete because after it’s sewn, the thing feels like a coat.  Even though it won’t be completely done yet, if there were some sort of natural disaster, and I had to run out of my house wearing nothing but this coat, I’d be covered and warm. Working on this seam plays right into my fantasy of beating the odds of mortal doom through sewing.

SEWING THE HEM
I watched Martha’s Sewing Room today, and there was a guest segment on how to hem a baby dress with a lining.  They showed a trick of sewing the hem right sides together, finishing it through a hole in the side of the lining.  This is the method for me! I like the idea because I can sew the hem on my serger, which makes it strong.  I don’t normally finish my hems this way, but with the sweater fabric, I’m concerned that it might stretch a bit over time, and with this type of hem treatment, the coat will still drape properly.  Other methods for hemming can mess up the drape if the lining is too short for the outside of the coat.  Ask me how I know.

I lay the coat on the floor to determine if the coat hem is the same length as the lining hem.   The lining is a little too long.  You can see the extra fabric on the right side of the photo below.  I cut off the adjacent seam, removing 2 inches of fabric there.  Because I’m going to leave a hole to work through, I finish the edges of the lining on my serger separately.  That way, the hole won’t fray while I work and when I sew it up at the end, the edges are already finished, so I can just use my regular machine and still get a nice, strong finish.   Interestingly, when I sew these edges on my serger, I sew it in one long row of stitches with a u-turn in the middle: up, around and down.  I wasn’t expecting that.  Nifty.  I was too lazy to rethread my machine for this step, and it appears that the chain stitches are less stretchy on one layer than they are on two.  So, I rip out the two threads that make the chain stitches. If you start from the ending end, and unlock the first stitch properly, they pull out easily in one quick zip.  I sew the bottom part of the seam together, leaving about a 7 inch hole. The two pins in the middle of the lining show the top and bottom of the hole placement.
In doing the hem, I decide to error on having the lengths match rather than the patchwork.  The difference is only about a half inch anyway.  I flip the coat and lining inside out.  I pin ¾ of the hem right sides together and sew.   
Flip the coat right sides out.   
Pull the unsewn quarter hem through the hole in the lining.  Pin right sides together and sew.  The front bottom corners are a wee bit too pointy, but they match well enough so I leave them.  When I try on the coat, the lining hem is a bit shorter than the coat hem, just like it’s supposed to be. 

HEMMING SLEEVE
Turn sleeves inside out.  Pin lining to coat under arm pits (the bottom half of the arm hole).
Hand sew the lining to the coat using a back stitch sewn from the lining side.  This tacking will help hold the lining in place without affecting the drape of the coat. 

I put on the coat and see that the sleeves are much too long.  That was my mistake in the pattern, but better too long than too short.   I pin the sleeves in place.  I have 4.5 inches in the sleeve hem.  I reduce it to 2.25 inches and serge the edges with a 4 thread overlock stitch.  Turn the sleeve inside out, and hand stitch the sleeve hem using cross stitch. 
Cut lining to same length as finished sleeve. 
Serge edge of lining.  Hand stitch lining to sleeve hem using itty bitty cross stitches.  Press.  Hang coat on dress form and steam bottom hem. 

Tuesday, April 19, 2011

Making a Sweater Coat Part 10 Attaching Hood, Facing and Sleeves


ATTACHING THE HOOD
I sewed the hood to the hood lining around the face earlier.  Now I press it and I baste the bottom edges together on my regular sewing machine.  Think of a hoods as a really long bulging collars.  To attach the hood to the coat, I will have to sew through four layers plus seam allowances, which my serger definitely won’t like, unless I do it right.  My serger has proven to only sew well through two or three layers at a time, so I decide to serge the edges separately.  I serge the edges of (a) the two layers of the hood, (b) the neckline of the coat, and (c) the neckline of the (3 piece) facing.  Then I pin the hood to the coat and baste on my regular machine.   
After laying the coat out on the floor,
I lay the facing on top of it.  Finally, I pin the facing on the neckline and sew all four layers together on my regular sewing machine with a very strong and slightly stretchy stitch.  
In doing so, I busted a needle in three pieces right at the center back seam and had to use needle nosed pliers to get one of the pieces out of the fabric.  The fabric was really thick, and the piece was entirely embedded before I fished it out.  The neckline seam is always a real bitch but this method seemed to work well and I’d definitely do it again.  Yes, it’s a lot of passes, but it’s all done by machine, and the seam is strong, straight, and centered. This seam has to be strong because people lift and handle coats by their hoods.

I press the facing in place with tons of steam.  I let each section cool before shifting the coat.  Next I pinned and sewed the front facings to the front.

Oh, I missed a spot where the hood meets the coat on the front edge. You can see how the right corner is correct, but the left one, you can see the threads poking through the hole.
 When I flip it wrong side out, you can see how the edges shifted right at the end of the seam. 
 So, ya, I need to redo that.  I rip out the stitches for an inch or so and resew it.  

SEWING THE SLEEVES
While pressing the facing, I sew the sleeves and repair the skipped overlock stitches on the sleeves.  With doubled thread, I whipstitch over the seam allowances on two spots on each sleeve.  Interestingly, the chain stitches are all good.

I attach the sleeves to the armholes.  First, I pin and hand baste the two pieces together.  Then, I sew the seam on my serger.  Works great.  Sorry, but I forgot to take photos.  You'll just have to imagine it.

Sunday, April 17, 2011

Making a Sweater Coat Part 9 What I have learned about how to sew lined coats


RECONSIDER LINING AND POCKETS
Now all of my patches are sewn into panels, but before I can assemble the coat, I need to consider the lining and pockets.  I buy deep black 90% cotton 10% spandex knit.  It’s not slippery like I’d like a lining to be, but it’s nice and stretchy, but still natural feeling.  I’ve learned that I prefer mostly natural fibers, but with cotton, in particular, a hint of synthetic fibers help the fabric keep its shape.  Since the sweater fabric is stretchy, I need a stretchy lining to match.  If I had all the money I wanted, I’d use a silk jersey knit for the lining; that would be so luxurious, but an extravagant expense, to be sure.

To pattern the lining, I would normally use my same pattern pieces minus the hem, but I want to try on the coat before I commit to my sleeve hem length.  I check my patchwork against my large pattern pieces, and the patchwork pieces are all about an inch longer than the paper pieces.  Hmm.  I think my fabric stretched?  Or was I systematically off on my piecing?  Considering the error is only in the length, I think the fabric probably stretched.

The lining pieces on a coat are similar to the fashion fabric pieces with a few notable differences. Here are a few things I have learned about lining coats:

1. None of the collar pieces have lining.  In other words, they have fashion fabric (felted sweaters) on both sides.  In the case of the hood, I essentially made a huge, head shaped collar, and like most collars, the top and bottom are made from fashion fabric. 

2.  Linings are cut shorter at the hemline than fashion fabric for the corresponding pattern piece.  This is to create a hem that has the fashion fabric on both sides near the hem.  In my case, the main coat is already an inch longer than my pattern, so, I decide NOT to shorten my pattern before I cut the lining. It’s better to error on too long of a lining than too short of one.

3. front = front facing + front lining – overlapping seam allowances.
In other words, if you sew the front facing to the front lining, you get a piece that’s the same size as the front piece.

Since I ended remaking most of the pattern pieces, I’ll be using those instead of the lining pattern pieces that came with my pattern.  I will however, use the front lining piece from the pattern since I didn’t alter my front piece.

4. back = back neck facing + back lining – overlapping seam allowances.
The only piece I have to alter is the top back piece to allow for the back neck facing.  To do this, I trace the back neck facing at the top of the back piece.  I move the traced line one and a quarter inches up since that’s twice my seam allowance.  Then, I cut slits in the paper and fold it into place.  The lining pattern is ready to go after I add a little tape.

CUT LINING
I need a big horizontal surface to cut my large lining pieces.  It’s better, easier and faster if you cut them all at once.  So I vacuum and mop the kitchen floor.  I lay my fabric out folded in half lengthwise so I can cut my pieces two at a time.  I lay out my pattern pieces on the fabric, and pin them in place.  I cut two of everything, plus an extra 2 pocket pieces, since I need two pieces per pocket.  
The pockets will be stretchy. I can’t decide if that’s a bad idea, but I can’t seem to think of anything intrinsically wrong with it, as long as they’re used mostly for hand cozies and not to transport pounds of cr@p.  I mean, it’s not luggage, it’s a coat.

SEW SIDE SEAMS WITH POCKETS
I sew the shoulder seams of the front and back panels together.  I try it on to decide how high on the side seams I should sew the pockets.  I sew the 4 pocket pieces to the side seams. 

I pin the side seams (including around the pocket),
and I can see that there is no way I can sew that sharp corner under the pockets on my serger.
I sew the side seams as well as I can, smoothing out the offending corners as my serger allows.  Remarkably, the loopers catch the edge of the fabric at that corner nicely.  I resew one of the points on my regular sewing machine, the first time overdoing it.  I can tell because I try on the coat and there’s a nice pucker right where the pocket meets the side seam.  So I rip it out and do it again.  Fixed.  The second one is easy.  See pin head for placement.
The side seams come out alright, but again, there are bulky spots where the loopers didn’t catch threads, and I have to hand whipstitch to fill in the bald spots.  I also broke a needle.
 
At this point, I realize that I should have used one of the thicker, sturdier fabrics on the shoulders.  I chose to use cashmere because it’s soft.  Unfortunately, it’s also much stretchier than the wool felt.  I think the coat might sag a bit in the sleeves because I used cashmere all across the shoulders. I learned that next time I should use the sturdiest (heaviest) fabric across the shoulders rather than using the softest.  I’m a sucker for soft; so I had to try it.

Friday, April 15, 2011

Making a Sweater Coat Part 8 Sewing the Hood and Facing


SEWING THE HOOD
I lay out my hood pieces.
I sewing patches starting with the center front and working my way back. 
At this point, I realize the order I should have used to piece together the back of the coat.  Start at the top, piece like a Log Cabin quilt block, make alternating strips that are sewn, left, right, left, right, … until you get to the bottom of the coat or the back of the hood.  After sewing together four patches around one of the points of intersection (corners), I find that it bulges out and looks completely absurd.  (Forgive my blurry photo; it was about 2AM when I snapped it.)
This corner was the one on the top of the head where I made dart-like adjustments, but I didn’t cut away nearly enough fabric with my wimpy darts.  So, I pinned it the way I wanted it, drew in some lines with pencil, ripped the seam open, and sewed them again to make all four pieces smaller.  I took off about a half inch on each piece, and it worked like a charm.  Remarkably, all of the other corners sewed together well, and fit smoothly around the head.  Here is the side of the hood pinned to the pieced top of the hood.
 I had some problems with the spot where seven different patches meet.  It’s not so perfect.  
Actually, I would have been quite impressed with myself it had been.  Any time you have four or more patches meeting at a single point, it gets harder and harder to match everything up correctly. I knew seven was a long shot when I designed it, but what the heck?  I liked the way it looked.  Although the corners slipped and I didn’t achieve perfect symmetry, the seam is strong and it doesn’t ripple or bulge oddly, so I left it as good enough.  The teacher in me reminds myself that you only need 94% correct to get a straight A. So far, the worst of my mistakes that I haven’t fixed was a slipped corner here and there.

I noticed that the upper looper on my overlock machine doesn’t always work properly over the bulkiest seams.  It skips stitches, but no thread breaks, and it sews properly on the flat, smooth parts.   
To fix this, with doubled thread, I hand whipstitch over the bulky seams where the overlock missed.  I can catch some of the loops with my needle and sew them into my stitches. 

I use my regular sewing machine to add some darts on the hood lining, two on each side.  I snip the top darts open a little to reduce bulk.
I sew the hood to the hood lining on the seam around the face and set the hood aside.

PATCHING FRONT FACING
I decide to make the front facing as patchwork because I’m down to scraps without a lot of extra to spare.  I use the cashmere for about the top third, and then run out of all but the lime green, which is really thin.  I blend the colors from top to bottom, while I use my pattern piece to check how to add each patch.  I use the thin lime cashmere on the bottom to reduce bulk on the hem.  Only after I get all but the last patch attached, do I cut out by two front facings for my scrappy patches. The facing is done after I sew the two front facings to the back neck facing.
Related Posts Plugin for WordPress, Blogger...