 I made myself a new pair of bloomers from the Simplicity Pattern 2777 by Archivestry. These are the mid-length version in size 10. Since I have an overflowing stash of cotton quilting fabrics left over from my days as a quilter, I delved into it for my first try at a Simplicity pattern since I was in college. There's nothing easier to sew with than cotton quilting fabric, so I thought it a good place to start. Most of the pieces I have are small cuts, often under a quarter yard, so I had to mix and match pieces to get enough for the whole project. I ended up combining 6 different fabrics including leafy green and off white for the main panels. The lightest one has feather plumes and the tan one has bumble bees. The hems are trimmed with a golden brown cork print and burnt orange ruffles with dandilion seeds flying in the wind. Then I died the rayon lace at the hems to match the ruffle and the greens.
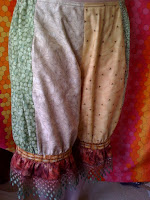
The pants sit low rise, and there's a long ribbon that ties in the back. They're very comfortable and fit just as I hoped.
I'm going to make the next pair longer and in orange silk. You can see the orange fabric I'm going to use in the background of this photo. Click on it to make it big.
What I learned: This was a very easy pattern, and I finally learned how to make a waistband. I learned that when gathering fabric to make a ruffle, use two parallel lines of basting stitches. It's much easier to control the distribution of the gathering because you have more friction with two threads than with one. It also helps the fabric lie flatter at the gathers, so sewing the ruffle to the hem is easier. I learned that these pants fit me great, and I can't wait to make another pair.


