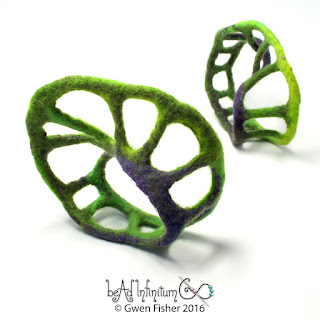
Two more felt cuffs... these are in purple. I don't know why, but my camera hates purple. The colors are prettier in real life, I think.
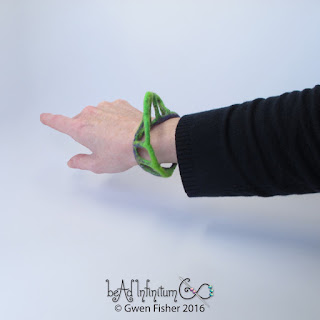
Anyway, this one is a Mobius bracelet. It has a half twist in it.
Now, you might be looking at that and thinking, "No way I could wear that. It's huge!" Well, it's also soft and flexible. See, here's a photo of that same bracelet flipped inside out. It's very soft, but it's stiff enough to pop back into position, which also makes it fun to play with.
If you're like me, you like the idea of bracelets but hate wearing them
because they're uncomfortable. That's why I make felt bracelets.
They're big, bold, colorful, and they are so soft and light, that you
barely know you're wearing one. Comfy, comfy, comfy!
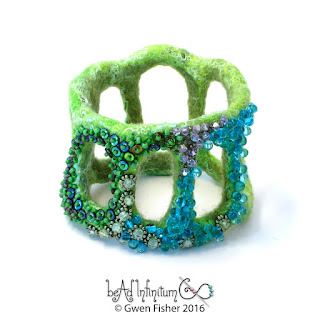
This cuff is a regular bracelet with some beads on it.
See? Beads!
Seriously, the colors are prettier in real life. Trust me.
These pieces are for sale. Click on the photos to go to the listings.
Thanks for looking. Have a great day.
I gave a workshop recently at the Gathering for Gardner on how to make topologically interesting surfaces in wool felt. After the workshop, I was asked to write a short article for Math Horizons, which you can expect to see published next fall sometime.
After making some samples for the article, including this one
I had the wool out, so I kept making felted objects, including this one.
These pieces can be worn as cuff bracelets,
but they are also fascinating
objects in their own right. As bracelets, they are large and bold. They are soft
and so light, you'll barely know you're wearing one. I added a few seed beads to this one to give it some extra texture and sparkle.
These
textile cuff bracelets are felted with fluffy merino wool with silk
fibers felted right in. The shapes are organized but organic. They have a lot of
holes to stick your fingers inside. They're fun to play with.
The
combination of needle felting and vigorous wet felting permanently binds
the fibers together. As you can see in the photos, the felt is stiff
enough to hold its shape, but it's still very soft and quite flexible.
If you bend them out of shape or flip them inside out, they will pop right
back into position. If they ever get bent out of shape, wet them because they are totally hand washable, very strong and won't shrink, crease, crumble or tear. When they are
wet, you can reshape them in position to dry, and they will stay like that. Since they are wet felted, I already pre-washed them.
Be sure to browse the entire collection of papers in the 2015 Proceedings of the Bridges Conference. There are so many great contributors this year; it will be impossible to pick a favorite. Seriously, go brew yourself a pot of coffee, start at the beginning and click on any title that looks interesting. Candy for your brain. If you can make it to University of Baltimore on July 29 - August 1, 2015 (Wednesday - Saturday), you can even go to the Bridges Conference and listen to the authors talk about their papers, which is way more fun than reading them because you can meet the people who wrote the papers and ask them questions.
If you don't know about the Bridges Conference, neither did I until about 2003, when I heard a talk at the Joint Mathematics Meetings by Reza Sarhangi, a Bridges founder and generally fascinating fellow. Reza talked about this meeting where people discuss connections between mathematics, science and the arts, including visual art, architecture, music, poetry and theater. As I listened, I thought, "I think I have found my people." It was a big moment for me, listening to Reza speak. So, I went home and wrote a couple short papers on quilting and math, and submitted them for review. Next thing I know, I was presenting my work to a group of like-minded people, other mathematical artists and mathematicians who loved art. They had many fascinating ideas to share, and they educated each other, plus they had interest in my work and opinions about it. I was in math-art-nerd heaven. I went to four Bridges conferences in so many years, and then I left academia to be an artist, and stopped going, and started going to Burning Man instead and doing art there with that community. Then, after last year with the Genie Bottle, I decided to take a year off of Burning Man, and go back to Bridges this year instead. So I wrote a paper on beading impossible figures, they accepted it, and I booked my tickets.
Then, Kelly Delp and the other organizers sent me an email. They thought my paper was so swell that they asked me to give a keynote address to the whole conference. That means that I get more time to talk and show slides, and there will be no other concurrent sessions while I will be speaking. I also get a little spot on their website here among the other keynote speakers, including John H. Conway, Ingrid Daubechies, and Alan C. Kay, who all have their own Wikipedia pages, by the way. So, you get that I'm excited to go and see and meet all the people. They asked me to make a mosaic for their website, which you can see here.
Last week, I shared instructions for how to make a Rainbow Twist beaded bead. I made them free, so if you haven't checked them out yet, you should go watch the video. I'm still making them, and I love that each one is a little different from the others.
This one has extra rows to give a scalloped edge, and it has two full twists instead of one. It also has more repeats and the extra length makes it quite flexible and fun to play with. This beaded bead is for sale. Thanks for looking.
Like the beaded bead in my last post, this version here has 20 repeats instead of the 16 I describe in the Doceri video. It does not include the optional shared J bead. Leaving out the optional step makes it more flexible.
I just recorded a new Doceri video on how to make a Rainbow Twist beaded bead, but I'm offering you more than just a video.
Here is the Rainbow Twist as a PDF file. Below the video, I give you the script I used in the video, along with a Doceri drawing of each complete slide in my presentation. Doceri software allows me to be multimedia in all of these different ways, so I'm doing it. I have to admit that the teacher in me is pleased with so many delivery options.
And now for the lesson...
The Rainbow Twist: A beaded bead made with peyote stitch, by me, Gwen Fisher of
beAd Infinitum.This lesson is
made with Doceri software, which is the premier software suite for hand drawn
communication of all forms, designed specifically for teachers.
Here you can see three views of the rainbow twist.Although it might look huge on your
computer screen, its biggest length is just one inch, or 24 millimeters, so
about the size of a quarter dollar.It makes a cute little pendant, and if you’re so inclined to make a
matching pair, it’s even small enough for an earring.
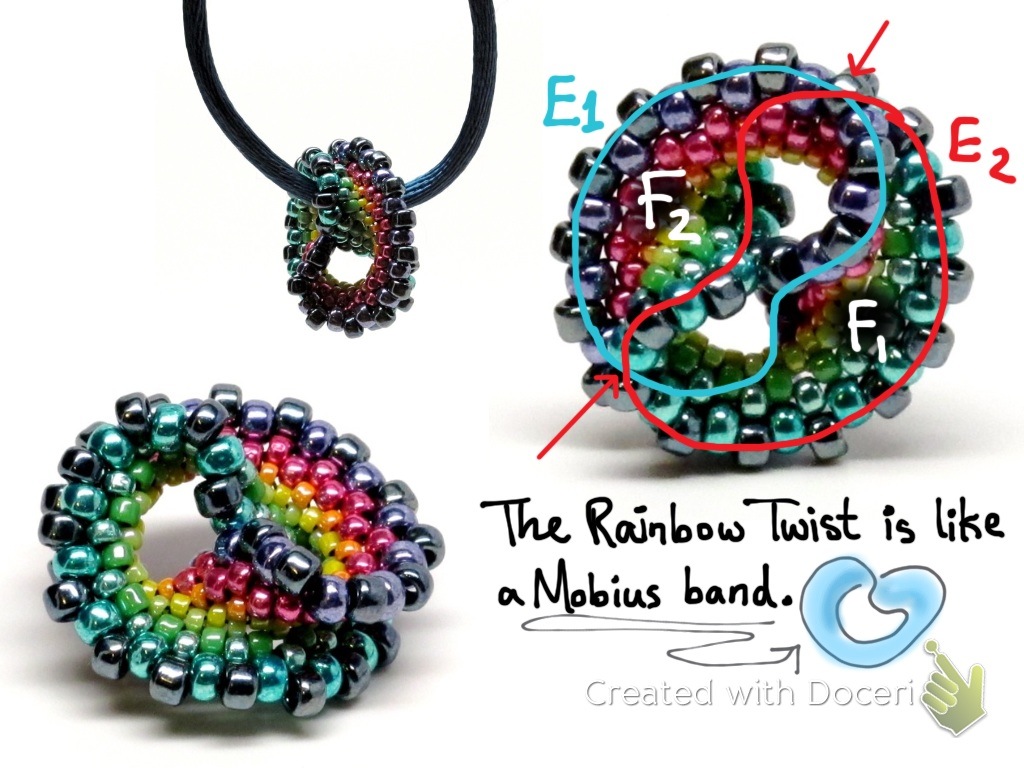
The Rainbow Twist might look like a Mobius band, but
actually, it’s a little different.Like a Mobius band, it’s a strip with a twist, but this one has a full
twist and a Mobius band has only a half twist.You can tell by looking at the edges.When we trace out the edges, we can see
that there are two of them, and they cross each other twice.This shows that the rainbow twist has 2 edges and 2 faces.In contrast, a Mobius band only has one
edge and one face.
These are two more Rainbow Twists I made.
The one on the left has 10 different beads in it, and the one on the right uses just 6 different beads.You can make one with as few as 3
different beads, but in any case, you need seed beads in sizes 15, 11, and 8 to
make a Rainbow Twist.
In particular, the materials you need include 4 feet of
beading thread.
You’ll need size 15 seed beads in three colors.These itty bitty beads lie right in the
middle of the strip. There are size 11 seed beads in 4 colors, but I cheated and
just used three here because I didn’t have the right purple, so I used the pink
twice, and size 8 seed beads in 3 colors.These are the big ones on both edges.You also need a beading needle, or maybe two because we will
be working from both ends of the thread, but you can get by with one if you’d rather
thread your needle a couple extra times than get out of your chair.As my dad used to say, only you know
what’s best for you.
To start beading, pick up 32 size 15 seed beads, ABABABAB
and so on, until you have 16 pairs.
Pass through the first bead to make a loop, and then center the
beads on your thread.
For Step 1, use peyote stitch to add size 15 seed beads in
color C between the size 15 seed beads in color A.By “Peyote stitch” I just means that you pick up a bead, and
then sew through a bead, pick up a bead, and sew through a bead, pick up, sew
through, pick up, sew through, and so on.Notice we always skip the green beads and sew through the yellow beads. Go
all the way around like this until you get back to where you started.
In Step 2, you need to step up to the next round, and what I
mean by THIS is you just pass your needle through the next B bead, which gets
you ready to start the next row of peyote stitch.Normally the “step up” means that you sew through the first
bead in the last round you added, like the C bead, but this first time, things
sit better if you step up to the other side. It’s a tension thing.Just go through the B bead.Trust me.
For Step 3: Use peyote stitch to add size 11/0 seed beads in
color D between the size 15 seed beads in color B.Be sure to stop right before the last stitch. Notice how the
beadwork in this photo is lying in a flat circle, hence the name “circular
peyote stitch”.This is also
called tubular peyote stitch.Tubular, the Californian in me is pleased.
Now we need to add a twist.Here you can see a half twist.Notice that when I trace the edges, they cross each other
once.That’s how I know it’s a
half twist.If I joined the ends
this way, I’d have a mobius band.
But what I really want is a full twist, like in this second
photo.I can see it’s a full twist
because when I trace the edges, they cross each other two times.Also, the green beads match up with the
greens, and the oranges match up with the oranges.
So in Step 4, you twist the beaded ribbon 1 full twist, and you’ll
probably need to pass your needle through the hole in the center.Or maybe the tail end, depending upon
how you twist it. Now you can add the last D bead between the B beads, and
then step up by passing through a D bead.This is a normal step up.
For step 5, thread the tail end of your thread onto a second
needle.If you have a second
needle for this, you won’t have to thread any more needles.
Then step up through a size 15 seed bead in color C.Then peyote stitch by adding size 11
seed beads in color E between the size 15 seed beads in color C.Be sure to step up by passing through a size 11 E at the end
of the round.
Before doing Step 6, let’s look at what we have so far.We did rounds A and B together.Then added C to A,Then, D to B where we did the twist,
and then we added E to C.
Staying on the E side, now add F to E, which you can see here on the beadwork. More specifically, peyote stitch by adding size 11 seed
beads in color F between the size 11 seed beads in color E.Be sure to step up by passing through a
size 11 F at the end of the round. Continue using peyote stitch to add more rows to the edges
of the beads. Add G to D; H to G; I to F;
and J to both I and H.
Here are labels for the bead sizes.So, if you really understand how this
whole thing works, this chart is all you need to make rainbow twists.
There’s one optional step at the end, which is to make
exactly one J bead shared by both edges.I’m not sure exactly how I found the middle to make it symmetric, so I
can’t explain it to you.You’ll
just have to figure out that step for yourself, or leave it out entirely.You might not even want it there
anyway.
Step 7 is tightening the last row on each edge and then
tying off.That’s it, you’re done.
One last note on twist: On the left two pieces, you can see the twist has the same
handedness.Yarn spinners call
this S twist.
On the right is a Z twist.You can’t turn an S twist into a Z twist without cutting the
beaded bead or passing it into the fourth dimension, which is hard to do
without super powers.So if you’re
making a pair of earrings, you probably want to make one of each.Enjoy, and as always, if you make
something nifty, please show me what you make!Bye now.
 Two more felt cuffs... these are in purple. I don't know why, but my camera hates purple. The colors are prettier in real life, I think.
 Anyway, this one is a Mobius bracelet. It has a half twist in it.
 Now, you might be looking at that and thinking, "No way I could wear that. It's huge!" Well, it's also soft and flexible. See, here's a photo of that same bracelet flipped inside out. It's very soft, but it's stiff enough to pop back into position, which also makes it fun to play with.
  If you're like me, you like the idea of bracelets but hate wearing them
because they're uncomfortable. That's why I make felt bracelets.
They're big, bold, colorful, and they are so soft and light, that you
barely know you're wearing one. Comfy, comfy, comfy!
If you're like me, you like the idea of bracelets but hate wearing them
because they're uncomfortable. That's why I make felt bracelets.
They're big, bold, colorful, and they are so soft and light, that you
barely know you're wearing one. Comfy, comfy, comfy!
 Seriously, the colors are prettier in real life. Trust me.