Showing posts with label knots and links. Show all posts

Saturday, May 11, 2019

Doodle No. 9 Inside a Donut

Donuts are more delicious on the inside.

5” by 7” Prismacolor ink and Prismacolor pencils on 108 lb Borden & Riley Paper
Sold.

Find shirts, mugs, notebooks and stickers, printed on demand, in my Threadless shop: https://gwenbeads.threadless.com/

Thanks for looking. 

Thursday, August 13, 2015

Cats with Knots Quilt and Beaded Celtic Knot Earrings

I've been playing with fabric recently, and found a stack of unfinished quilt tops in a drawer. I used to quilt before I found beads. My quilt UFOs have been stashed away since I started beading in 2004. I decided to finish one into a quilt. It's called "Cats with Knots," although this section is more of a knot with some cats.  The quilt has more knots and more cats, all in fully saturated colors like you see here. 

I was inspired to make this quilt after I wrote a paper on the topology of Celtic knot designs with Blake Mellor. In this example, the knot is square with side length 3.  So, by Theorem 1 in the paper, it has 3 components.

The knot design in the quilt is the same knot that I beaded years later and wrote about in my first tutorial on beaded Celtic knots
https://www.etsy.com/listing/174859574/tutorial-beaded-celtic-knot-earrings-and

I need to hang the quilt to get a good picture of the whole thing, but I will, eventually. Then you can see more cats and more knots!

Sunday, March 29, 2015

More Trefoil Triangle Earrings Beaded with Herringbone Stitch

Last time, I showed you my new tutorial for Trefoil Triangle Earrings. After making a handful of Trefoil Triangles, I wanted to add some crystals for a touch of sparkle. So I came up with this variation, which I included at the end of the pattern.
Trefoil Triangle Earrings
The tutorial is 12 colorful pages, with over 65 illustrations and photographs.

Thanks for looking!

Wednesday, March 25, 2015

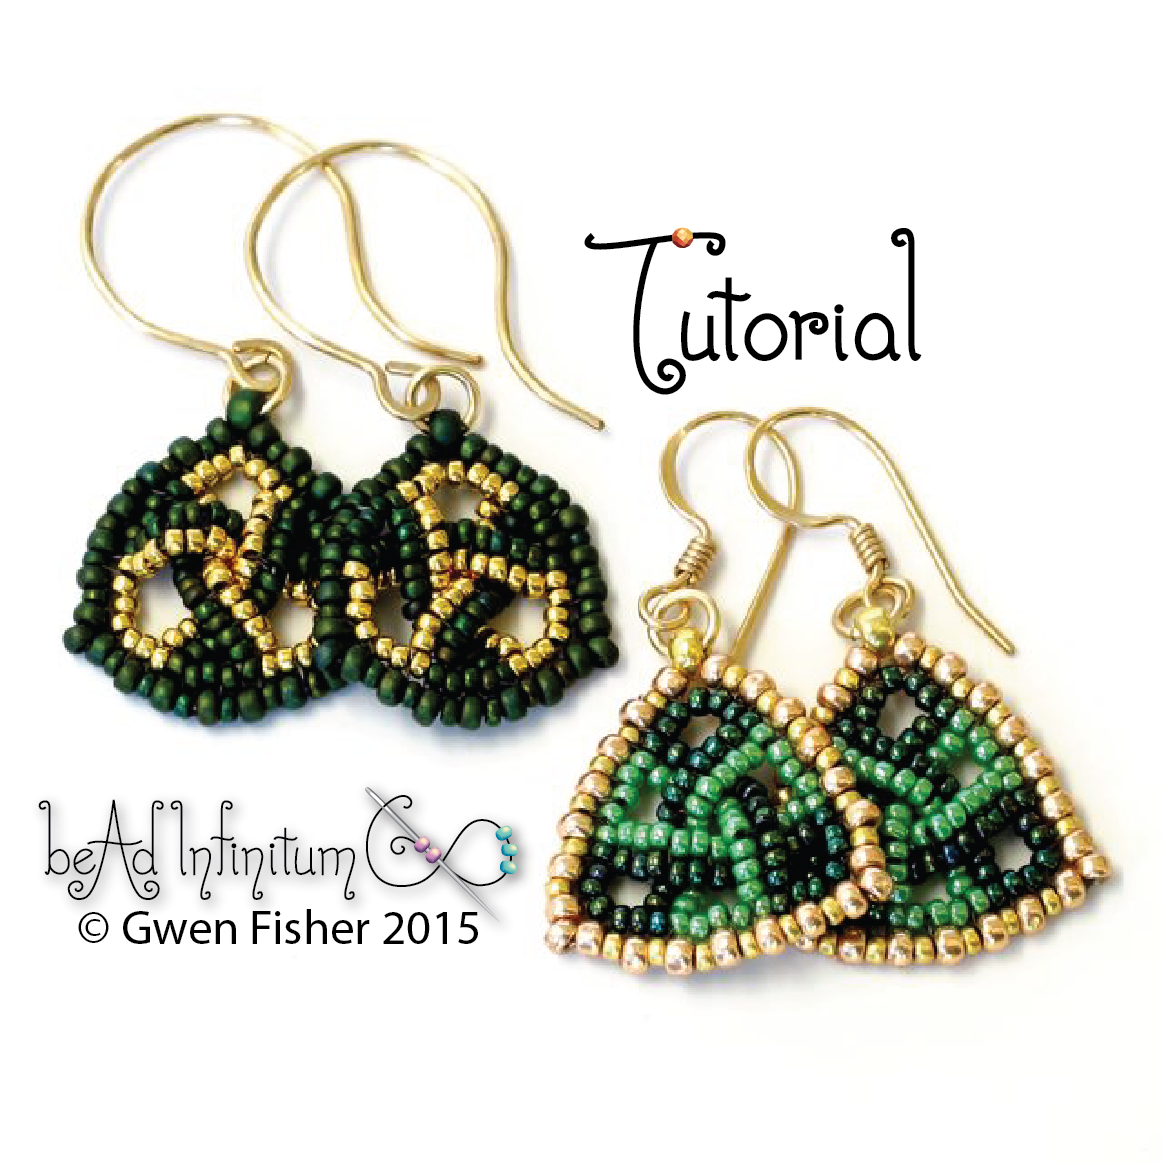
New Tutorial - Trefoil Triangle Earrings Beaded Celtic Knots

This tutorial explains how to make Trefoil Triangles in three designs, in two sizes, and in mirror images. You only need a few pinches of each bead color, making this a good choice to use up your leftover seed beads from other projects. No fancy shapes required!


Trefoil Triangle Earrings
These earring are quick and easy to make. This pattern is suitable for advanced beginning bead weavers. If you have tried bead weaving once or twice before, you are probably ready to try this. The technique is herringbone and square stitch. The main projects are shown in the first photo, and the second photo shows you a variation with tiny bicone crystals that is explained at the end of the tutorial.

The tutorial is 12 colorful pages, with over 65 illustrations and photographs.

Tuesday, November 25, 2014

More on Puff Beads, a design for the beaded bead connoiser who loves right angle weave

I finished a new tutorial last week, called Puff Beads.  The Puff Bead technique is shaped Super Right Angle Weave (SRAW) with some embellishment to make it stiff.  I'm pretty sure that puffs are not the most visually beautiful jewelry I've ever created, but structurally, mathematically, they are quite nice... fascinating, really.  If you are a connoiseur of beaded beads, and enjoy making them as an intellectual activity, I think you will really enjoy making this design.  I think what makes Puff Beads interesting is that you bead the surface of a shape made out of cubes, in particular, a torus. I mean, who doesn't like doughnuts, right? 
But seriously, most beaded tori include the whole doughnut, including the volume on the inside AND the surface on the outside: the cake AND the frosting.  Puffs are just the frosting.  Certainly there are peyote stitched tori where you only bead the surface, like my Nuts and Washers below, but with peyote stitch, the beads sit so close together, you can't see through the beadwork.   
https://www.etsy.com/listing/193802036/

In comparison, when you bead just the surface of a doughnut with SRAW, you get a square lattice of beadwork with holes that let you see inside the doughnut, like right through the side. 

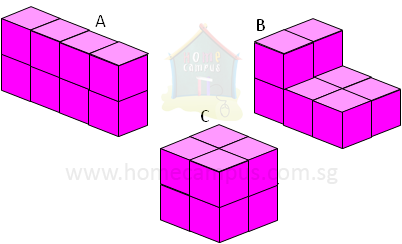
In particular, you can see the big hole through the little holes from all different directions, and I think that makes this technique rather unusual. Thinking further, one could apply this technique to cover all kinds of crazy surfaces made out of cubes, like these pink cuboids, for example.  I just learned that a shape assembled out of cubes placed face to face is called a "cuboid."
My tutorial is designed to teach you the theory behind bead weaving cuboids with SRAW, and I chose the torus as my explicit step-by-step project because I like the idea of beading a hole through the center of a sphere.  At the end of the tutorial, I also show examples of beaded beads using the structure in figure C above, with some discussion about how to apply the techniques to this cuboid design, but I don't give explicit step-by-step instructions for how to do it.  My goal is that after you learn how to build a torus, then simpler shapes will be easy for you figure out how to bead without me telling you every step.  That's my hope, anyway.

... because there is so much cool stuff you can build with cubes.  For example, you could use the Puff technique to bead weave the surface of a trefoil knot, like this beautiful wooden puzzle by Tom Longtin.

I'm not saying it would be easy, just possible.  (I just thought I'd throw that challenge out there to see if I get any takers.)  Of course, you could also build this knot with cubic right angle weave, like I did for my Highly Unlikely Triangle. That would also be nifty.  

So if you really love cubes, and you want to learn the Puff Bead technique, you can find the tutorial here:  https://www.etsy.com/listing/210844618/
https://www.etsy.com/listing/210894145/
And for those of you who just want to look at pretty pictures, or want some beads but don't want to make them yourself, I put this pink necklace up for sale, you know, just in case you like pink.  Thanks for looking.
https://www.etsy.com/listing/210894145/

Friday, April 4, 2014

Instant Download PDF Patterns Now Available

We are continuing to get your patterns relisted as PDF instant downloads at reduced prices. It's a slow process, but today we got the Borromean Link patterns and kits back on the website.
We also have patterns and kits for the Color Medallion and the Starburst Galaxy, shown below.
Thanks for looking!

Tuesday, February 25, 2014

Math Cookies

We made math cookies!  More specifically, we formed mathematical objects out of shortbread and white chocolate. These photos show the combined confectionery efforts of Ruth Fisher, Andrea Hawksley, Vi Hart, and myself.  
Here you can see our set up.  We rolled out the colored shortbread dough using some plastic strips so that we would get a nice, evenly thick sheet of dough.  Here we are cutting (1 : root2) rhombuses with 60° rhombus holes.  We were able to cut the holes with that little metal cookie cutter, but we had to use a knife and straightedge to cut the larger rhombi.
With the little 60° rhombuses that were in the holes, we made a tiling.
Here's the shortbread tiling, before baking.
Shortbread tiling, after baking.
Can you guess what we made with the bigger rhombuses?
 Here you can see them being assembled on jig made from paper and tape.
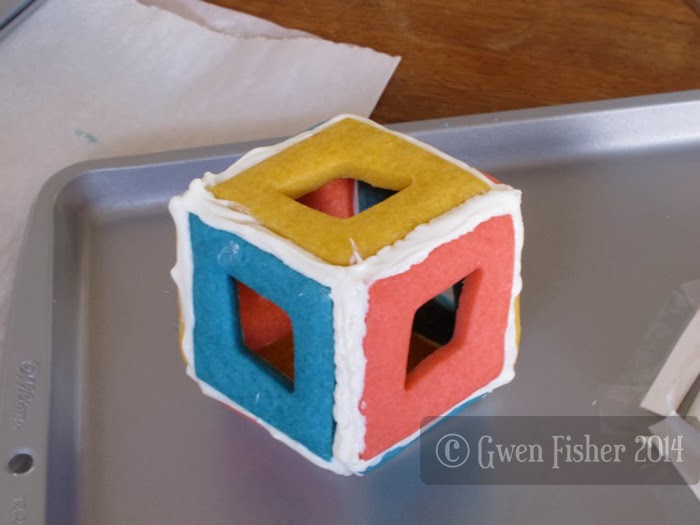
We made a rhombic dodecahedron, called that because it has 12 faces, each of which is a rhombus.
Here's the complete rhombic dodecahedron assembled with white chocolate.


Then we started assembling our blue hexagons.  Here's the jig for a truncated octahedron.
Here's the jig for a truncated icosahedron.
Here we are assembling the truncated icosahedron with melted white chocolate.

Here you can see all three of the truncated regular polyehedra we made.  Notice we just used one cookie cutter for all of these cookies, a hexagon. In fact, it was BECAUSE we had a hexagonal cookie cutter that we decided to make these particular shapes.         
Quasiperiodic cookies taste better than nonperiodic ones.  We had to make our own cookie cutters for this piece.  We made them out of paper and tape.  This is called a Penrose tiling.  We wanted to decorate it with white chocolate to show an isomorphic tiling on top, but we found an error.  To anybody else who can find the error, you will receive two points and a gold star.
This is a short braid made out of shortbread.
With the last bits of dough, we made lots of little tetrahedral cookies.

We assembled these tetrahedrons into second generation Sierpinski tetrahedral cookies with white chocolate. This actually worked better than I thought it would. Unfortunately, we ran out of dough before we could make the third generation. 
They were delicious.  Thanks for looking. 

Updates:
Vi Hart also created a video of our cookies making adventure.  She's a wonderful story teller, and among other things, she included my dog Walter's involvement in our day of making cookies.  Check it out. http://www.youtube.com/watch?v=_n1126GoxbU

We even made it on BoingBoing! http://boingboing.net/2014/03/04/cookie-geometry-with-vi-hart.html

Thursday, January 30, 2014

TUTORIAL- Celtic Knots Part 2: Rings Rosettes and Beaded Beads

Since 2004, I've enjoyed making all kinds of beaded beads, but I have to say, these knotted ones are a little different from all the rest.
Each beaded bead knot is made from one long strip of seed beads, woven together into a circular knot.  They're a little bit soft and squishy while at the same time holding their shape.  I usually prefer my beaded beads to be rigid, but with these beaded beads, I like them flexible. 
I also like that the holes are large, so you can string these beaded beads on cord, matched with lampwork beads.  I can't tell you how long it took me to assemble this mere two inches of beads, but it was longer than I'd like to admit. In the end, I like this simple little necklace a lot.  Small, subtle, but with lots of interest, texture and detail.
So do you want to learn how to make knotted beaded beads?  Well, you're in luck.  I have a tutorial that will teach you how to braid pieces of beadwork into knotted beaded beads.
These knots are quite flexible, literally and figuratively! You can turn them inside out. They can be worn as finger rings, and since I explain how to make them in a ton of different sizes, you can make one that fits you!
You can also flatten these beaded knots to make rosettes for pendants or earrings.   This pattern is suitable for beginning bead weaver, with enough design possibilities to entertain advanced bead weavers. I provide specific counts for four different knots, and explain the general concept so you can bead the whole set of braided circular knots, any size you want!
Circular Celtic Knot Pattern with Bead Weaving
If you like this design, you'll also enjoy my first tutorial on Celtic knots that shows earrings made from rectangular knots,

Friday, January 24, 2014

TUTORIAL- Celtic Knots Part 2: Rings Rosettes and Beaded Beads

This is my second tutorial on Celtic knot.  The last tutorial showed earrings made from rectangular knots, whereas this new tutorial will teach you to braid the pieces of beadwork into circular knots.
Circular Celtic Knot Pattern with Bead Weaving
These knots are quite flexible. You can turn them inside out. They can be worn as finger rings, of flatten them to make rosettes for pendants or earrings. You can also add extra stitching to turn these knots into sophisticated beaded beads with large holes. This pattern is suitable for beginning bead weaver, with enough design possibilities to entertain advanced bead weavers. I provide specific counts for four different knots, and explain the general concept so you can bead the whole set of braided circular knots, any size you want!


Circular Knots
The tutorial is 17 pages, with over 60 full color illustrations and photographs.  Click the photos to go to the listing.  Thanks for looking.

Thursday, January 16, 2014

Tutorial Celtic Knot Earrings and Knotted Cross

I just released my newest tutorial on beaded rick rack and Celtic knotwork designs.  This tutorial starts with a beginner’s lesson on beaded rick rack in several sizes. Then you learn to make beaded squares, leading to the main pattern: the Celtic Knot Earrings shown here. In a later project from the same pattern, I also explain how to make these earrings.
And there's more, because I also devote a full page to this beaded Celtic cross.  I don't give step-by-step instructions for this advanced design, but I do give enough information that if you put your mind to it, you should be able to make one for yourself.  
Lastly, here's a photo of some of the basic designs I show in the pattern, namely beaded rick rack and squares.
Thanks for looking!

Thursday, January 9, 2014

Tutorial Celtic Knot Earrings and Beaded Rick Rack

I just released my newest tutorial on beaded rick rack and Celtic knotwork designs.  This tutorial starts with a beginner’s lesson on beaded rick rack in several sizes. Then you learn to make beaded squares, leading to the main pattern: the Celtic Knot Earrings shown here. The beaded rick rack technique works remarkably well with lots of different bead sizes. 
https://www.etsy.com/listing/174859574/
This pattern ends with 7 colorful pages of dozens of beading projects and illustrated designs to inspire you to make beautiful beaded rick rack and knotted jewelry.  In 2004, Blake Mellor and I published a paper together called, “On the Topology of Celtic Knotwork Design,” and I used what I learned from writing that paper to design some of the beadwork in this tutorial. 
This pattern is suitable for beginning bead weavers with enough design possibilities to entertain advanced bead weavers as well.

Because rick rack is a common textile trim, I'm considering this to be part 7 in my series, The Beaded Lace Adventure, where I aspire to write a series of tutorials designed around making a large collar necklace out of beaded lace. I am carefully documenting my process in this series, and I invite you to make a lace collar or cuff bracelet with me.

As always, thanks for looking!

Monday, September 30, 2013

Illuminated Blueberry Buckle Recipe

In 2002, I got really into studying old books, really old books, the kind that were written by hand with a chiseled reed and burnt walnut shell ink, the kind that were painted on parchment or vellum with hand ground pigments of white lead, green malachite and blue lapis lazuli.    Most of what I studied were old religious texts, some dating as far back as AD 400.  After hours and hours of pouring over all of the books I could find on illuminated manuscripts, I learned to do calligraphy and how to glue real gold leaf to paper.  I wanted to make something similar to what I saw in books like the Book of Kells, but not being a particularly religious gal, I looked for some non-divine inspiration and found a recipe for a blueberry buckle, which I adore. 
I wish I knew who wrote it, but I don't.  It was ripped out of some home magazine in the late 1990s, and I won it in a party game with a mug of blueberries because I gave the best guess for how many blueberries were in the mug.   Here is my illuminated recipe for a blueberry buckle.  All that glitters is 24K.  It's a combination of ink and gouache on paper.  It's currently hanging in a fancy gold frame at my mother's house.
If you don't know what a buckle is, it's like coffee cake, with a crumble topping, and this one is overflowing with blueberry goodness.  Seriously, it's so good with all of that cream, butter, vanilla, cinnamon, brown sugar, flour, and blueberry goodness, I had to immortalize it in gold leaf with a rose vine, ivy, Celtic knots, and three different portraits of my late kitty, Boo.  If you like cooked blueberries, stop what you are doing and MAKE THIS RECIPE!  You won't be disappointed, unless maybe if you skimp on the butter and cream. 
By the way, if you click on the picture of the whole recipe, then right click, then click view, and click once more, you can see it large to get a better look at some of the details that are hard to make out at this size.  Thanks for looking.

Related Posts Plugin for WordPress, Blogger...