Showing posts with label hexagon. Show all posts

Monday, December 11, 2017

Truncated Icosidodecahedron in Beads Crater Moon Beaded Bead

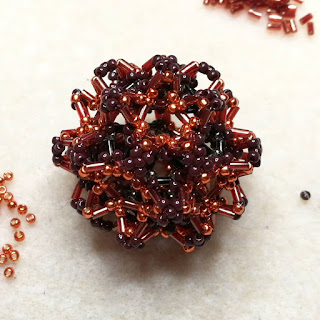
Meet Crater Moon.
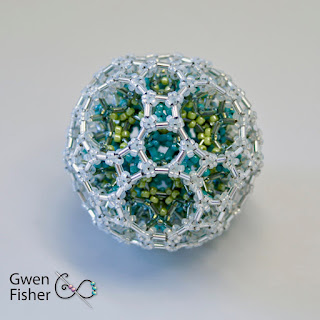
and Crater Moon in White...
https://www.etsy.com/listing/579082293
Each Crater Moon is composed of nearly 2700 beads.
https://www.etsy.com/listing/582628369/
The American Mathematical Society recently posted a photo of an amazing structure on their Facebook page with no comment of who made it. They called it a rhombicosidodecahedron (3.4.5.4) because that is the name of the polyhedron in the very inside layer, but Susan Goldstine noticed that the outside layer is actually a truncated icosadodecahedron (4.6.10). This object is a multilayered compound of unusual polyhedra.
With help from Susan, I figured out how to weave it with seed beads and thread. Susan built this model below using Zometool, and wrote, "This is what the structure above each triangular face of the rhombicosadodecahedron looks like. I feel better about not being able to make out what's going on from the original photo. The cavity has a triangle, six trapezoids, three pentagons, and the hexagon at the top." Furthermore, "Above each core pentagon is half an icosidodecahedron (3.5.3.5)."
To bead it, I used an edge-and-cover weave with 3 mm bugle beads for the edge beads and size 11° seed beads for the cover beads. (There's one exception, where I used 11° seed beads for the short edge beads under the squares.) In other words, every n-gon has 2n beads, including n edge beads alternated with n cover beads, all sewn in a loop.

Here you can see how I started to weave the inside layer, showing the edge-and-cover weave for (3.4.5.4), also known as the rhombicosadodecahedron as I mentioned above.
This is a photo from Ivona Suchmannova of Spiral Beading, showing the first layer curled into a ball.
This is the complete first layer of Crater Moon with 6 mm bugle beads and 11º seed beads. This piece will finish a lot larger than the others because the bugle beads are longer.
Here is the start of the second layer on Ivona's bead. She stitched loops of triangles around the pentagons, connected by at the bugle beads.
This shows the start of layer 2 with the longer, 6 mm bugles. You can see the 5 triangles around the pentagons and the 3 trapezoids around the triangles. The short edge of the trapezoids is the aqua 8°. All other beads are 11° and 6 mm.
 
Next, the center front is still just one layer, 
but layer 2 is nearly complete.  Layer 2 
consists of 30 little 3D pentahedrons sitting 
on top of the squares in the first layer. Four 
little walls like a camping tent, the four other 
sides of the pentahedrons include two 
triangles and two trapezoids. The short sides 
of the trapezoids are the one place where 
we use an 11° instead of a bugle bead.


These show the second layer finished. The seed beads in the center of the Xs (aqua below, burgundy above) are the tops of the tents, the one place I used seed beads for edge beads.
This is the start of the third layer. It's triangles and pentagons. Here are the pentagons.
And here you can see both pentagons and triangles.
You can add the pentagons and triangle in two steps, or you can stitch them together.
Here you see 3 of the 12 rings done.

Four more to go!
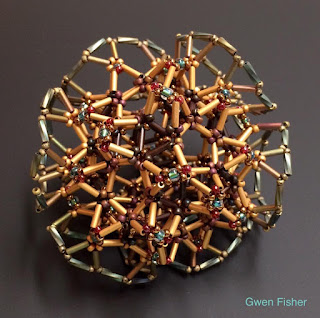
 Here all 12 are done.
In the fourth layer, I finished the space under the 30 squares, adding two trapezoid loops per square.

The fifth and final layer requires adding 720 size 15° seed beads to the outer surface.  Only then does the Crater Moon really hold its shape neatly.
You should make one.
It's just 11°, 15°, Toho 3 mm bugles, and Fireline 6lb.
And a whole lot of stitches.
Here you can see how big it is, just 1.75 inches across or 45 mm.
If you would like to have your very own Crater Moon, you can find the white one in my Etsy shop here: https://www.etsy.com/listing/579082293/
The larger Crater Moon is available here: https://www.etsy.com/listing/582628369/
Thanks for looking.
P.S. If you'd like to try weaving beads, but you think that the Crater Moon is a little beyond your skill set, have a look in my Etsy shop for tons of other tutorials for all skill levels.
Monday, September 12, 2016

Tutorial - Bicone Bangle Bracelet Pattern Made with Seed Beads

https://www.etsy.com/listing/464065712/
This beading tutorial explains how to bead weave a bracelet with two sizes of Japanese seed beads and two sizes of bicone crystals. Use Swarovski crystals for a lot of sparkle! No fancy shapes required! The Bicone Bangle Bracelet is hollow and somewhat flexible, but if you reinforce your stitching, it will be stiff like a bangle should be. It measures 11 mm wide and 9 mm thick, 79 mm in outside diameter, 62 mm inside diameter.

This tutorial includes step-by-step instructions for weaving the bracelet into a continuous bangle.

This tutorial is designed for intermediate bead weavers. The weave is a variation on David’s Star, an angle weave like a cross between hexagon angle weave and super right angle weave. If you like angle weaves and want a new challenge, you’ll love this.

Thanks for looking.

Wednesday, August 26, 2015

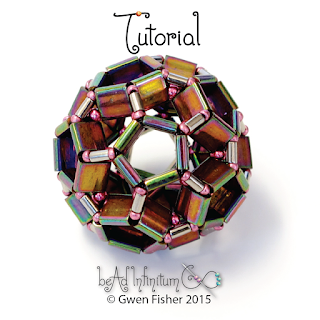
New Tutorial - Tila Buckyball Bead Beaded with Bugle and Seed Beads

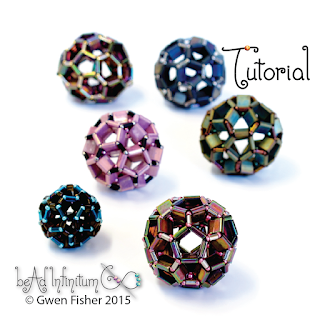
Here is a new tutorial that will show you how to weave beautifully spherical buckyballs with two-holed Tila beads (or half Tilas), bugles and seed beads.
beaded buckyball

The design is based upon the structure of a soccer ball. When made with shiny metallic beads, it has lots of facets that reflect light like a disco ball. The beaded bead is remarkably hollow with lots of large holes that let you see inside.
beaded buckyball

This tutorial is suitable for intermediate bead weavers who know have already beaded a dodecahedron of some sort. This beaded bead is a relatively quick project that will push your spatial reasoning thinking to new places.
beaded buckyball
Presented is a very efficient and intuitive method for beading the beaded beads and earrings, both in two sizes. Yes, that's right, you can make matching earrings in two sizes, and they weave up rather quickly!
pentagon earrings
 Thanks for looking!

Tuesday, July 21, 2015

New Tutorial - Tentacle Bracelet Beaded with Honeycomb Weave

I recently released my newest tutorial for a bangle bracelet. I called it the Tentacle Bangle because the way the embellishment looks reminds me of the suckers on a octopus' tentacle.
Beaded Tentacle Bangle Bracelet
This tutorial explains how to bead weave a bracelet with one size of seed bead, round or bicone beads, and thread. No fancy shapes required! The Tentacle Bracelet is hollow and somewhat flexible. It is quite substantial, measuring 14 mm wide.
Tentacle Bangle Bracelet
This tutorial includes step-by-step instructions for weaving the bracelet into a continuous bangle. This tutorial is designed for intermediate bead weavers. The tutorial is 12 pages, including about 75 illustrations and photographs. The tutorial is a PDF file that gives step-by-step instructions for the bracelet and earrings in the photos.
This design uses the honeycomb angle weave. It’s like right angle weave (RAW), but with other angles. If you like RAW and want a new challenge, you’ll love this. However, you don’t need to know RAW to follow this tutorial. This is my fifth tutorial using honeycomb weave. The first was the Daisy Chain Cable.
Daisy Chain Cable Bracelet Tutorial
Second is the Delta Queen Necklace.
Third is the Honeycomb Chain Bracelet.
Fourth is the Solaris Bracelet.
And here you can see one last photo of the Tentacle Bracelet. 
https://www.etsy.com/listing/241077024/
As you can see, honeycomb weave is a very versatile weave.  Somehow, I think I'm not done designing with it yet.  As always, thanks for looking.

Thursday, June 4, 2015

New Tutorial - Solaris Bracelets Made with Beaded Honeycomb Weave

Solaris Beaded Bracelet
This tutorial on honeycomb weave explains how to make bracelets with beads and thread. Honeycomb weave is a flat angle weave that creates a dense but flexible fabric of seed beads with large holes. The wide, lacy bracelet has circular embellishments (the suns) that run down the center of its length, and matching beaded buttons for the clasp. The tutorial explains how to make both versions of the bracelet, with one button or two.


Solaris Beaded Bracelet Pattern
Honeycomb weave is like right angle weave (RAW), but it is denser and is made with other angles. If you like RAW and want a new challenge, you’ll love this. However, you don’t need to know RAW to follow this tutorial. All you need is seed beads, a few bicones and the desire to try something new. No fancy bead shapes required! This is my fourth tutorial with honeycomb weave.  The others are the Daisy Chain Cable, the Delta Queen Necklace, and the Honeycomb Bracelet.

This tutorial is suitable for intermediate bead weavers with enough design possibilities to entertain advanced beaders. Included is a sheet of honeycomb graph paper so you can make up your own designs.


Solaris Beaded Bracelet Tutorial
The tutorial is 22 pages, including over 125 illustrations and photographs. The tutorial is a PDF file that gives complete step-by-step instructions for how to make the bracelets. At the end of this tutorial, I show you a few step photos for a large pendant that uses the same techniques. Click on the photos to go to the listing.  Thanks for looking!

Saturday, May 2, 2015

New Tutorial - Honeycomb Chain Bracelets and Finger Ring

This tutorial on honeycomb weave explains how to make bracelets and rings with beads and thread. Honeycomb weave is a flat angle weave that creates a dense but flexible fabric of seed beads. It has large holes that you can fill with crystals or leave them open for a lacy look. Honeycomb weave is like right angle weave (RAW), but the beads fit together better, and it is made with other angles. If you like RAW and want a new challenge, you’ll love this. However, you don’t need to know RAW to follow this tutorial.
https://www.etsy.com/listing/231972545/
These bracelets are a great way to feature that old favorite button you've been coveting.
https://www.etsy.com/listing/231972545/
This tutorial is suitable for advanced beginners to intermediate bead weavers with enough design possibilities to entertain advanced beaders. Included are lots of variations on the basic stitch and a sheet of honeycomb graph paper so you can make up your own designs with honeycomb weave.
https://www.etsy.com/listing/231972545/
The tutorial is 17 pages, including over 90 illustrations and photographs. The tutorial is a PDF file that gives complete step-by-step instructions for how to make the bracelets. At the end of this tutorial, I show how to make the center medallion into the blue and gold finger ring for when you want a quick and easy project for instant gratification! I also included some tips for making matching earrings.
https://www.etsy.com/listing/231972545/
No fancy shapes required! In fact, you can stitch honeycomb weave with just one size bead in two colors. For the jewelry shown, that one size would be 11° seed beads, but you could use any size you want to scale the weave larger or smaller. All of the other sizes are optional and we use them to embellish the weave and create variations on the basic stitch. Thanks for looking!
Related Posts Plugin for WordPress, Blogger...