Friday, December 23, 2011

Felt cuffs: It must be cold outside

If you love fiber, click on this photo:
It must be cold outside because all I want to do is make warm fuzzy things.  I hadn't made any felt cuffs in months, so I dragged out my collection of wool and other fiber delights, and I made these cuffs.  I sold out of all of my purple cuffs, so I went with purple and black, and again, purple fails to show its true colors in photos.  These photos show much more blue than what I see in the wool.  I think they're prettier in real life. See the listing for these felt cuffs.
And then I made this pair is similar colors but in a smaller size.  For these, I used yarn that I spun by hand to embellish the cuffs. The base of these cuffs are from a recycled wool sweater, so they are very stretchy, but the wool embellishments are firmly felted into place.

Wednesday, December 21, 2011

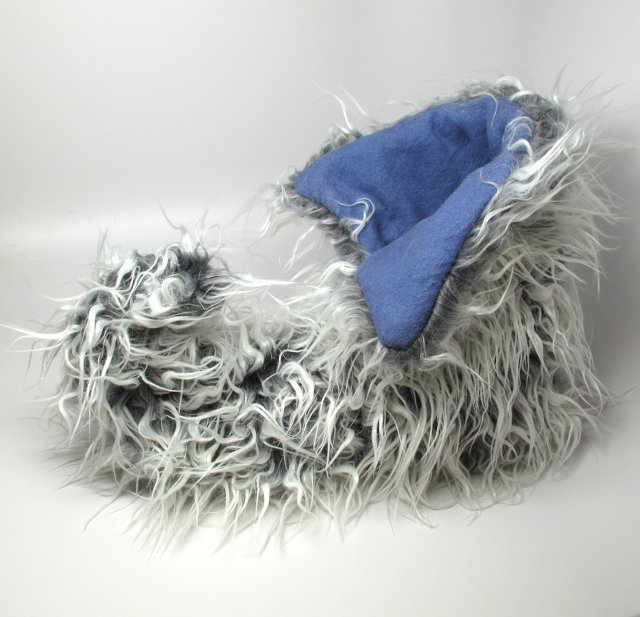
Furry Elf Slippers

In early November, I had the wonderful opportunity to spend some time with my good friend Zelda, who is, among many things, a costume wizard extroidenaire.  I presented her with the idea of designing a pair of slippers, something whimsical with a turned up toe.  I was thinking of something you might see on an elf or gnome, large and comical, much bigger than regular shoes to exaggerate the size of your foot because big feet are funny, and adding extra padding makes the slippers warm.  Zelda helped me imagine how the tops should look, and I drew a few pictures.  We decided that faux fur was the best choice, for so many reasons, not the least of which is the yards and yards of it stashed high up in the closet, leftovers from previous coat projects. 
I have never sewed slippers before, but I was confident that if I wasn't afraid to cut up and waste a bunch of fabric, paper and tape, I could eventually figure out a pattern.  That's what it takes to make a pattern.  You also need a needle and thread, a seam ripper, scissors, pencils, and patience.   I also used my sewing machine. 
To start, I traced and measured my foot, and drew a paper pattern that I used to cut the ugliest mustard yellow quilting cotton.  Ew.  I sewed it together, ripped it apart, pinned it, resewed it, inked in the lines, ripped it all apart, and made a new pattern.  I did that whole thing again in a different but equally ugly piece of fabric.  Two tries done, I realized that I needed to work on the lining FIRST, and THEN use that to design the fur pattern with the curling toe.  I was doing it backwards.  So I made another draft, but this time of the lining, something that conformed to the shape of my foot.  The lining took me two rounds of drafts, and then one more draft for the fur.  I made many adjustments at each draft. 
And then FINALLY, I was ready to cut some fur.  I knew my pattern was still wonky and unlikely to meet my vision perfectly, but it was good enough to make slippers, and my feet were cold. So I made a blue pair which are super comfy, but I didn't include enough ease in sole, which caused the toe to only curl up halfway.   My sister wanted them, so I traded for her home made chocolate covered caramel with two kinds of chile and salt. She also gave me a really ugly cookie, that I asked for in particular because I felt sorry for it in the beautiful bouquet of flower cookies.  It was yummy. 
Anyways, I altered the pattern again, and made myself a pair, finding only a few minor improvements, like trading in the icky polyester batting I was using for nice natural cotton batting.  Then I made the pair in the first two photos, and they are just the way I wanted them to be, so I put these slippers in my Etsy shop.  I think maybe I'd like to write up and sell this pattern.  I'm pretty happy with it.  They're super comfy.

Sunday, December 11, 2011

Furry Hats with Ears and Horns

Making fuzzy hats with ears and horns makes me happy because people always seem to smile when they're wearing them.  People also seem to smile at me when I'm wearing mine.  We call ourselves Horny Hatters.

I'm offering two new hats for sale so you can be a Horny Hatter too.  I decided to start numbering them so I can keep track of how many I make.

Pink and Purple Horny Hat #13
I got a bundle of faux fur remnants from the fabric store, and this super thick fur was in the set.  I matched it with purple horns in cotton and a pretty purpley pink silk lining from my overflowing stash of silks. 
You know I love pure silk, right?  Well this one is particularly stunning, the way it shimmers in the light.

Blue Horny Hat #14
After making a pink one, I wanted to make one in boy colors.  Here you can see the blue one with the matching coat I made my sweetie. 
This blue one has especially big ears. I used a button clasp instead of pom-pom ties, just for a change.

Tuesday, December 6, 2011

Flashy Blue Labradorite Sunflower

I made this pendant by capturing a large labradorite coin bead with the fringe method for beading around a core bead.  In particular, I used variation of the Rivoli Sunflower design for the pendant.  I adore the blue glass beads in this piece and the way the inclusions shimmer in the light.  I think the shimmer works well with the blue flash of the labradorite stone.
For the necklace part, I used a variation herringbone weave that I described in my Toggle Clasp & Cable pattern.

For more information and to purchase this necklace, click the photos.  Thanks for looking.

Wednesday, November 30, 2011

Leopard Print Beading

I just listed this earring and pendant set made with my "picnic weave" but I think this color scheme looks more like a leopard print than a picnic blanket.

Although they look quite different, this weave is an easy variation of my Night Sky weave

Monday, November 28, 2011

Flower Ring Bouquet

If I had all of the time in the world, I'd make a large bouquet of beaded flowers like this.
This is a pile of Flower Rings made with the fringe method, a technique for weaving beaded beads that Florence Turnour figured out and showed me in 2004.  If you haven't tried the fringe method yet, check out this free beaded bead tutorial that Florence and I wrote together.

Sunday, November 27, 2011

Wonka of Wonderland Top Hat #5

Last night, I finally finished a custom order for another top hat.   This one is number 5. 
This photo above is now the logo for RWS Associates.  What these photos don't convey is how springing this hat is.  If you bend the brim, it will spring right back into shape. 
What you also can't see is that inside of the silk and cotton fabrics are stiff double buckram and wire, which together, give this hat its form.  Double buckram is two layers of cotton fabric with a thick coating of sizing.  Sizing is a combination of glue and stiffener that can be re-wet with water or steam to sculpt it.  When it dries again, it stays in whatever shape you left it to dry.  To shape this hat, I only used a bit of steam as the wire is doing much of the work.  I really love the sculptural possibilities of wire and buckram, but they require a very firm grasp when working with them, and sewing through the buckram requires strong fingers.   

I figured out that sewing cut up felted wool sweaters is much easier on my hands.  So, now I make top hats with felt, like this one.
They are so soft, cozy, and comfortable that I also wrote and illustrated a tutorial on how to make a top hat with felted wool sweaters.  So you can make one too.
Want to own one of my hand made hats?  See what hats are for sale in my Etsy shop. Thanks for looking!
Related Posts Plugin for WordPress, Blogger...