Monday, April 30, 2012

Hyperbolic Felt Lace Bracelets

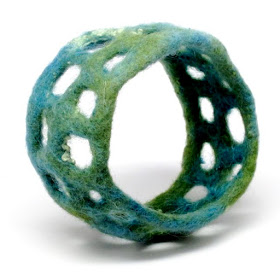
My new friends and I met for our second "Make Stuff Sunday" yesterday, and we continued to play with felt.  As you can see from my last few posts, I devised a technique for making chunky felted lace which can be used to make surfaces of all types, and I've been playing around with it to see what is possible.
In this post, all of the (lone) pieces in the photos are examples of hyperbolic surfaces, meaning they have saddle points or negative curvature.  Informally, it's a saddle point if the concavity goes up in one direction and down in another direction.  One super cool fact about hyperbolic surfaces is that the geometry on a hyperbolic surface fails the parallel postulate, which is why I think everybody's been calling it a postulate for so long and not an axiom.... but I digress.  In terms of sewing, you might say that a piece of hyperbolic fabric has ruffles, or it flares like you get when you add gussets to a skirt.  This is in contrast to flat fabric (i.e., normal fabric) or something that curls into a ball, like the blue-purple bracelet here...
...or the green-purple bracelet on the bottom of this photo.  The top bracelet is hyperbolic, and the bottom bracelet is spherical with positive curvature (i.e., it's a ball).  I like the way you can stack them into a vase.
This purple and black piece resembles a hyperboloid, but I checked it for straight lines and it failed to have them.  So it's still hyperbolic, but a little too ruffled to be a true hyperboloid.
This is a little crown for a snow queen.  I stitched beads to the felt to look like snowy ice crystals. Like most crowns, this piece flairs out at the top, thereby making it hyperbolic.  It's more or less the same size as the others, and it still fits as a bracelet, but I intended it mostly to be worn on top of the head as a crown.   I think it would look nice with a wedding dress, something blue, and all.
This cute little ruffle isn't a bracelet, but it is an awesome little hyperbolic surface.  More precisely, it's a patch of the hyperbolic tiling by pentagons, where four pentagons meet at every vertex.  It's called the order-4 pentagonal tiling.  This piece was created by mathematical rock star, Vi Hart (she calls herself a mathemusician, but I kind of like mathematical rock star).  After our adventures last week making Seifert surfaces in felt, Vi wanted to felt a hyperbolic tiling.  I gave her some instructions to get her started, and she did everything else.  
In fact, it was her expressed desire to make this piece that led me to devise this technique for felted lace.  This is a nice example of how representing abstract mathematical objects as sculptures leads to more general techniques.  I really love it when that happens.  Math inspires art, which then gives me a reason to write about both.  
The yellow is wool, and the orange is recycled sari silk, which Vi used to emphasize the boundary.  After playing with hers, I kind of want one.   But I also want to make a felted hypercube.  Too many choices...

Friday, April 27, 2012

Textile Cuff Bracelet No. 35

I've been having way too much fun with felt lately. I just can't get over how sculptural wool felt is. You can make these wildly lacey pieces that are light as air, but they hold their shape.  Compress it an it will collapse, but then it pops right back into position. This is a bracelet, by the way, and it's in my Etsy shop just in case you need it.  Only you know for sure.
Yesterday, a good friend of mine set up my computer so that I can easily watermark my photos in batches rather than one at a time.  So finally, after releasing more than a thousand photos on to the internet with no watermark, I'm finally going to have them marked with my name.  What do you think?  I'm not sure that this is the final version, but I think it's a good start.  I'm definitely open for suggestions for improvements, if you have any.

Wednesday, April 25, 2012

Textile Cuff Bracelet No. 34 Purple Wet Felt

I love the sculptural possibilities with felt, that it is soft, but at the same time, holds its shape so that large bangle bracelets like this are possible.  It's so light, you'll hardly notice you're wearing it.  
It's in my Etsy shop.  Click on the photo to go to the listing.

Tuesday, April 24, 2012

Felt Cuff Bracelet No. 33


I'm experimenting with a new way to make felt that gives a nice netting with large holes.  The result reminds me of coral skeletons.  I'm definitely going to try more of this.  Soon.  It's made of wool, silk and mohair, and it's available in my Etsy shop.  Click on the photos to go to the listing.

Sunday, April 22, 2012

Seifert Surface of a Figure Eight Knot

Today I had fun making felt with new friends.  Everyone made interesting topological surfaces, and this was mine.
I chose this design because it's a Seifert surface for a figure eight knot.  In part, that means that the edge (or boundary) of this surface is a figure eight knot.  It also has two faces, one in green and the other in purple.  It's made of felted wool and silk.

Herbert Seifert was a mathematician who studied topology, and he figured out that if you take a knot, and make this special kind of surface that has the boundary as the knot, then you can use that surface to learn lots of interesting stuff about the knot.  If you'd like to learn more about Seifert surfaces and see tons of nifty pictures, I suggest you check out this page by Jack van Wijk.  It was one of his papers (available at the bottom of the page) that gave me the idea to make this.

This piece is for sold.

Saturday, April 21, 2012

Highly Unlikely Frame, Tetrahedron and a Video

I've been having fun making impossible objects possible.  
In this case, this frame is designed from the optical illusion shown in the line drawing here.
Like many of my pieces, this one has to be held to be fully appreciated.  The piece above is for sale in my Etsy shop.  Click on the photos to go to the listing.  

In a similar vein, here is an Unlikely Tetrahedron I made a while ago.  I don't love the colors, but I was happy to find that that the idea works.  Notice that every edge has a quarter twist in it, and every face is an "impossible" triangle.
Both of these pieces are made with cubic right angle weave (CRAW).  Here's a quick and dirty tutorial that I made on that stitch.  It's not my best work, and not really designed for beginners, but I made it in  response to a request for a tutorial on CRAW where every face has a different color.


I have a tutorial for the Highly Unlikely Triangle, which uses CRAW. 

https://www.etsy.com/listing/204753180/
Thanks for looking.

Saturday, April 14, 2012

Highly Unlikely Square


The Highly Unlikely Square is a beaded variation of the Impossible Triangle of Roger Penrose that was made famous by M.C. Escher.  While the Impossible Square is not possible to make in three dimensions, my beaded version has twisted sides, which make it just highly unlikely.
I have a tutorial for the Highly Unlikely Triangle, a related but simpler design. 

https://www.etsy.com/listing/204753180/
These funny little earrings remind me of tiny temples.  I made them with a variation of my Infinity Prisms pattern.
Thanks for looking.

Thursday, April 12, 2012

Hyperbolic Beading No 3


I tried beading another hyperbolic tiling.  It's called Order 4 3 3 Dual, boring name, un-boring tiling.  A picture is worth a thousand cryptic sentences, so here's an illustration of Order 4 3 3 Dual using the PoincarĂ© disk model of hyperbolic space.

This beautiful creature is composed entirely of hexagons.  Notice the center has four hexagons meeting at a point, and if you go out a bit, you can find places where just three hexagons meet at a point.  Compare this with the red tiling below.  This tiling also has all hexagons, but it lies flat.   Here, three hexagons meet at every corner.

If you weave an across edge weave of this red tiling, you get hexagon angle weave.  Here's a tutorial where I explain how to do that weave.

Back to the hyperbolic tiling:  What makes "Order 4 3 3 Dual" hyperbolic (and not spherical or planer) are the four hexagons meeting at some of the corners.  The extra angles jammed into all of those corners is what makes it ruffle when you build it with hexagons that are all the same size.  In contrast, if you wanted to make a spherical tiling with hexagons, you could make them get infinitely smaller at a point like on the Sheikh Lotf Allah Mosque dome:
Alternately, you could add some pentagons, squares or triangles to make it work.  This image shows a pentagon near the top right, and I'm pretty sure there's another one diametrically opposite that I can't see.

Coloring:  I fiddled with the coloring a bit in my beaded version of Order 4 3 3 Dual.  In particular, I used gray beads for the blue and red tiles, and yellow beads for the yellow and green tiles.  I also made some rules for the beads sewn across the edges of the tiling depending upon whether the two adjacent tiles are gray-gray, gray-yellow, or yellow-yellow.

Chronologically, the photo below starts with figure 5.  Notice what a ruffled mess I had.  In figure 6, I did a bit to organize the ruffles to show the 4-fold symmetry, but it's still a mess. Figure 6 has the same orientation as the illustration of Order 3 3 4 Dual above.

Figures 1 through 4 show the finished piece.  It's a bit thicker than I'd like it to be for a pendant, but Figure 2 shows how easy it is to string as a pendant. 

Alas, this piece is a little wonky, more than I like.  No matter how hard I try to make it perfectly symmetric, it just wouldn't cooperate.  In my frustration, I just kept adding more crystals.  When all else fails, add more crystals, right?  Still, little wonky bits of beadwork flip this way and that, as you play with it.  I'm trying not to think about it.  I showed it to my friend Andrew, and he didn't mind the wonky bits.  So maybe it's just me.  Anyway, it's done.  Thanks for not reminding me that it's wonky.  I know.

What I learned: Why is it wonky?  I think my largest "core" beads are a bit too big for the space I put them in.  That'll do it.  Also, it's too ruffly.  I couldn't get the ruffles to all fit together neatly.  I think I need to make smaller patches of tiles.  Also, the patch of tiles I used was quite round.  I think if I made my patches more "square" (that's a hyperbolic square), it should be easier to fold all of the ruffles neatly into place.  At least that's the theory.  Hey, you know the difference between theory and practice?  In theory they're the same, but in practice they're different, sometimes.

Want more? I've been playing with beaded hyperbolas here:
hyperbolic beaded bead No. 1 
hyperbolic beaded bead No. 2


Saturday, April 7, 2012

Hyperbolic Beaded Angle Weave No. 2

This week, I wrote about beading the hyperbolic tiling (4.5.4.5).  I mentioned that if you take a different patch of this tiling, you can get five-fold symmetry.  To show you what I meant, I beaded the piece shown here.  This time, I also used a much larger patch of the tiling; so it's a lot bigger than the first one.  This side of this pendant shows most of the beaded tiling, including the center of my patch in the center of the pendant.  
This is in contrast to my first example, where you couldn't see the center of the tiling because it was in the center of the beaded bead, on the inside.  Here is that photo again so you can compare.
This is one of the reasons that hyperbolic tilings are so different from spherical tilings, like those we usually use to make beaded beads (e.g., a beaded dodecahedron).  You can almost think of a hyperbolic plane as a sphere that's been flipped inside out.  In a spherical beaded bead, the core bead (if needed) goes on the inside, and the beaded tiling goes on the outside.  In contrast, in a hyperbolic beaded bead, the tiling goes on the inside, and the multiple core beads go on the outside.  With flat weaving, there's no core bead at all.  This all corresponds to the fact that spheres have positive curvature, flat planes have zero curvature, and hyperbolic planes have negative curvature.

If you flip this piece of beadwork over (figure 2), you can see most of the larger beads I added to stabilize the angle weave.  From this side, you can also see (almost) the entire boundary of the patch of tiles.  Do you see the ruffled edge of seed beads zigzaging between the larger beads?  Patches of hyperbolic tilings have a lot of perimeter, and if you want it to lie flat like a pendant, you have to zigzag a lot. 
I had intended the side with the big beads, figure 2, to be the front, including the big blue Swarosvki rivoli in the center, but I think I like the other side better.  In any case, the two sides are very different.  They had to be.  This piece has the symmetry of a pyramid or a flower.  The five-fold symmetry in (4.5.4.5) wouldn't allow me to make the two sides the same, even if I tried. (Correction: I could have made the two sides the same if I destroyed all of the reflection symmetries.  In that case, the finished beaded piece would have the symmetry of a barber pole.)

In figure 3,  you can see what the beaded tiling looked like before I added the larger beads and the rivoli in the center.  At this stage, it also had an unfinished edge.  It was quite floppy and uncooperative, and I had to pose it carefully for the photograph.  Smile for the camera.

In figure 4, you can see how flat the finished pendant is.  With a little doing, I was able to make the finished piece pretty flat, just 12mm thick, which is a good size for a pendant. 

You can see that I strung the cord right through the holes in the angle weave.  There were several holes to consider, and I had to try a couple to find one I liked.  I was thrilled that I could string the pendant directly onto cord because the piece I showed in my last post has no great way to hang it.  It was somewhat of a beaded bead fail, but since it was a prototype, a first try at something new, I forgive myself.  I already have a whole pile of beaded checkers, pretty little sparkly clusters with no good way to string them. Yet beaded angle weaves have built in holes big enough for cord, so as long as you don't cover them all up with the larger beads, you can use them to string the finished piece.  Nice.

More? See hyperbolic beading No. 3.

Friday, April 6, 2012

Sierpinski Tetrahedron No. 6

I made my sixth beaded Sierpinski Tetrahedron to show at the Gathering for Gardner last week, and I just listed it in my Etsy shop.  So now you can have one for your very own.  As much as anything I've ever beaded, this piece has to be held to be fully appreciated.
This beaded bead design was the inspiration for a 22 foot tall jungle gym made of bats, balls, and two tons of steel.  If you would like to learn more about this project and see more photos of the jungle gym, check out my website on Bat Country.

Wednesday, April 4, 2012

Hyperbolic Beaded Angle Weave (4.5.4.5)

Last week, I attended the Gathering for Gardner an event held in honor of the late, great Martin Gardner.  In case you have never heard of him, Gardner is generally considered to be the most famous recreational mathematics writer of all time.  He wrote about puzzles and games, optical illusions and magic, mathematical art, poetry, and juggling; he also wrote the definitive annotated Alice in Wonderland, and the list goes on and on.  I grew up reading many of his books. My very first quilt (using a Penrose tiling) was inspired by one of his essays.

This year I got an invitation to the Gathering.  So I eagerly traveled to Atlanta, GA to meet this wonderful community of puzzlers, mathematicians, artists, magicians and so forth, all of whom love and have been inspired by Martin Gardner's writings, just like I have.  It was my first time attending, and I gave a short talk on mathematical bead weaving.  Although I only had five minutes to speak, I presented twenty something slides across a wide gamut of mathematical concepts that I have represented with bead weaving over the years.  (Now, I'm trying to turn my five-minute talk into a four-page paper. Wish me luck.)  I didn't realize until the day after my talk that it was the largest group I've ever addressed, maybe 300 people.  Fortunately, the talk was over so quickly that I didn't have time to get nervous.

At the Gathering, a few women showed their versions of hyperbolic planes.  These included the crocheted coral reef by Margaret Wertheim, the director of the Institute for Figuring; Daina Taimina's crocheted Geometric Manifolds; and the hyperbolic bead weaving of Vi Hart, who you might know from her videos about doodling in math class.  Inspired by their work, I thought I'd take a new try at bead weaving a hyperbolic surface of my own.  To do this, I first noticed that Vi Hart's version shows an edge-only angle weave of (7^3), that is, she uses one bead on every edge of a tiling with three 7-gons around every vertex.  Her version is sparkly, and fun to fiddle with, but it's very squishy and something of a ruffled mess.  It's nice to hold, but difficult to photograph as it doesn't hold its shape. It was exactly this kind of uncontrolled ruffling that had prevented me from trying to bead hyperbolic tilings in the past.  I had seen this kind of ruffled confusion before, in such works as Helaman Ferguson's hyperbolic quilt, and I didn't give it much thought because I like my beading (and quilts) to look more organized than that.

But then I had an epiphany. You see, at the Gathering, Daina Taimina exhibited crocheted hyperbolic planes in a way I'd never seed before.  She used strategic tacking to turn a ruffled mess into an organized structure like I had done in my Dancing Fan beaded bead.  Her crochet was stiff enough to keep the whole piece from collapsing, and the tacking kept the ruffles in place.  It was easy to see the symmetry in Taimina's crochet.  I noticed this tacking immediately as I had never seen someone do that before on a crocheted hyperbolic surface.   I decided to combine Hart's idea of beading a hyperbolic tilings with strategic tacking.  Instead of tacking the edges together, however, I would use larger beads within the folds.  Also, instead of using an edge-only angle weave as Hart had done, I tried an across-edge angle weave because it would give a tighter fit and thus make stiffer beadwork.  I made a patch of the tiling below, namely the uniform hyperbolic tiling that goes by many names, including (4.5.4.5).  It has squares in yellow and pentagons in red.  I chose this one because 4 and 5 are small numbers, so the beads would fit tightly.
What you see in the first photo in this post is three views of the finished beaded bead.  Below you can see what it looked like in progress before I added the largest beads.  I show five different ways to orient my little patch of this hyperbolic tiling, but these are not all of them.  Each illustrates a different subgroups of symmetries of this patch of the tiling.   I could have used any of these as the symmetry of my beaded bead above, and I ultimately chose the one on the bottom right.  A different patch of this (4.5.4.5) tiling could also be used to show five-fold symmetries.
This little experiment made me realize that there are a lot of interesting possibilities for hyperbolic beading that are yet to be explored, an infinite number in fact.  Many infinities.  If you thought there were a lot of different polyhedra to bead, that's only because you haven't tried beading hyperbolic tilings yet.  Try it, because with infinitely many tilings to go, I know for sure that I won't have enough time to bead them all myself.

I beaded another patch of (4.5.4.5) here.