Friday, December 28, 2012

New Tutorial -- Iris Drop Earrings

Last summer, I realized I really needed some pink earrings because I have a lot of pink clothes, and no pink earrings.  I designed this pair for myself, and I've been loving them ever since.  If you've seen me since July, you've probably seen me wearing these earrings.
They're pretty small, just one inch tall without the ear wires, but they're big enough to be noticed.   For the holidays, I made this pair for my sister with lots of dazzling Swarovski crystals.
This holiday season, I took some time to write an earring tutorial so you can enjoy making and wearing them too.  The design is a bit challenging, but I show lots of photos and illustrations with detailed written explanations to help you with every step.  Also, each earring uses just 3.5 feet of thread.  So you know they weave up quickly, if you don't make too many mistakes! 
I had a hard time coming up with a name for these, but I think they look a little like a Fleur de Lis.
That means "lily flower" or "iris" in French.
I love iris, and I have them growing in the front yard, black ones.  Well, they're very dark purple.
I had so many iris in one a little planter next to the sidewalk that I separated them this Fall, and replanted iris all around the yard.  I gave 15 plants to my neighbor and kept 15 for myself, and the spot I took them from is still full of young plants. I hope I get lucky and they bloom this spring.

One thing I like about these beaded irises is they're links.  That means that you can add briolette drops at the bottom like I did with this pair.  The long briolettes are natural faceted pyrite.
These Iris Drops also have natural amethyst and sapphire mixed with the Swarovski crystals to make them colored just like real iris,
minus the yellow.  Upon further research, I found that most natural iris flowers have some yellow in them. Hmm.  I don't own many yellow beads....   These are purple, blue, pink, silver.... Yum.
My earring tutorial does not explain how to wire wrap briolette beads, but you can learn a similar technique here, starting at time 2:31.  It's not identical to what I did, but her technique is good, and it gives a very similar look.

Finally, I made one more pair with non-standard sizes of beads.  The large beads in this pari are hand made dichroic glass that I bought years ago from Paula Radke.  I had to add beads the border to make them fit, but I'm quite happy with how they turned out.  The shape reminds me of little goddesses.  Also, I really like the look of the dichroic glass with the bronze colored seed beads.  You just can't match the flash of real dichro.

Want the tutorial?  Find it here: Iris Drop Earring Tutorial  Also, the last three pairs of earrings are for sale.  Click on the photos to go to the listings.  Thanks for looking.

Monday, December 24, 2012

Large Ginkgo Leaf Earrings CRAW

Last time I showed you some little Ginko Leaf Earrings, and I enjoyed making them so much I decided to try a larger pair with an extra row of cubic right angle weave (CRAW).  They are very see-through.
Here you can see how big the new fans are in comparison to the old ones. Big leaf:
Little leaf:
It's a big size difference, that one extra row.  But since they're so lacy, they're still light enough to be comfortable.
Since I've been on an earring spree lately, I thought I'd make some DNA earrings.  First is a pair in silver and aqua blues include two faceted green amethyst on each earring.  The coloring of the base pairs uses the sequence recognized by the enzyme SbfI, which is found in the microorganism Streptomyces sp. BF-61. Streptomyces is the largest antibiotic producing genus of bacteria, producing antibacterial, antifungal, anti-parasitic drugs.
The base pair sequence shown in each earrings is a palindrome, reading the same forward as backwards, specifically,
CCTGCAGG
GGACGTCC
The faceted green amethyst are the T or the A, depending on you choose to label them.

The next pair don't have any color coding on the base pairs.
They match the DNA Tetrahedron I showed you a few weeks ago.  I made the first earring as a sample for the tetrahedron, and I just got around to making the second earring.  It was very satisfying to to get that big pile of seed beads cleared off of my mat, finally. 
Want them?  You are in luck because these pieces are for sale.   Click the photos to go to the listings.   Thanks for looking.

Tuesday, December 18, 2012

Ginkgo Leaf Beaded Earrings CRAW

UPDATE: Here is the tutorial for the Ginkgo Leaf Earrings!

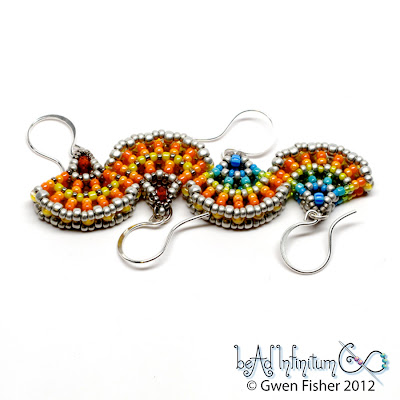
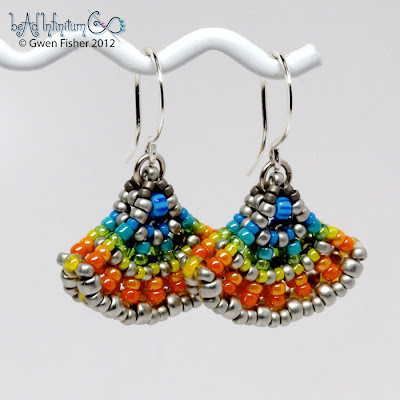
I was fiddling around with cubic right angle weave and I came up with this fan shape that reminds me of ginkgo leaves.  So that's what I'm calling these: Ginkgo Leaf Earrings.
https://www.etsy.com/listing/269167493/
It's not a terribly original name, but descriptive, nonetheless. I've seen others make ginkgo leaves with other bead weaving stitches.  My ginkgo leave are made with cubic right angle weave, CRAW, a very different beading stitch from peyote.  Although real ginkgo leaves are very organic, mine are more regular and geometric. CRAW lends itself to very geometric forms, which is why I love it.  CRAW is very difficult to explain how to do on paper, which is why I hate it.
For a long time, I resisted the temptation to design with CRAW because it's so so sooooo difficult to write patterns for it. Then, I decided to succumb to temptation and just play, you know, not worry about explaining how I did it, but just play with the weave.  So, I tried the CRAW variation shown here, where some sides have one bead, some have two, and the beads are different sizes.  Now, the cubes in CRAW aren't really cubes.  They're not even rectangular prisms.  Nope.  Each little cell is a frustum of a square pyramid like this:
No, wait.  They're not even that regular.  The base and top are not square. They're rectangles. What that means in terms of beads is that the stitches don't repeat much, and it's difficult to make this stitch repeat exactly from cell to cell, especially if you're trying to be efficient with your thread path and not fill the bead holes with thread.  If you don't understand what you're doing, following a rote list of steps would be very confusing.
Here's a pair with a rainbow of colors similar to the pair I used for the writing the tutorial.

In the next photo, I used my new photo light, covered with a bit of waxed paper. See the little shadow? That's what I get for the extra effort. I think the colors are just a bit brighter too. Like, it goes to eleven.  
Here is a link to the pattern if you'd like to have a go... https://www.etsy.com/listing/269167493/ Thanks for looking.

Friday, December 14, 2012

Starburst Galaxy Kits Bead & Button 2013

I'm working on designing kits for the Starburst Galaxy class that Florence Turnour and I will be teaching at the Bead & Button Show in June 2013.

So far, the pattern is 20 pages and counting. So far, the pattern is 20 pages and counting.  I am pretty sure you can make at least two dozen different stars with the techniques we describe in the pattern, even though  we've only made about a third of that number so far.  I am designing the pattern so that you'll learn to make the whole set, all two dozen, maybe more: large stars, medium, small, and mini stars, with any number of points from 3 to 8 or maybe more.  There's so many different stars, all made with the same techniques, we haven't even tried them all yet.  The written pattern will hold your hand through several different sizes, and then show you lots of photos with some text and charts so you can work several more, and fiddle your way through the rest of the set without too much trouble.
Certainly, the kits won't make every possible star, so I'm designing smaller kits in coordinated colors so students can purchase more than one kit if they want to make something big.  Or they can purchase one kit in different colors that just make a single pendant or a pair of earrings. Here is my first color scheme: white opalite crystal and silver.  All of the faceted beads and gems in there are Swarovski crystal. Get these under the right lights, and there are rainbows everywhere!  It's a pity it's so hard to capture that in a photo. 

Here is a sample earring.  I poled a bunch of friends on Facebook and we decided that the kits will NOT include the red heart drops.  Apparently, sometimes "more" is actually "too much." But I like the photo because it shows how you can easily link the stars together with jump rings.
Here's info on the class in case you're thinking of signing up.
Starburst Galaxy 130411- Tue. June 4 - 9:00am-5:30pm

Florence and I will also be teaching a class together that she designed, called the Color Medallion B130596- Sun. June 2 • 9:00am-5:30pm.  I've been bugging her for months to write the pattern so I can make one for myself.  This pendant is big, dazzling and super groovy in real life.  Florence, hurry up! I want one!!!

Tuesday, December 11, 2012

Beaded DNA with Clear Beads

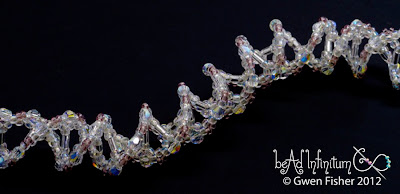
I was asked this week to make a custom order of beaded DNA using transparent beads.  Usually I don't use light colored transparent beads, especially not so many of them, but that's what they wanted, so that's what I gave them.  I got two photos before I packed it up and shipped it out.

Since it's so light, I photographed it on a dark background.
In the next photo, I used a new light I got for taking photos.  Which photo do you like better? I can't decide, so I'm giving you both.
Have you made some DNA lately?  Well, you should.  You can learn how to make beaded DNA just like this with this free video tutorial:  http://gwenbeads.blogspot.com/2011/04/how-to-bead-weave-dna-double-helix.html

Sunday, December 9, 2012

Put beads on that felt

Every time I make felt, people say, "Put beads on it." So here, I put beads on it.
The beads are not sewn on the felt; they're sewn around it. Because they're beaded beads, they move up and down the felt. 
Here you can see the same pink bracelet with an earlier purple one.  I took this photo before I added beads.  I kept the purple one for myself because it's not good enough to sell.  It's too flimsy, in my opinion, because I didn't use enough wool.  
What's interesting about the design of the purple piece is that when I rewet it, I was able to reform it into a very different shape.  Below,  you can see the same purple bracelet on the top of this stack of bracelets. It was originally round.  That honey comb shape of the lace, it's that shape that allows me to deform the felt from spherical (positive curvature) to cylindrical (zero curvature).
If you rewet the pink bracelet, you can reform it so that the bars twist around your arm.  Neat-o.  Felt is really magical stuff.  Everyone I've taught to make natural wool felt seems to fall in love with the stuff.  Click the photos to see more.

Thursday, December 6, 2012

Beaded Molecules: Menthol CRSAW

This beaded bead represents a single molecule of menthol with 31 atoms: 10 carbon, 20 hydrogen, and one oxygen. Each atom is represented by a single beaded cube made with cubic super right angle weave. The bead work is gray, black, white and red, just like standard molecular molecules, and exhibits tetrahedral bonding.

Menthol is an organic compound made synthetically or obtained plants such as peppermint. It is a waxy, crystalline substance, clear or white in color, which is solid at room temperature and melts slightly above. Menthol's ability to chemically trigger the cold-sensitive TRPM8 receptors in the skin is responsible for the well-known cooling sensation it provokes when inhaled, eaten, or applied to the skin.

The bead work is stiff yet flexible, and shows a variety of moods when posed. My favorite part of this molecule is the ring of six carbon molecules (called the cyclohexane conformation) with its 3mm hole visible in the photo below and its "chair formation" visible in the first photo.
This model has many other holes as big as 2mm to string it. It's hard to measure how big it is precisely, but it's longest measurement is about 2 1/4 inches (55 mm).  Here it is sitting on a quarter dollar.  It's for sale.  Click the photos.  Thanks.

Tuesday, December 4, 2012

Beaded Molecule: Propane CSRAW

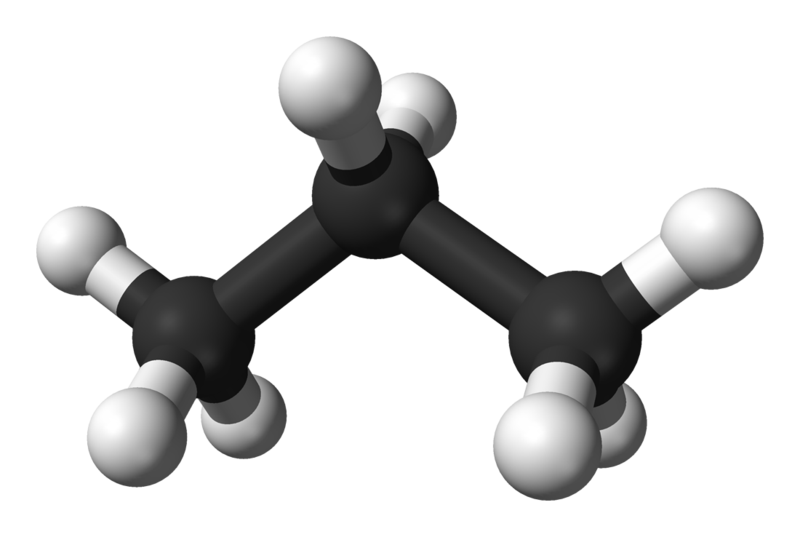
This beaded bead represents a single molecule of propane with 11 molecules: 3 of carbon, and 8 of hydrogen. Each atom is represented by a single beaded cube made with cubic super right angle weave.  At standard temperature and pressure, ethane is a colorless gas. The bead work is gray, black, silver and gold. Propane is commonly used as a fuel for engines, oxy-gas torches, barbecues, portable stoves, and residential central heating. Propane is odorless, and so is this bead work.


Propane was first identified as a volatile component in gasoline by Walter O. Snelling of the U.S. Bureau of Mines in 1910. This beaded molecule was created by me last week. 

The bead work is stiff yet flexible, and shows a variety of moods when posed. In some poses it resembles a poodle. It has many holes as big as 2mm to string it.


It's hard to measure how big it is precisely, but it's longest measurement is about 1 1/2 inches (3 cm).  Here it is sitting on a quarter dollar.  It's for sale, cheap, just in case you need it.  Click the photos.  Thanks for looking.

Sunday, December 2, 2012

DNA Tetrahedron for the Nanotech Nerd in You

I created lacy beaded sculpture with glass seed beads, all woven together to resemble a double helix of DNA in the form of a tetrahedron. You might wonder why I would bead such a thing.  Well, it so happens that this structure is studied in nanotechnology and nanofabrication. Scientists have actually built structures like this that are less than 10 nanometers on a side, and they can self-assemble in seconds!
Here is a drawing of a similar DNA tetrahedron by Antony-22.
Three strands of DNA meet at each corner of the tetrahedron. In my beaded version, each edge of the tetrahedron is a 15 base pair DNA double helix (Antony's drawing shows 20). Like Antony's drawing, the 4 DNA strands that form the 4 tetrahedral faces are color coded; mine are in red, green, gold and purple. The beadwork is stiff yet very flexible, and shows a variety of moods when posed. You can even squish it flat shown below, where one point of the tetrahedron is twisted and everything fits together into the opposite face.
It's hard to measure precisely how large it is, but it's about 3 inches (9 cm) across.  This is original art. This is also an educational model. Think of it as a tactile mind game, a little bit of sparkle to entertain your brain. 
Related Posts Plugin for WordPress, Blogger...